Navigation Bar
A guide to the navigation bar at the top of the Clew Platform and how to use it efficiently
Contents
- 1. Introduction & Context
- 2. Key Features & Functions
- 3. Requirements
- 4. Step-by-Step Guide
- 5. Common Issues & Troubleshooting
- 6. Related Articles
1. Introduction & Context
The navigation bar gives you access to every key area and action in the Clew Platform from a single toolbar fixed to the top of every page, so you never need to return to a home screen or dig through menus to find what you need.
Whether you are looking for a specific risk, creating a new action, or reviewing a downloaded report, the navigation bar is where you start. Understanding each element will save you time and help you move through the platform with confidence.
Who is it for? All Clew Platform users, regardless of role or permission level. Some elements, such as the Account dropdown, display different options depending on your access level.
What does it impact? The navigation bar is read-only in the sense that viewing it does not change any data. However, actions you take from it, such as creating a record or running a search, will affect your data as normal.

The navigation bar showing all eight elements. The My Registers dropdown is highlighted in red when a register is active.
2. Key Features & Functions
The navigation bar contains eight elements, each serving a distinct purpose. They are arranged from left to right as follows.
Logo
The Clew logo sits in the top-left corner. Clicking it takes you directly to your default dashboard, which is the main overview page configured for your account. Use this to quickly return to your starting point from anywhere in the platform.
These two dropdowns work together and are the primary way to navigate between different areas of your organisation's data.
- My Registers: A register in the Clew Platform is a container that holds a set of records, such as risks, actions, or incidents. Registers are typically organised by business unit, project, or folder. The My Registers dropdown lets you select which register you want to work in.
- Menu: Once you have selected a register, the Menu dropdown lets you navigate to a specific section within it, such as the risk list, dashboards, or settings. Always select a register first before choosing a menu option.
Create Button
The Create button provides a shortcut to create new records, such as a risk or an action, without navigating into a specific register first. The options available in this button are configurable, so your organisation may have set it up to show the record types you use most often.
Search Bar
The search bar lets you find any record in the platform by typing a keyword, phrase, or ID. Results appear as you type, covering risks, actions, incidents, and other record types depending on your permissions. This is the fastest way to jump directly to a specific item.
AI Icon
The AI icon, located next to the search bar, gives you access to AI-powered features available in your version of the Clew Platform. The specific capabilities available depend on your organisation's configuration and licence.
Library Icon
The library icon (displayed as a book) opens your organisation's library. The library is a shared repository of pre-approved items that can be applied to records across registers. Depending on your configuration, the library may contain causes, consequences, controls, and business objectives. Using library items promotes consistency across your organisation's risk and compliance data.
Notification Bell
The bell icon displays system notifications relevant to your account. A common example is a notification that a report has been prepared and is ready to download. The bell will show a badge when you have unread notifications.
Account Dropdown
Your name appears next to the bell icon. Clicking it opens the Account dropdown, which provides access to user-specific settings and actions. The options shown depend on your permission level. Common options include profile settings, notification preferences, and sign-out. Administrators may also see additional system management options here.
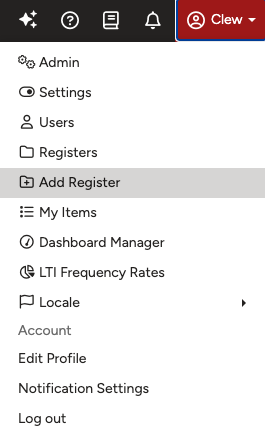
The Account dropdown open. The options shown vary depending on your permission level. Administrators see additional options such as Admin, Settings, and Users.
3. Requirements
- You must be logged in to the Clew Platform to access the navigation bar.
- The My Registers dropdown only lists registers you have permission to access. If a register is missing, contact your administrator to review your permissions.
- The Create button only shows record types your administrator has configured it to display.
- AI features require a compatible version of the Clew Platform and may require a separate licence. Contact your Clew account manager for details.
- The Account dropdown options vary based on your assigned role and permission set.
4. Step-by-Step Guide
Navigating to a Register
- In the navigation bar, click the My Registers dropdown. A list of registers you have access to will appear.
- Click the register you want to work in. The dropdown will close and the selected register will become active.
- Click the Menu dropdown. You will see a list of sections available within the selected register, such as risks, actions, or dashboards.
- Click the section you want to navigate to.
Once complete, you should see the selected section load, displaying the records or content for the register you chose.
Using the Search Bar
- Click the search bar in the navigation bar. The cursor will move into the field.
- Type a keyword, phrase, or ID. For example, typing risk assessment will return all records containing that phrase.
- Review the results that appear below the search bar. Click on the record you want to open.
Once complete, you should see the selected record open on screen, ready for you to view or edit.
Using the Create Button
- Click the Create button in the navigation bar. A menu will appear showing the record types configured for quick creation.
- Click the type of record you want to create, such as Risk or Action.
- Complete the form that appears and save the record.
Once complete, you should see a confirmation that the record has been created, and you will be taken to the new record or returned to your previous view depending on your settings.
Checking Notifications
- Click the bell icon in the navigation bar. A panel will open showing your recent notifications.
- Review the list. Notifications such as completed reports will appear here with a link or action to follow.
- Click on a notification to action it, for example to download a prepared report.
Once complete, you should see the notification marked as read and any linked content, such as a report file, become accessible.
5. Common Issues & Troubleshooting
| Issue | Likely Cause | Solution |
| A register is missing from the My Registers dropdown | Your account does not have permission to access that register | Contact your Clew administrator and ask them to review your register permissions |
| The Menu dropdown shows no options | No register has been selected from My Registers | Select a register from the My Registers dropdown first, then open Menu |
| Search returns no results for a term you expect to find | The search term may not match the exact text in the record, or you may not have permission to view those records | Try a shorter or different keyword. If you believe you should have access, contact your administrator to check your permissions |
| The Create button does not show the record type you need | The button has not been configured to include that record type | Contact your Clew administrator to update the Create button configuration for your account |
| The bell icon shows a badge but the notifications panel is empty | The notification may have already been actioned, or a brief sync delay occurred | Refresh the page and check the panel again. If the issue persists, contact Clew support |
Best practices:
- Always select a register from My Registers before using the Menu dropdown to avoid empty or irrelevant results.
- Use specific keywords or record IDs in the search bar for faster, more accurate results.
- Check the notification bell regularly, particularly after requesting a report, as downloads are delivered there rather than by email.
- Configure the Create button to include the record types your team creates most often to reduce navigation time.
Was this article helpful?
That’s Great!
Thank you for your feedback
Sorry! We couldn't be helpful
Thank you for your feedback
Feedback sent
We appreciate your effort and will try to fix the article