Creating a User
How to add a new user to the Clew Platform and configure their profile, security, and settings
Contents
- 1. Introduction & Context
- 2. Key Features & Functions
- 3. Requirements
- 4. Step-by-Step Guide
- 5. Common Issues & Troubleshooting
- 6. Related Articles
1. Introduction & Context
Creating a user gives a person access to the Clew Platform, with their profile, security groups, and settings configured from a single form.
A user is a person who is created in the system to have access to it. When you create a user you define who they are, where they sit in the organisation, what they can access, and how they experience the platform, including their time zone, language, and notification preferences.
Who is it for? Administrators responsible for onboarding new users to the Clew Platform.
What does it impact? The new user's access to registers, projects, and modules is determined by the Security Groups selected on their profile. Settings such as Active, Expiry Date, and Enable Notifications control whether and how the user can use the platform.
2. Key Features & Functions
- Invitation emails: send the new user an invitation to set up their own account, rather than setting a password on their behalf.
- Organisation details: record the user's position, default register, default location, and supervisor.
- Security configuration: assign Security Groups, security clearance, an automatic expiry date, and System Administrator rights.
- Service accounts: mark an account as a service account so it does not receive notifications and does not appear as an option in user fields.
- Personal settings: set the user's time zone, preferred language, notification preferences, and mobile access.
3. Requirements
- You must have admin access to create users.
- If your organisation uses SSO, the user's email address must be added to the provisioning group before they can log in.
- The Supervisor field needs to be enabled in the User Custom Type before it appears on the form.
- The Clearance feature needs to be enabled through Clew before it appears on the form.
4. Step-by-Step Guide
Creating a User
- Click your name in the corner of the page and click Users. This takes you to the list of users already available in the application.
- Click Add.
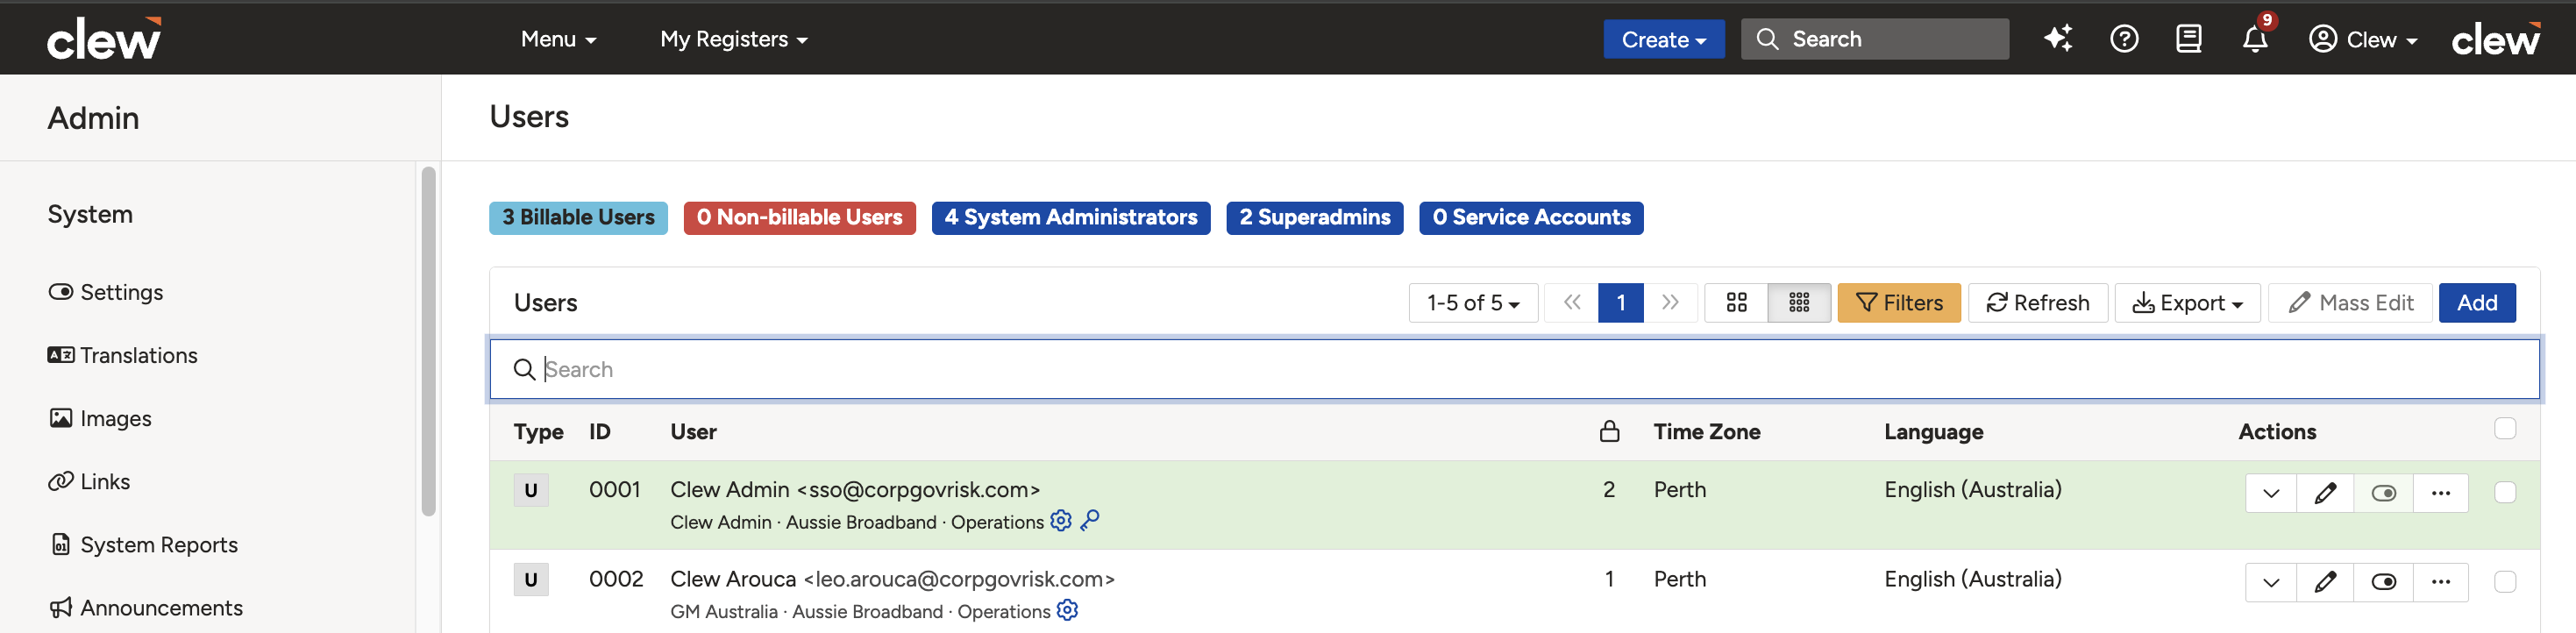
The Users list. Click Add to create a new user.
- Complete the form using the field reference table below.
| Field | Description |
| First Name | Enter the first name of the user. |
| Last Name | Enter the last name of the user. |
| Enter the email address. If you use SSO, make sure the user's email address has been added to the provisioning group. | |
| Send Invitation (recommended) | Tick this box if you want to send an invitation email to the user to set up their account. |
| Password/Confirm Password | Enter and confirm the password if you did not tick the Send Invitation checkbox. For security reasons, this is not recommended. If you do set a password, choose a secure one. |
| Organisation | |
| Position (optional) | Designation of the user. |
| Default Register | Enter the default register of the user. |
| Default Location | Enter the default location of the user. |
| Supervisor (optional) | Select the supervisor of the user. This field needs to be enabled in the User Custom Type. |
| Time Zone & Language | |
| Time Zone | Select the time zone of the user. |
| Language | Select the preferred language of the user. Where translations are available, they will be displayed. |
| Security | |
| Security Groups | Select the groups as per the required level of access for the user. |
| Clearance | Select the relevant security clearance for the user. This feature needs to be enabled through Clew. |
| Expiry Date | Select a date if you want to deactivate this user automatically on the selected date. |
| System Administrator | Tick this box if you want to make this user a System Administrator. |
| Service Account | Tick this box if the user account is a service account. A service account does not receive notifications and will not appear as an option on user fields. |
| Settings | |
| Enable Notifications | Untick this box if this user does not want to receive any notification emails. |
| Active | Untick this box if this user should be inactive. |
| Enable Mobile | Untick this box if this user does not require access through the mobile application. |
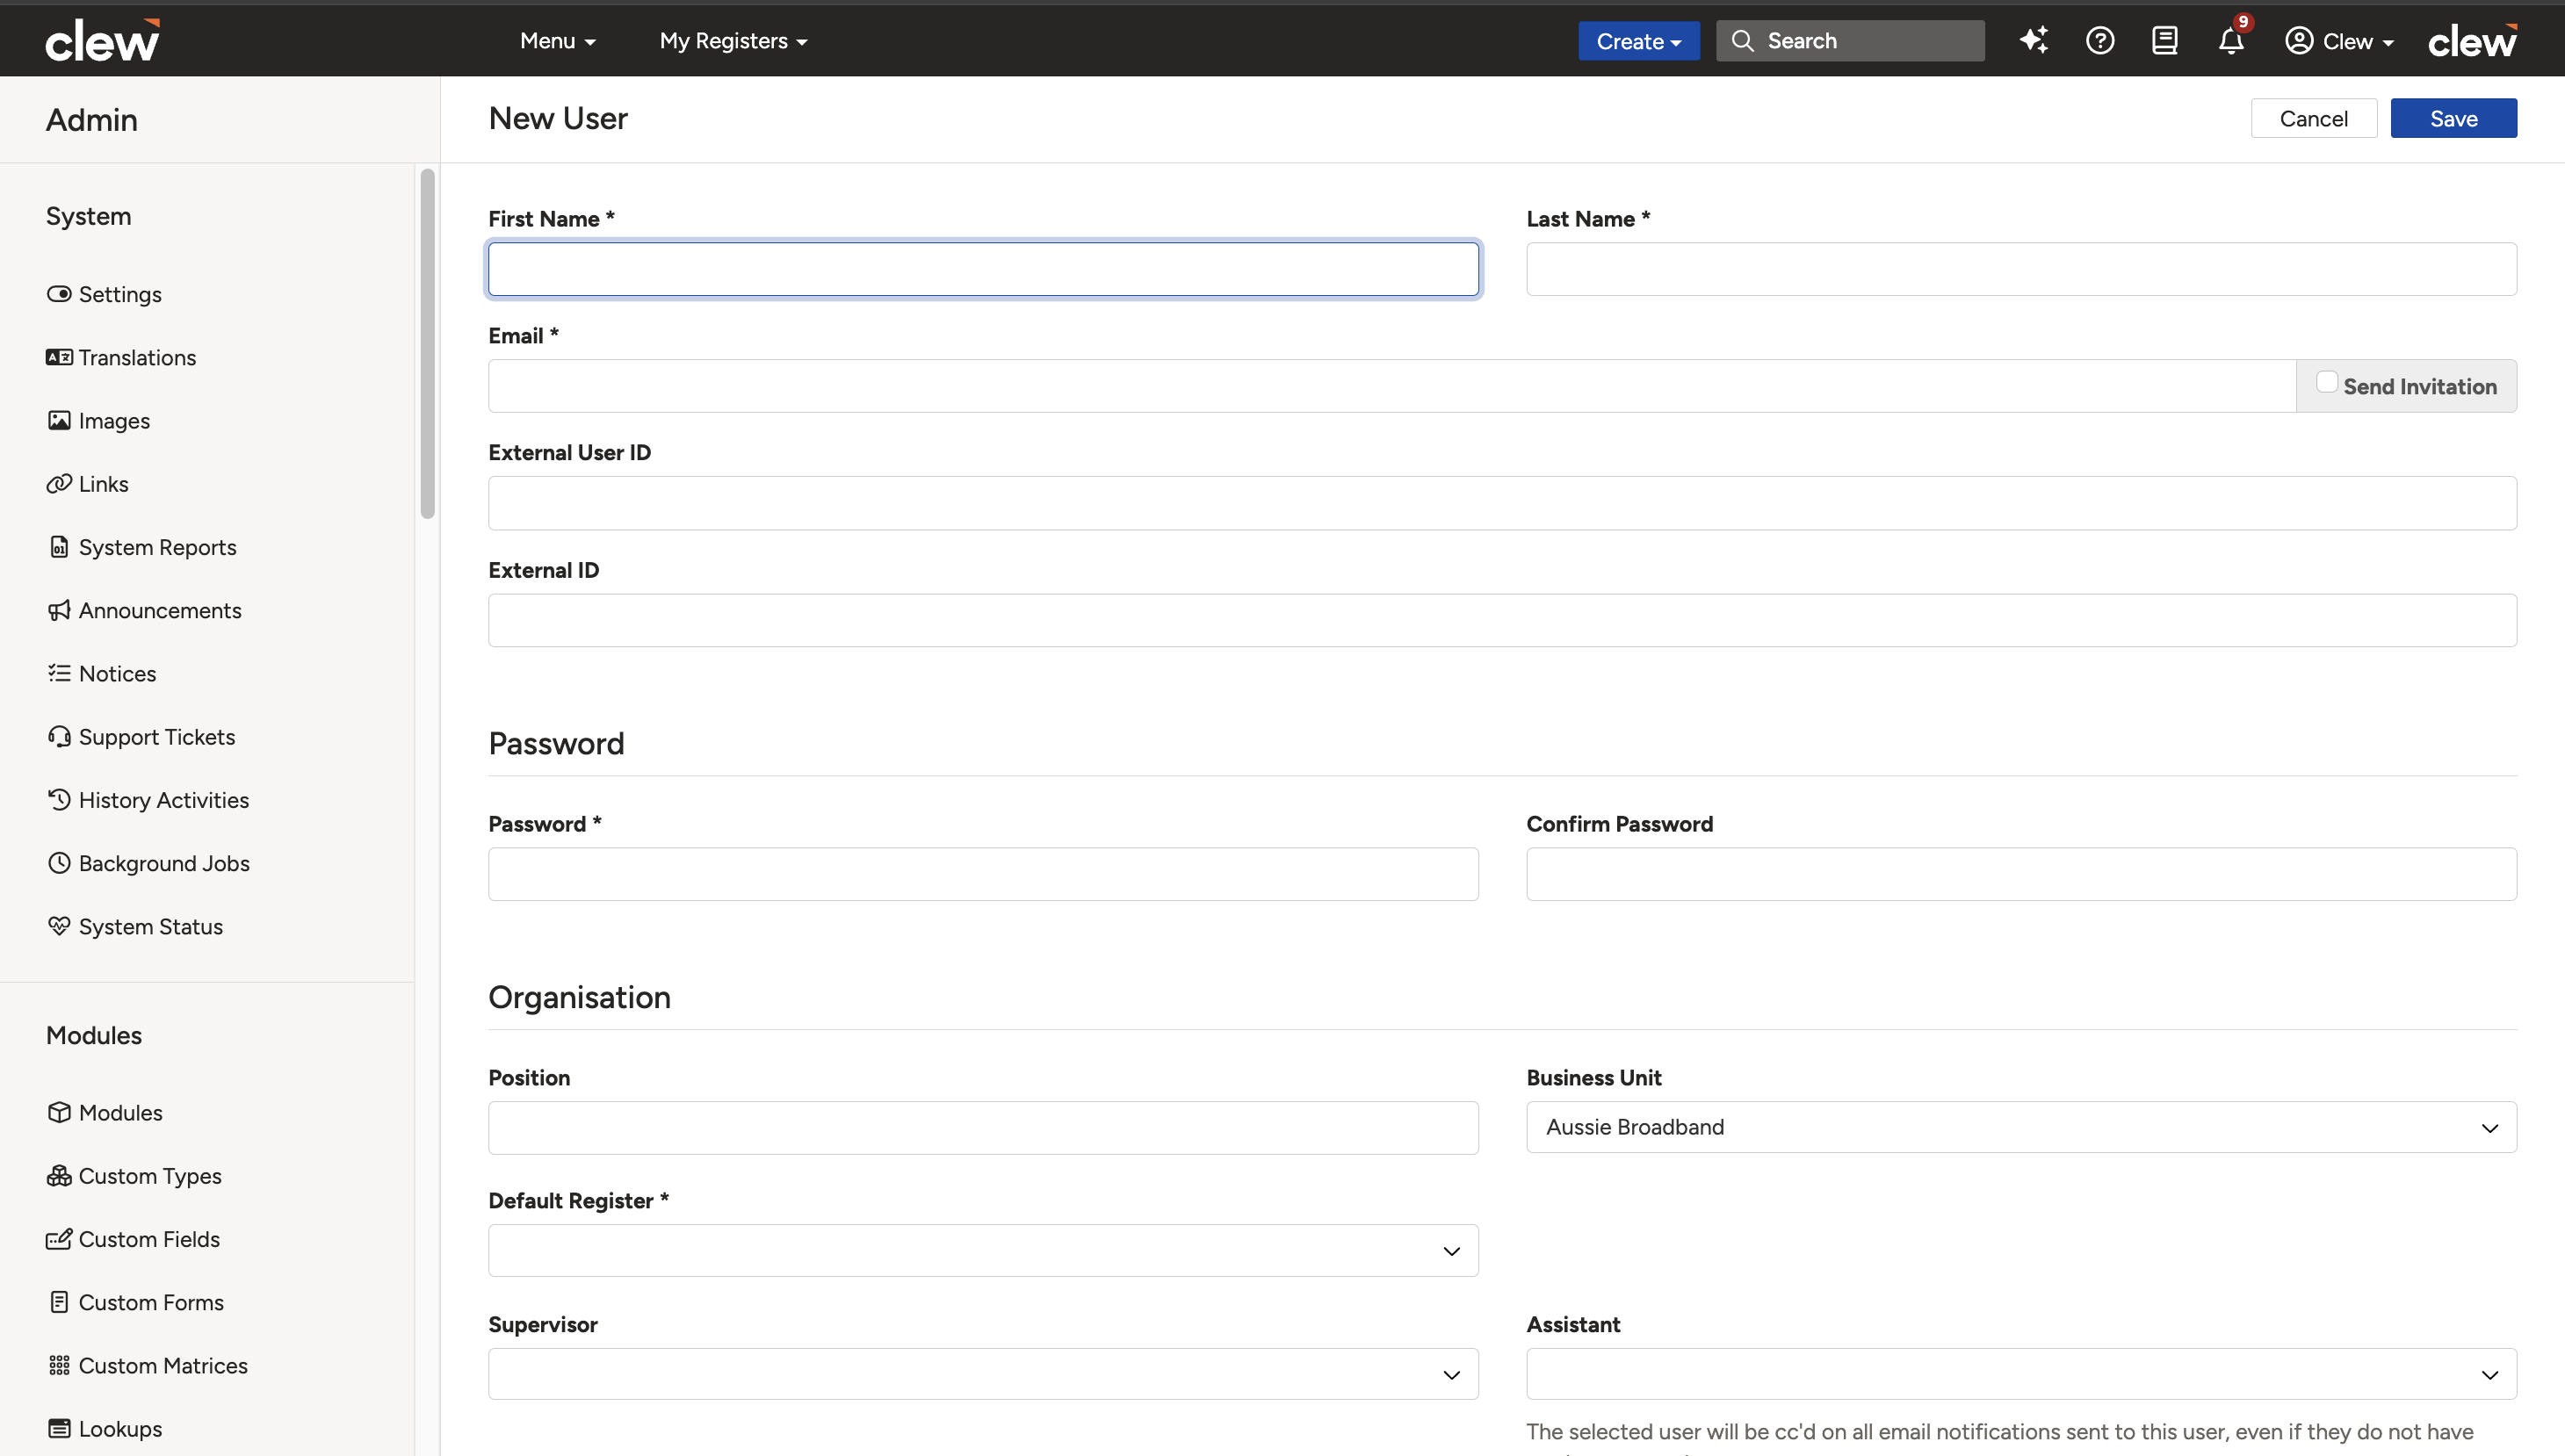
The new user form showing the fields described above.
- Click Save.
5. Common Issues & Troubleshooting
| Issue | Likely Cause | Solution |
| A new SSO user cannot log in | The user's email address has not been added to the SSO provisioning group | Add the user's email address to the provisioning group, then ask them to try again |
| The user did not receive the invitation email | The email address may be incorrect, or the email may be in the user's spam folder | Check the email address on the user's profile and ask the user to check their spam folder. Correct the address and resend if needed |
| The Supervisor field is not visible on the form | The field has not been enabled in the User Custom Type | Enable the Supervisor field in the User Custom Type, then return to the user form |
| The Clearance field is not visible on the form | The Clearance feature has not been enabled for your organisation | Contact the Clew team if your organisation needs the Clearance feature enabled |
| The new user cannot see any registers or data | No Security Groups were selected on the user's profile | Edit the user and assign the Security Groups that match their required level of access |
Best practices:
- Use Send Invitation rather than setting a password on the user's behalf. It is more secure and lets the user choose their own credentials.
- Set an Expiry Date for contractors and temporary users so their access is deactivated automatically.
- Use Service Account for integration accounts so they do not receive notifications or clutter user selection fields.
- Grant System Administrator rights sparingly and review them regularly.
- Review the assigned Security Groups before saving, as they determine everything the user can see and do.
Click a title to preview it here. Use the Open full article button to read the full version in a new tab.
▾Security Groups Open full article »
Related article
How Security Groups control what a user can see and do across registers and modules, which is set on the user's profile.
▾Custom Types Open full article »
Related article
How to configure custom types, including the User Custom Type where the Supervisor field is enabled.
Was this article helpful?
That’s Great!
Thank you for your feedback
Sorry! We couldn't be helpful
Thank you for your feedback
Feedback sent
We appreciate your effort and will try to fix the article