Roles
How Roles connect Users, Teams, and Security Groups, and how to create and manage them in the Clew Platform
Contents
- 1. Introduction & Context
- 2. Key Features & Functions
- 3. Requirements
- 4. Step-by-Step Guide
- 5. Common Issues & Troubleshooting
- 6. Related Articles
1. Introduction & Context
A Role represents a specific function within your organisation's hierarchy, such as Risk Manager or Internal Auditor, and is the central unit that connects Users, Teams, and Security Groups to control who can access what in the Clew Platform.
In the Clew Platform, a Role is not just a single entity but a central organisational unit that binds Users, Teams, and Security Groups together:
- Users are assigned to Roles.
- Teams are assigned to Roles.
- Roles are linked to Security Groups, where permission sets are assigned to Registers.
This structure helps ensure that permissions are granted in an organised and consistent manner across all users, teams, and groups, reducing administrative overhead while maintaining security in access control.
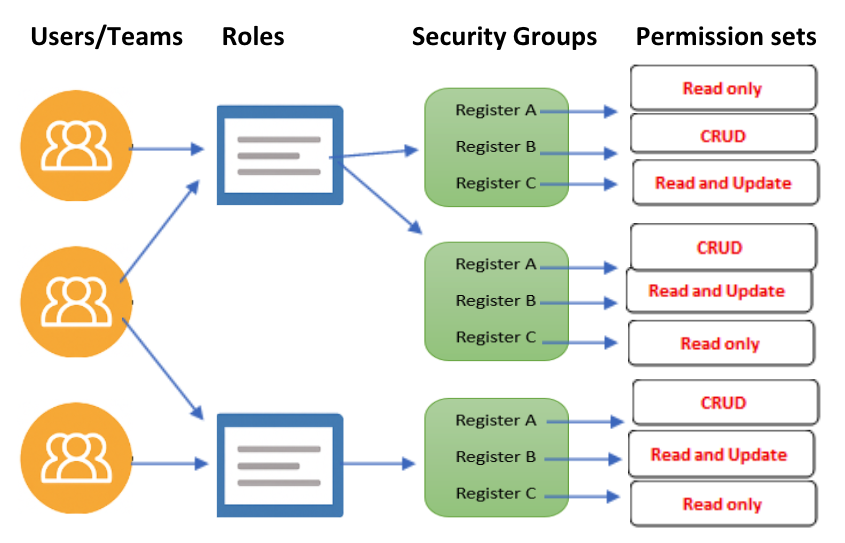
How Users and Teams connect to Roles, Security Groups, and Registers.
Who is it for? System Administrators who configure access control, and Team Administrators or Team Managers who assign roles within their teams.
What does it impact? Roles determine the permissions users inherit through Security Groups, which control access to registers, projects, and modules across the platform.
2. Key Features & Functions
- Role-centric user management: when Role-based user management is enabled, Roles serve as the intermediary between Users and Permissions.
- Assignment of Users and Teams to Roles: Users and Teams are assigned to specific Roles, which are then linked to Security Groups.
- Hierarchical structure: Roles are organised hierarchically, much like business units, locations, and projects. This hierarchy mirrors your organisation's structure and ensures that access control aligns with your organisational needs.
- Multiple Roles per user: a single user can be assigned multiple Roles. The permissions granted to that user are defined by the Security Groups associated with those Roles.
- Role sharing across users: Roles can be shared by multiple users who perform similar tasks. For instance, a Management Role can be assigned to several users who share similar responsibilities within the organisation.
3. Requirements
Roles can be assigned to users by:
- A System Administrator.
- A Team Administrator or Team Manager, if team management is enabled. Team admins and managers can only assign Roles that have been linked to the team by a System Administrator.
4. Step-by-Step Guide
Creating a Role
- Navigate to the Admin section, enter Roles in the search box, and click the Roles icon to open the Roles list view.

Searching for Roles in the Admin section.
- Click the Add button to open the Add Role form.

The Roles list view. Click Add to create a new Role.
- Fill in the required and other relevant fields using the reference table below.
| Field | Description |
| Title | Name of the Role (for example, Internal Auditor). |
| Description | An optional field to provide additional context or the purpose of the Role. |
| Reports To | Defines the hierarchical parent Role. Used to model organisational structure. |
| External ID | A reference identifier for external system integrations, if applicable. |
| Active | Indicate whether the Role is active. |
| Users | Assign users to this Role. A Role can be filled by one or more users. Each assigned user will inherit the Security Groups linked to the Role. |
| Security Groups | Security groups granted through this Role that determine the projects and modules that the users linked to this Role can access. |
| Teams | Teams associated with this Role. |
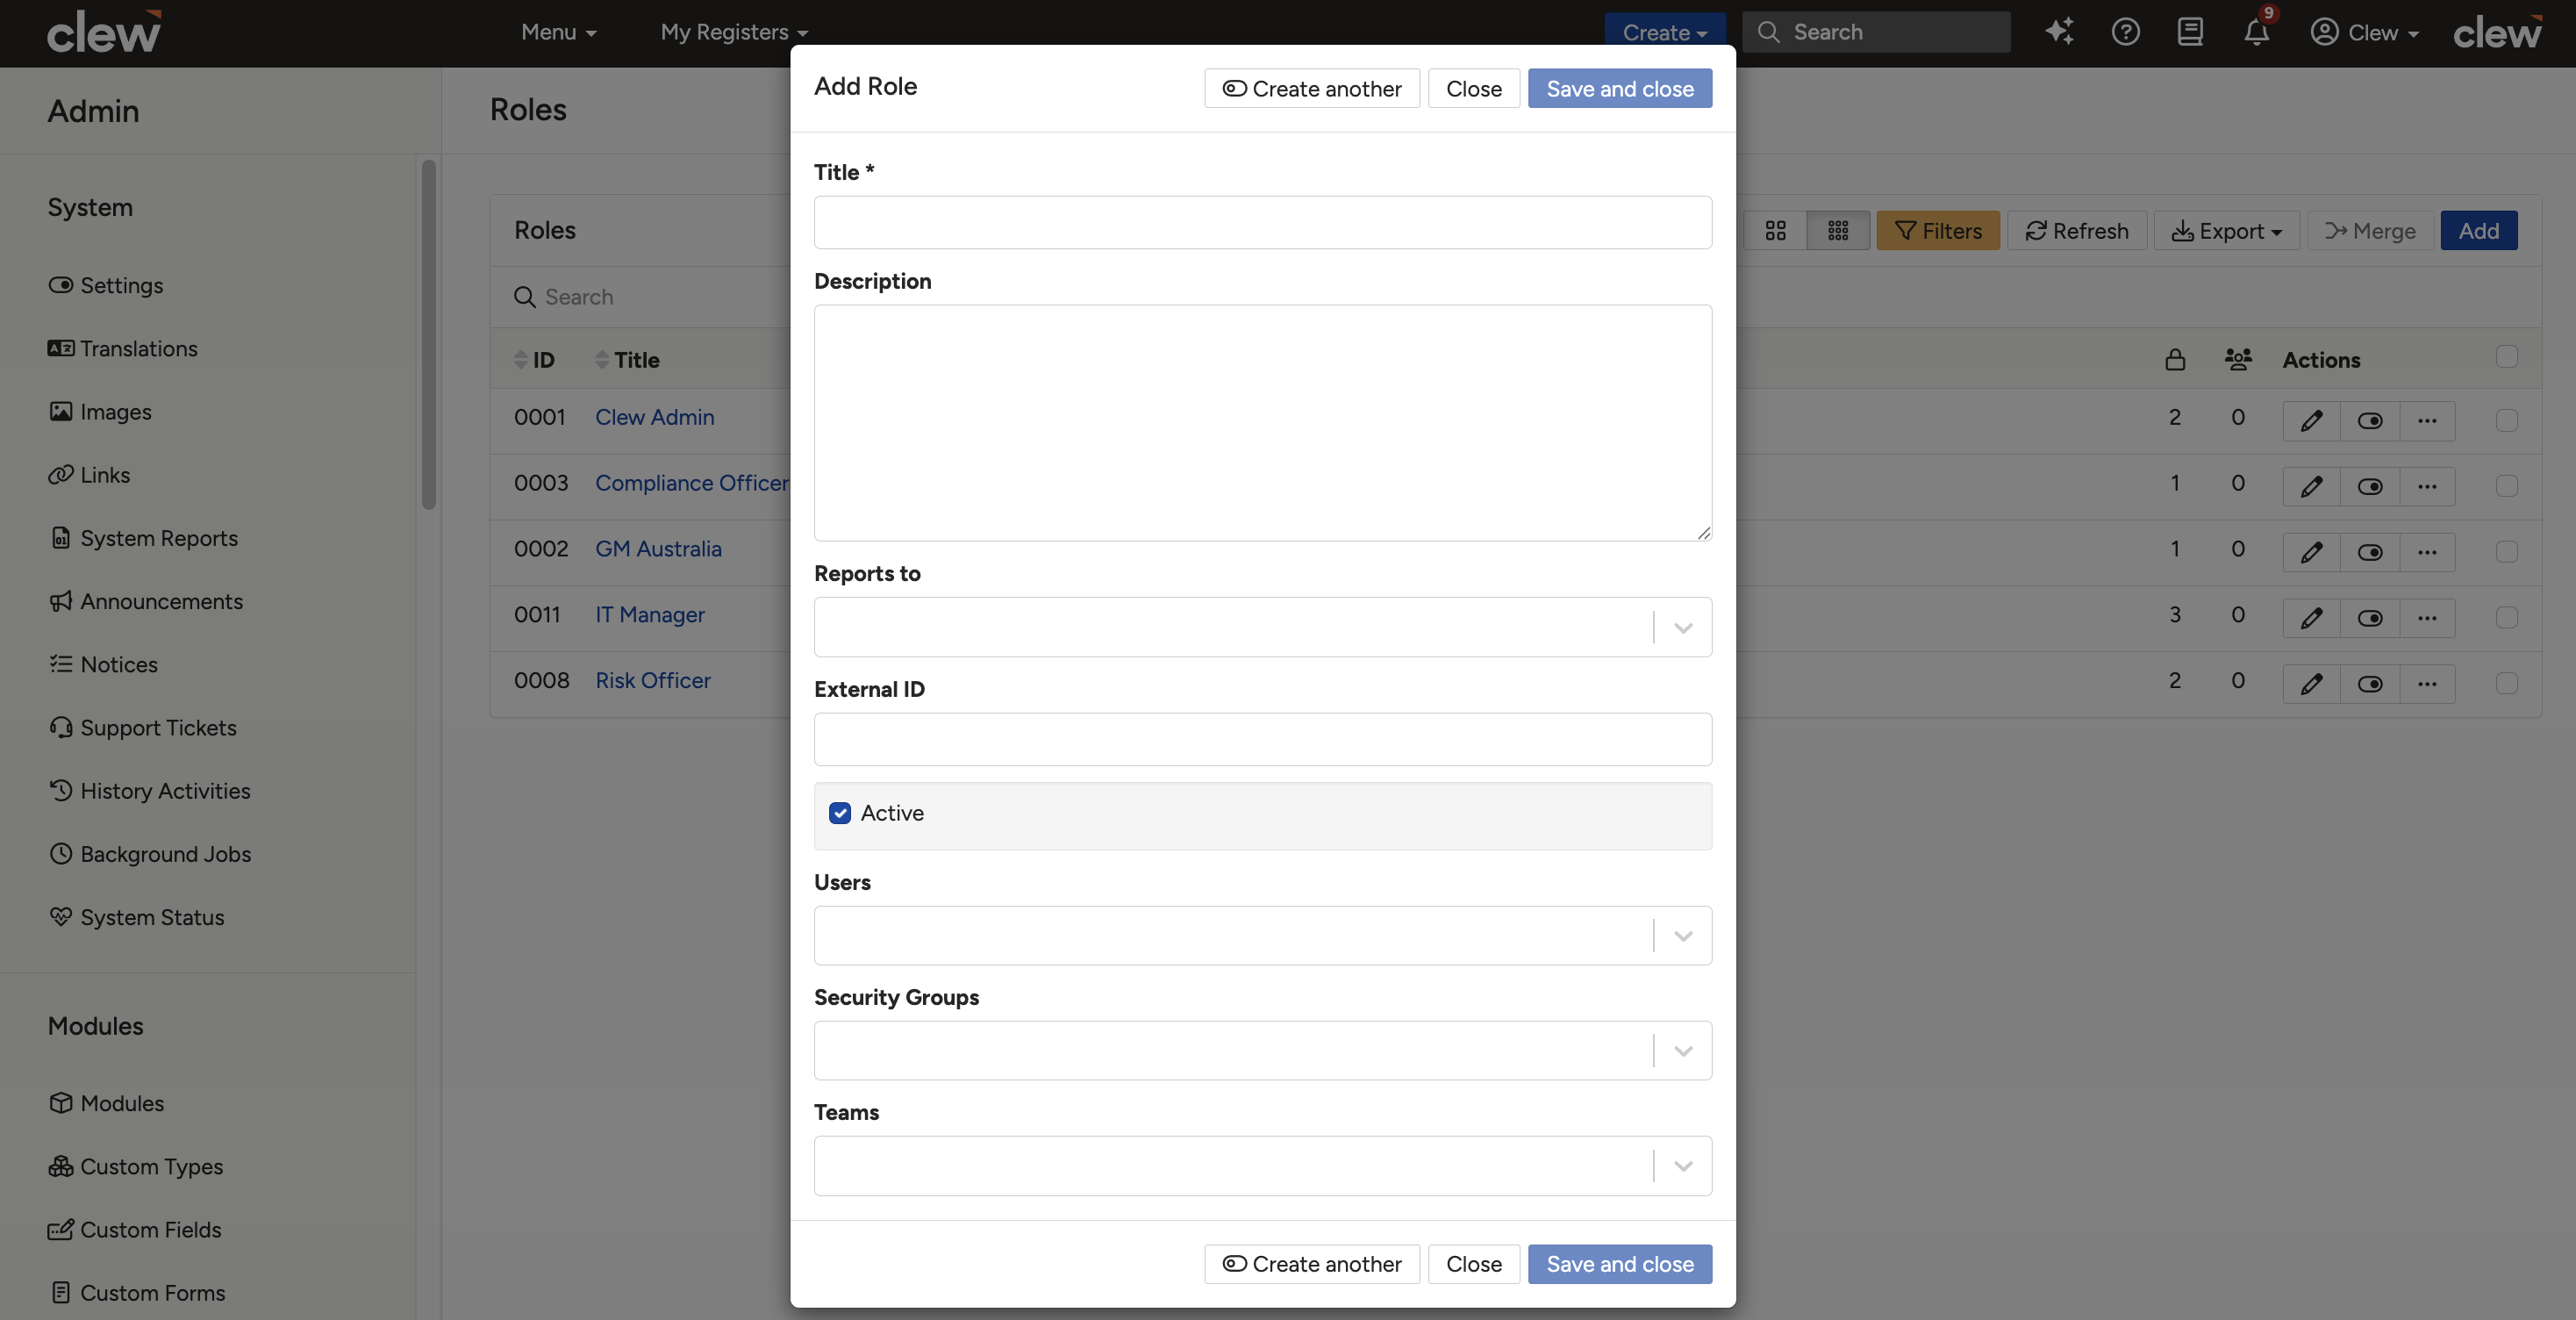
The Add Role form showing the fields described above.
- Click Save to finalise the Role configuration.
Checking Which Roles Are Assigned to You
If User-Centric Group Management is disabled:
- Go to the Admin section and select Users from the top dropdown.
- Find your name in the Users list and click the Edit icon.
- Scroll to the Security section to view your assigned Role(s).
If User-Centric Group Management is enabled, Roles are automatically created and mapped to users. Role details can be found in Admin Roles, but they are less significant in this mode.
Changing a User's Role
- Navigate to Admin > Users.
- Select the user and edit their profile.
- Update their assigned Role(s) and save.
5. Common Issues & Troubleshooting
| Issue | Likely Cause | Solution |
| A user cannot access a register | The user's Roles are not linked to the correct Security Groups | Check the user's Role assignments and ensure the correct Security Groups are linked. Use the user's Access Control Matrix to verify access permissions |
| A user without a Role cannot access any registers | When User-Centric Group Management is disabled, users without a Role have no register access unless linked to items via ABAC or a Global Permission Set is enabled | Assign the user an appropriate Role, or confirm whether ABAC links or a Global Permission Set should apply |
| A newly added user is assigned a Security Group by default | A Security Group has the Default option enabled, which automatically assigns it to all new users | Verify the Default setting on your Security Groups and adjust it if new users should not receive it automatically |
| A user can see all registers without being linked to a Role | A Global Permission Set is enabled, which gives all users access to all registers | Check whether a Global Permission Set is enabled and confirm it reflects your intended access policy |
| A user can see some registers but no Role or Security Group appears on their User page | The Role was assigned through the user's team. Security groups assigned via teams do not appear on the User profile page but still apply | Check the user's team memberships and the Roles linked to those teams |
Best practices:
- Design your Role hierarchy to mirror your organisational structure using the Reports To field, so access control stays aligned with how your organisation actually works.
- Share a single Role across users with similar responsibilities (for example, a Management Role) rather than creating near-identical Roles for each person.
- Use the Access Control Matrix as the definitive check when investigating a user's access, as it reflects permissions from all sources including teams.
- Fill in the Description field on each Role so other administrators understand its purpose without having to inspect its Security Groups.
- Assign multiple Roles to a user only when their responsibilities genuinely span different areas, and review multi-Role users periodically.
Click a title to preview it here. Use the Open full article button to read the full version in a new tab.
▾Security Groups Open full article »
Related article
How Security Groups assign permission sets to registers, which is what Roles link to in order to grant users their access.
▾User: Managing User Settings Open full article »
Related article
How to manage user settings, including where you view and change the Roles assigned to each user.
Was this article helpful?
That’s Great!
Thank you for your feedback
Sorry! We couldn't be helpful
Thank you for your feedback
Feedback sent
We appreciate your effort and will try to fix the article