Workflow Transitions
How to configure workflow transitions so records move through statuses in the correct sequence and by the right users
Contents
- 1. Introduction & Context
- 2. Key Features & Functions
- 3. Requirements
- 4. Step-by-Step Guide
- 5. Common Issues & Troubleshooting
- 6. Related Articles
1. Introduction & Context
Workflow transitions define how a record moves from one status to another within the Clew Platform, ensuring records progress in the correct sequence and are only moved by the right users.
Transitions are typically triggered by a user action such as clicking a button on a record. Each transition can include additional rules: required fields that must be completed before the move, restrictions on who can perform it, automated actions triggered by the change, and a confirmation step to prevent accidental transitions.
Who is it for? System Administrators who configure workflow transitions, and all users who move records through a workflow.
What does it impact? Transitions control the buttons and actions users see on every record in a module. Changes take effect immediately for all users of that module.
Workflow Transition Example Diagram
The diagram below illustrates how transitions link statuses together in a simple workflow.
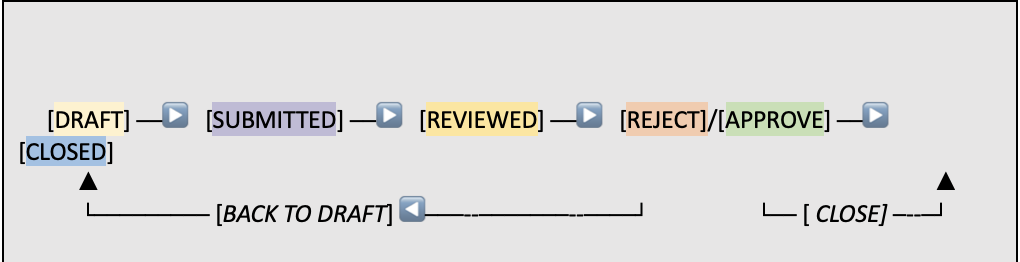
A sample workflow transition diagram showing how transitions connect statuses from creation to completion.
2. Key Features & Functions
- Streamlined Progression: Defines how records move from one status to another to reflect your business process. For example, in the Risks module, a risk record starts as Draft. When a user clicks Submit, the record transitions to Submitted, ensuring it enters the correct review queue.
- Authorised Transitioning: Ensures that only designated users or teams can move records into critical statuses. For example, only the Audit Approver can finalise an audit, or only the Approvals Team can close a record. This adds a layer of control and accountability to the workflow.
- Enforcing Field Values: Ensures specific fields are completed before a transition is allowed. For example, before transitioning a Risk from Draft to Submitted, users must fill in the Approver Name and Submission Date fields.
- Maintaining Audit Trail: Every transition is logged in the record's history, providing full traceability and accountability across the workflow.
- Customisable Labels: Transition buttons, help text, and descriptions can be custom-labelled with clear, action-oriented text, or localised based on the user's language. This helps users navigate workflows more intuitively and understand each action's purpose.
3. Requirements
- System Administrator access is required to configure workflow transitions.
- Users must have Update access on a record to perform a workflow transition.
- Workflow statuses must be defined on the workflow before transitions can be configured.
4. Step-by-Step Guide
Go to Admin > Workflows and click the workflow where you want to add or update transitions.
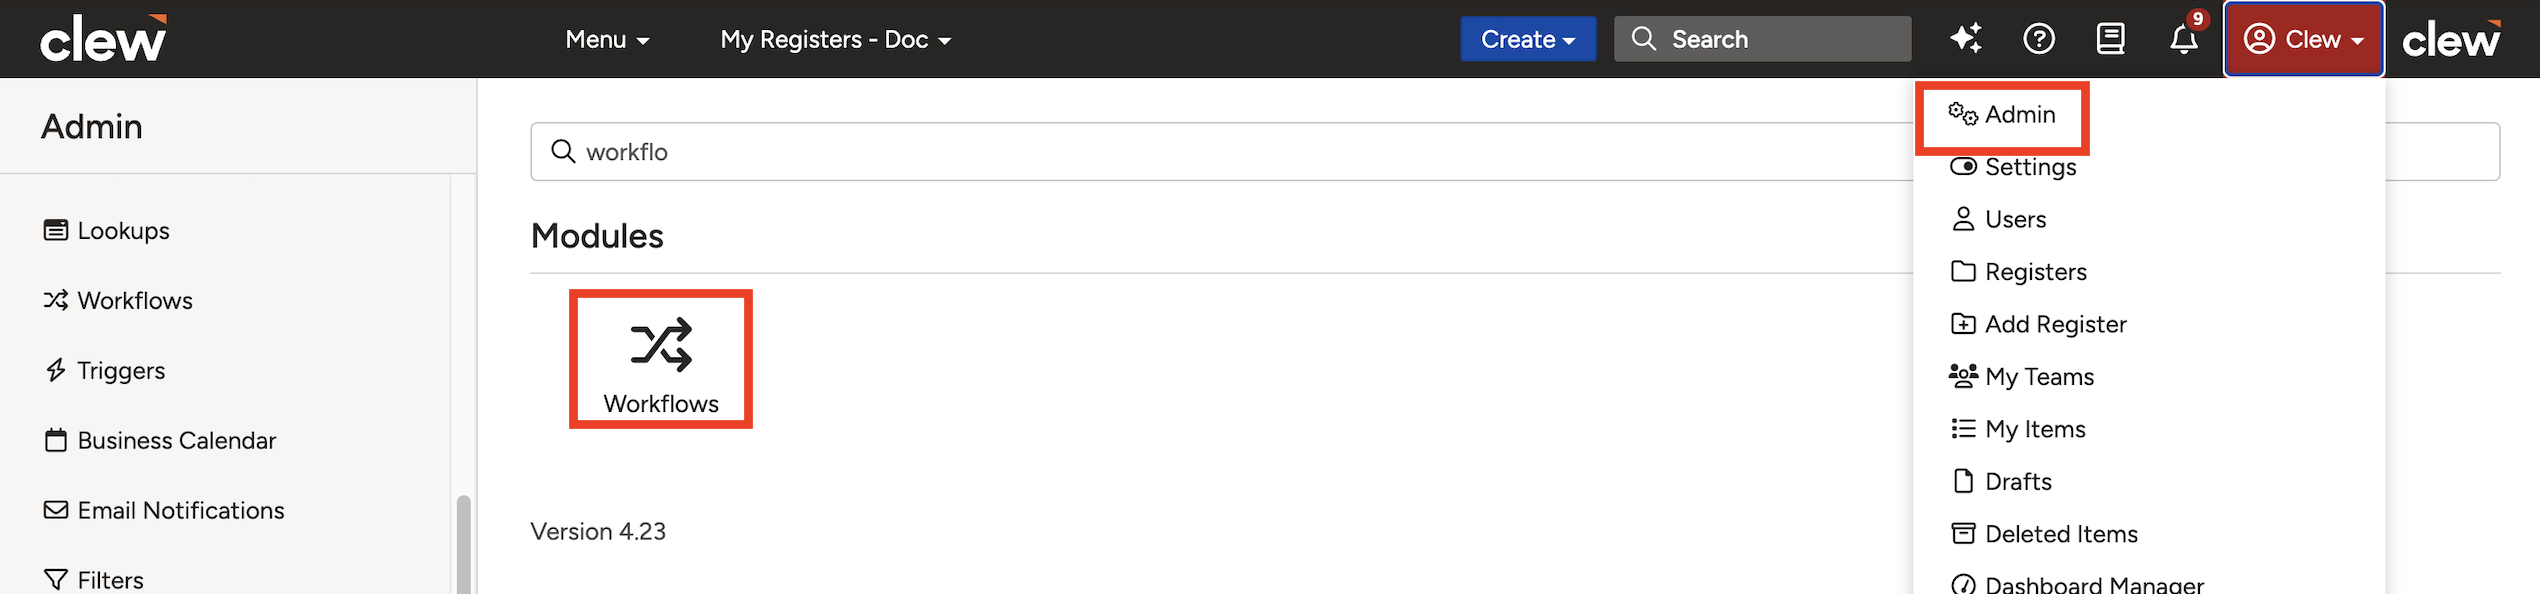
The Admin Workflows list view. Click a workflow to open its detail page and manage statuses and transitions.
Step 2: Define Workflow Statuses
Before adding transitions, confirm that the statuses a record should progress through are already added to the workflow (e.g. Draft, Submitted, Approved). Statuses should be defined in the same order as your business process. If the order is incorrect, use the arrow icon to the right of each status to reposition it.
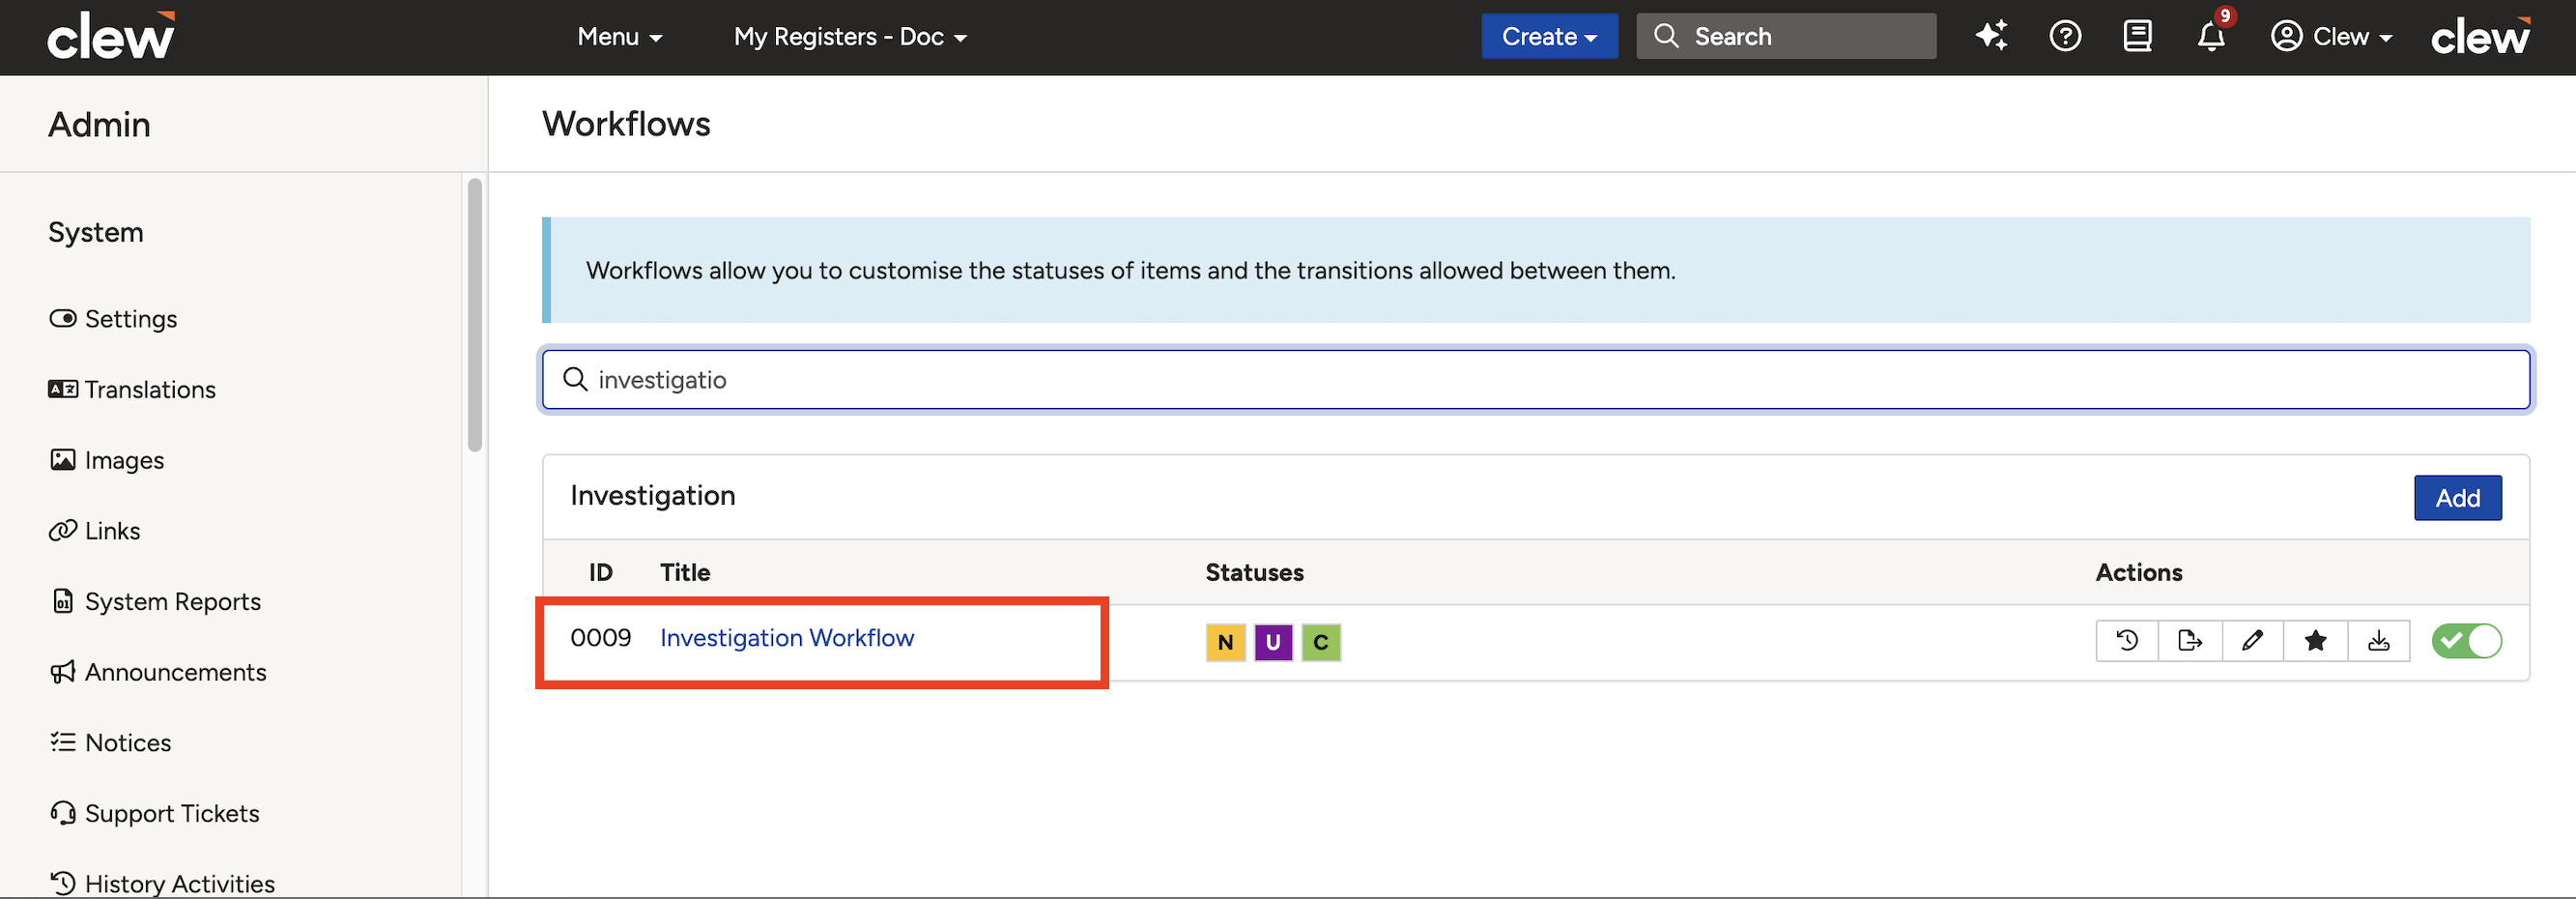
The Statuses sub-panel showing configured statuses in order. Use the arrow icons to reposition them.
Step 3: Add Transitions
Once statuses are in place, you can add transitions to the workflow in two ways:
- Add button: The manual approach. Click the Add button in the Transitions section to open the Add New Transition form and configure each transition individually.
- Link All Statuses: Adds all transitions in one step by automatically linking all statuses. Transitions created this way can be customised individually by clicking the Edit icon next to each one.
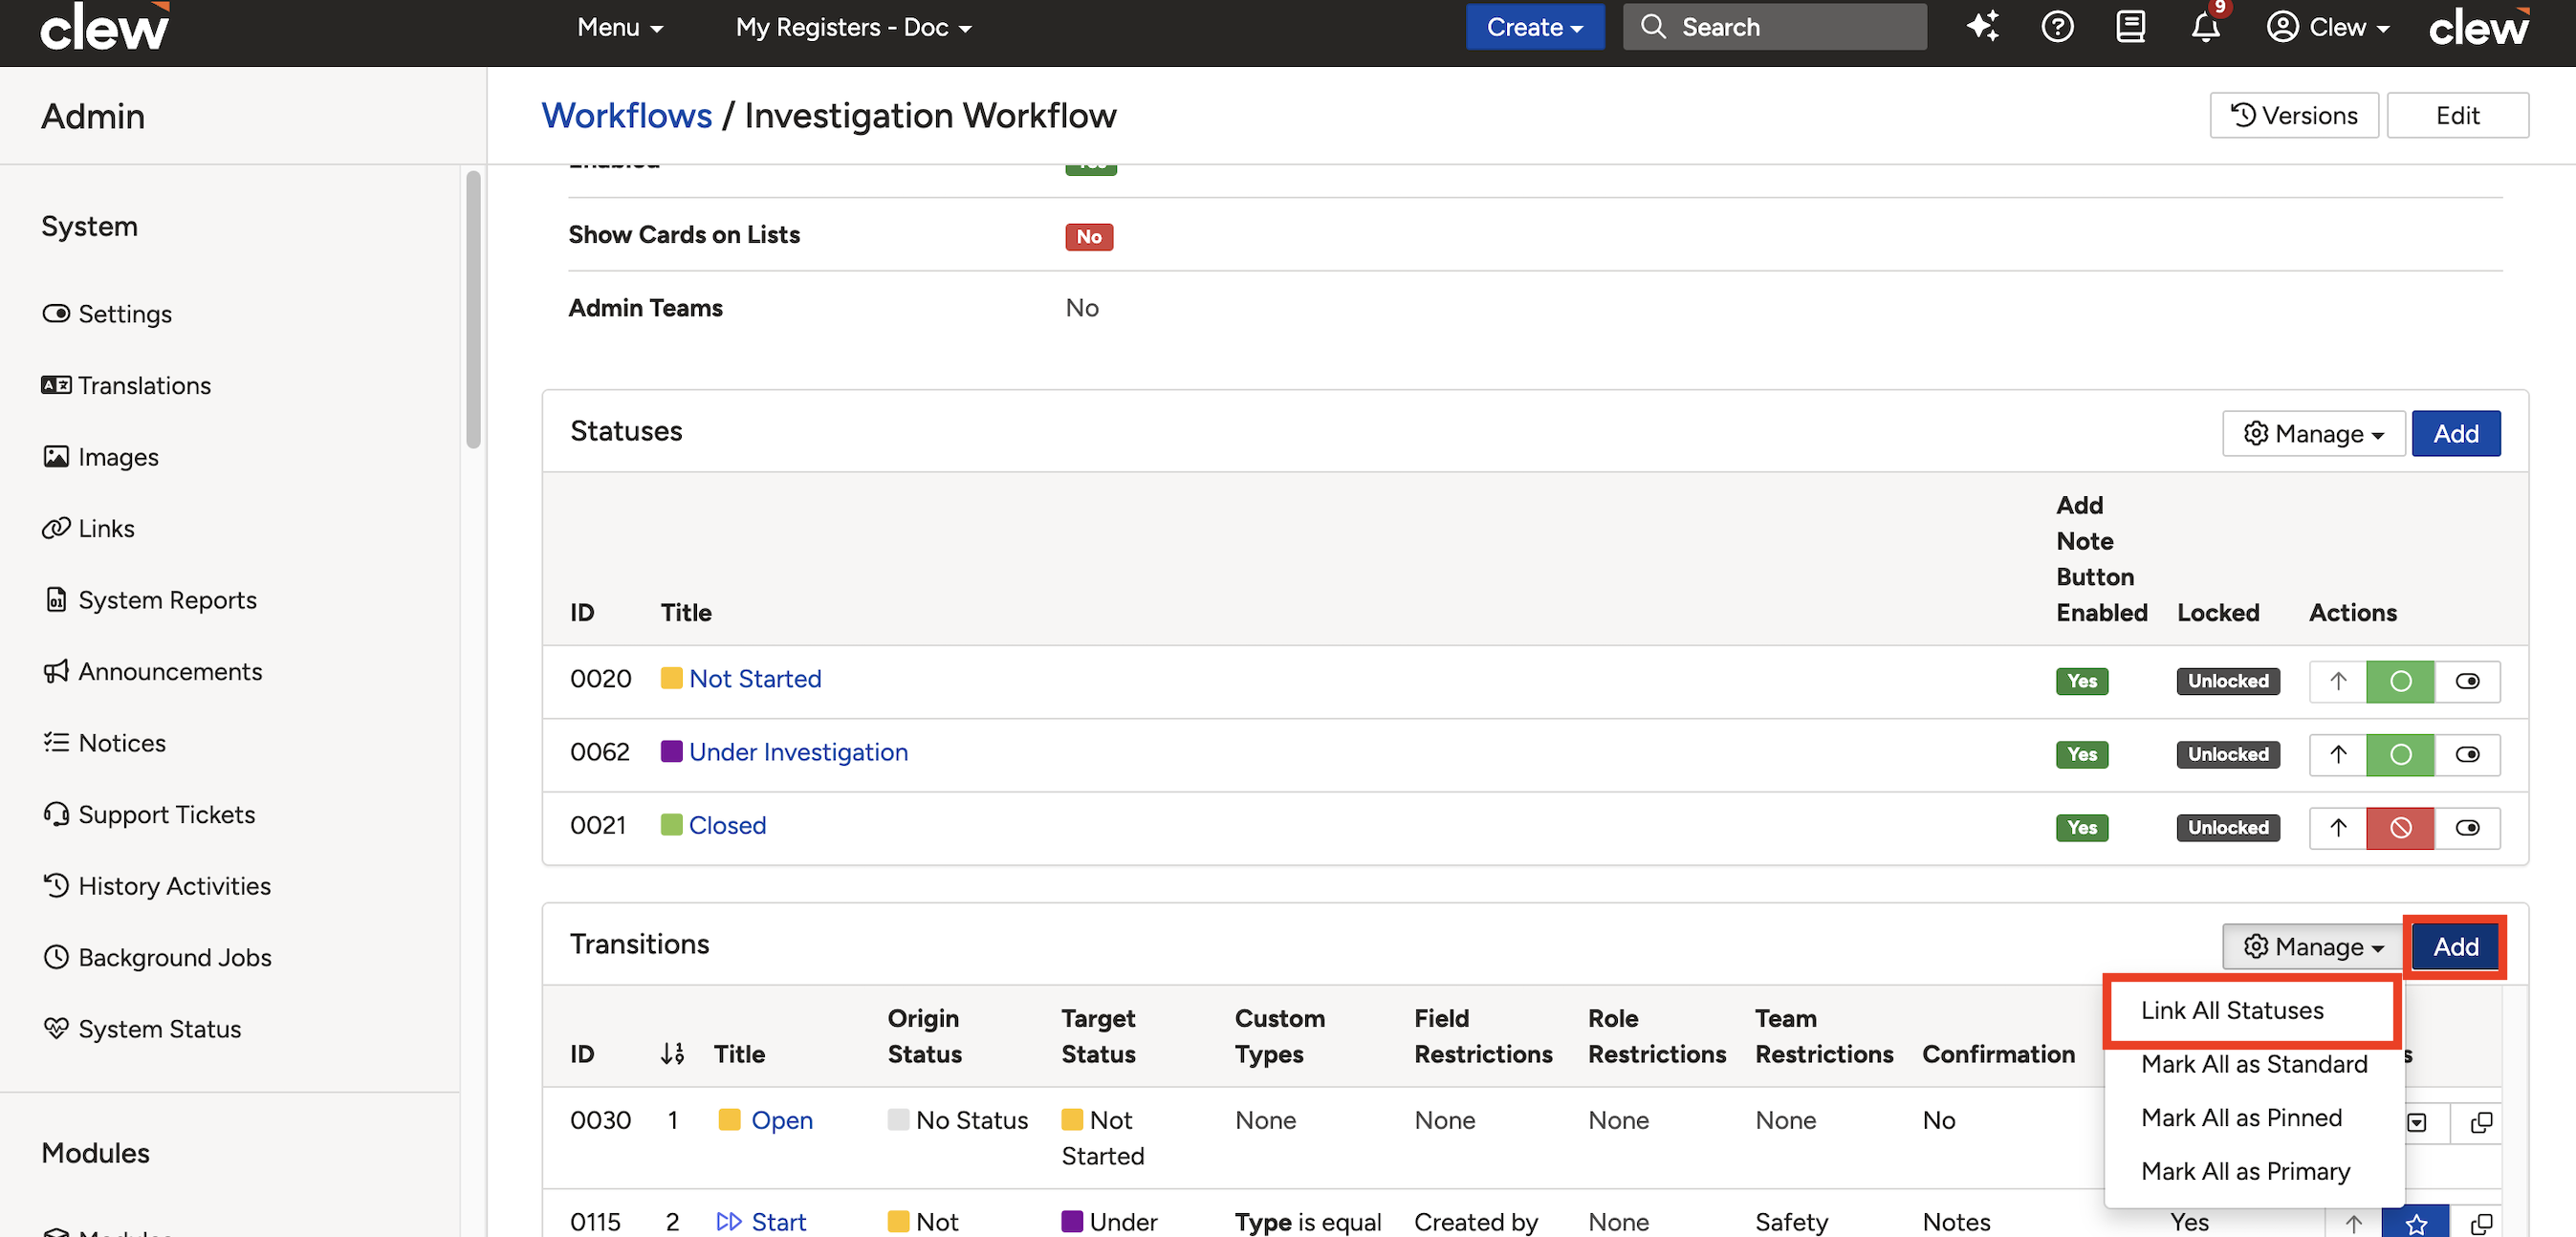
The Transitions sub-panel showing the Add button and the Link All Statuses option.
The transition form is divided into several sections. The sub-sections below describe each one in detail.
- General: Core fields such as title, description, origin status, and target status.
- Visual: Controls how the transition button appears to users, including icon, colour, and transition type.
- Restrictions: Defines who can see and perform the transition, and under what conditions.
- Confirmation: Controls whether a confirmation pop-up appears, which fields it includes, and whether notes or attachments are required.
- Translations: Provides locale-based translations for transition labels and messages.
Transition Form: General Fields
These are the core fields that define the transition's identity and the statuses it connects.
| Field | Description |
| Title | The name of the transition as it appears on the interface, such as the workflow button or transition pin. |
| Description | A brief explanation of the transition's purpose. Useful for administrative reference during configuration. |
| Origin Status | The status a record must be in before this transition can be performed. You can select multiple origin statuses to create transitions from each of them to the same target status (e.g. No Status, Draft, Not Started). |
| Target Status | The status the record will move to once the transition is completed (e.g. Approved, Submitted). |
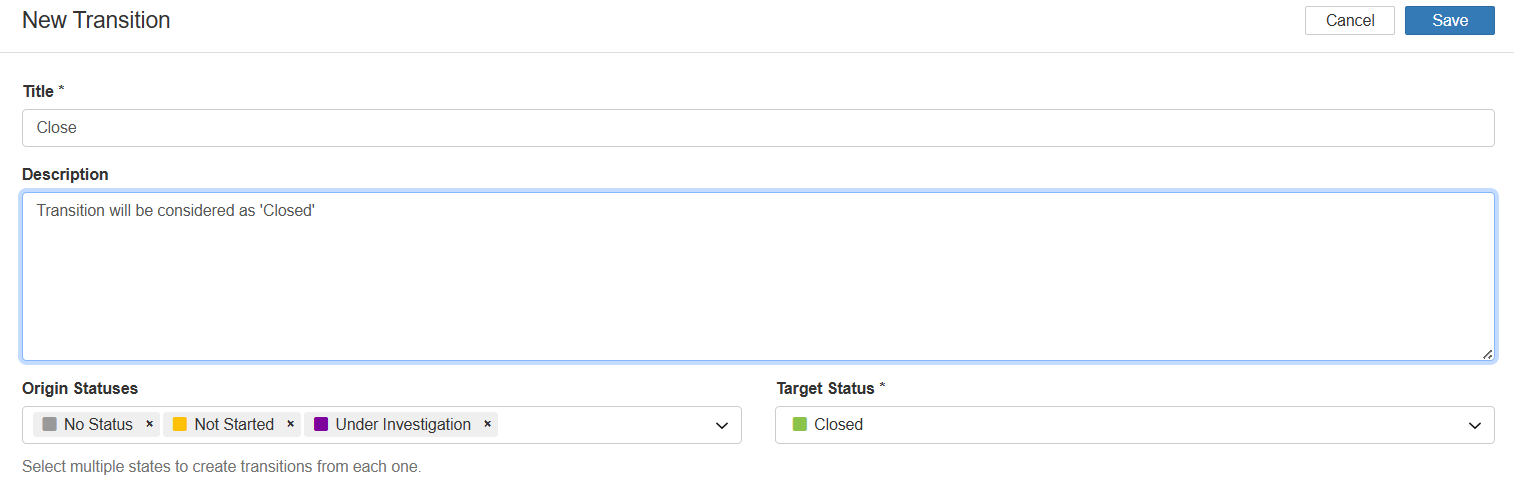
The General section of the Add New Transition form.
Transition Form: Visual
These fields control how the transition appears to users on the record view.
| Field | Description |
| Icon | A visual symbol representing the transition on the interface for quick recognition. |
| Colour | The colour of the transition button. Useful for visual categorisation or urgency indication (e.g. green for Approve, red for Reject). |
| Transition Type | |
| Standard | Appears within the Workflow button dropdown in the record's detail view. |
| Pinned | Displays as a separate button at the top-right corner of the record view. |
| Primary | Similar to Pinned, but with inverted colours: the selected colour appears as the background colour of the button for additional visual prominence. |
| Position | |
| Position | Defines the display order of the transition within the Workflow dropdown or among pinned transitions. For pinned and primary transitions, buttons are displayed left to right based on this value. |
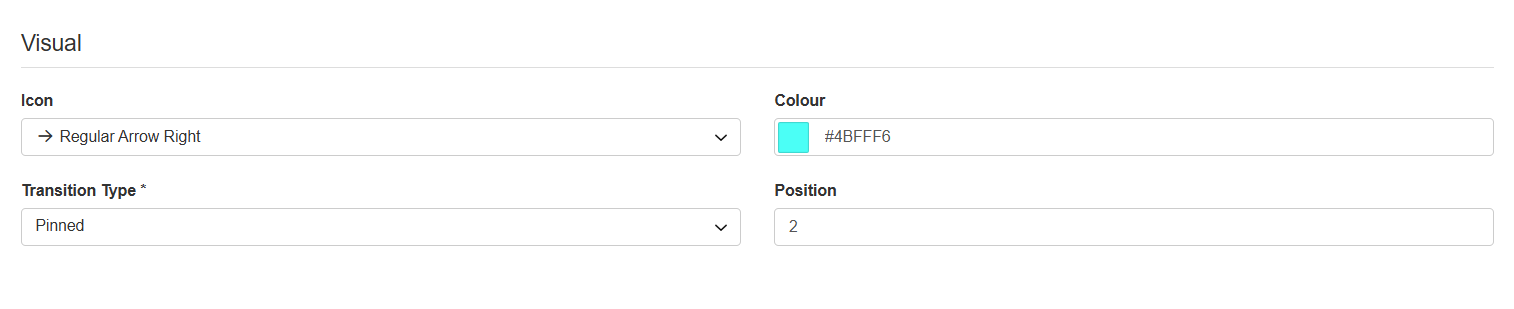
The Visual section of the transition form.
Transition Form: Restrictions
These fields control who can see and perform the transition, and under what conditions it is available.
| Field | Description |
| Field Restrictions | Specifies which users are allowed to perform the transition based on their relationship to the record (e.g. Owner, Assignee). If field restrictions are set, the transition will not appear for any other users. |
| Team Restrictions | Limits access to the transition based on team membership (e.g. users from the Audit Team only). Like field restrictions, this controls who can see and click the transition. |
| Role Restrictions | Only users with the specified roles will be able to perform the transition (e.g. users with the Admin role). This setting is preferred when the Clew Platform is configured in a role-centric model. |
| Conditions | Logical expressions that must evaluate as true for the transition to be available. Conditions take priority over field and team restrictions, making them useful for data-driven control (e.g. show transition only if Score is less than 50). This field only appears after the transition has been saved and you are editing it. |
| Show When Conditions Are Not Met | Enabling this shows the transition button on the record view even when its conditions are not fulfilled. Use together with the field below to guide users on what they need to do. |
| Message When Conditions Are Not Met | A custom alert message shown when the transition's conditions are not fulfilled. This helps users understand why the transition is visible but not yet actionable, encouraging them to complete the required criteria rather than assuming the transition is missing. |
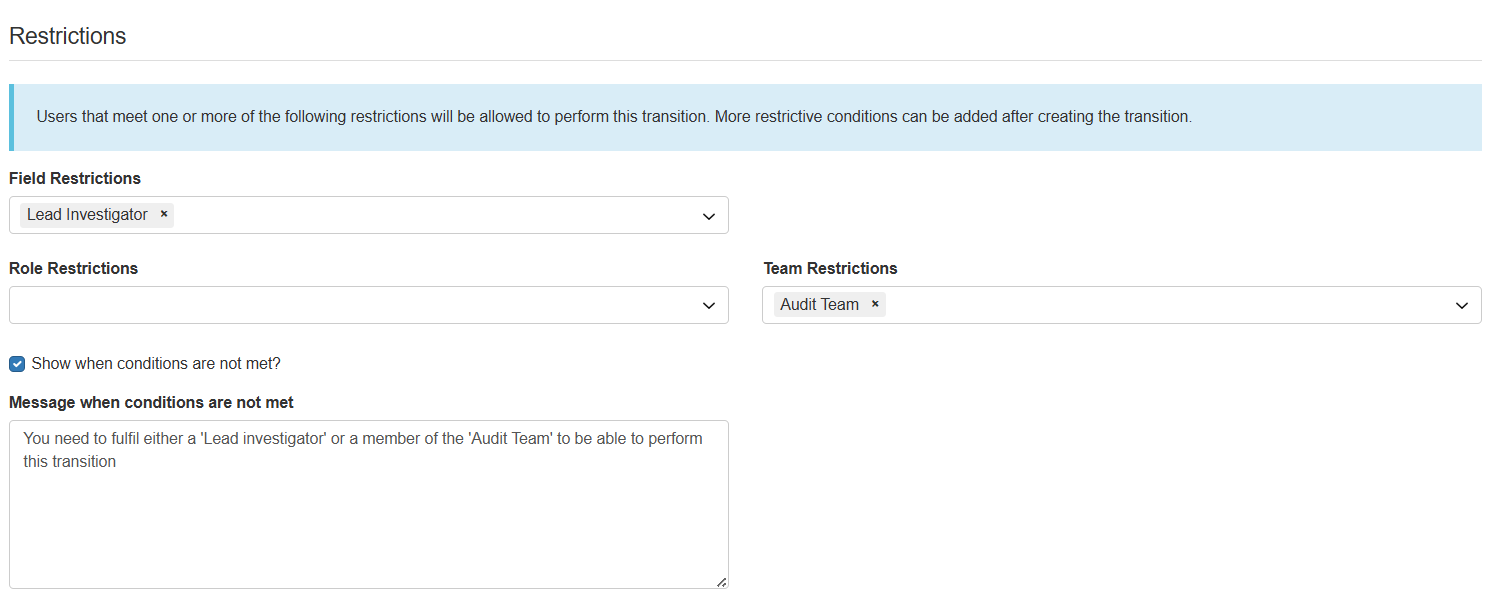
The Restrictions section of the transition form.
Transition Form: Confirmation
These fields control whether a confirmation pop-up appears before the transition is applied, and what the pop-up contains.
| Field | Description |
| Confirm Transition | When enabled, a confirmation pop-up appears before the transition is applied. This prevents accidental transitions and gives users a chance to review or enter final data. |
| Notes | When enabled, a Notes field appears on the confirmation pop-up, allowing users to add context or justification for the transition. Notes are displayed in the Activity Stream sub-panel (if enabled for the module), providing a clear audit trail. |
| Default Notes | A predefined message that auto-fills the Notes field (if configured) on the transition form. Users can modify or replace this text as needed. |
| Redirect to Clone Form | Select Yes to redirect to the record's clone form after the transition is performed. Useful for quickly duplicating records after approval or closure. |
| Fields | Select which fields should appear on the confirmation pop-up. Fields are displayed in the order they are selected. Each field can be set as:
|
| Fields Required | Fields selected here are marked as required (denoted with an asterisk). Leaving this field empty will prevent the record from transitioning to the next status. |
| Header Image | An optional image displayed at the top of the confirmation pop-up. Images uploaded to Custom Images will be available for selection. |
| Footer Image | An optional image displayed at the bottom of the confirmation pop-up. Images uploaded to Custom Images will be available for selection. |
| Attachments | Select the applicable option to control whether attachments can be added during this transition. |
| Attachment Fields | Select the fields displayed alongside the file upload input (e.g. Description, Sensitivity). Note: the Sensitivity field is currently disabled for input, as uploaded attachments inherit their parent record's sensitivity setting by default. |
| Attachments Description | Text entered here appears by default within the Attachment Description field (if enabled above). |
| Message | A custom message displayed at the top of the confirmation pop-up to provide context or instructions for the user performing the transition. |
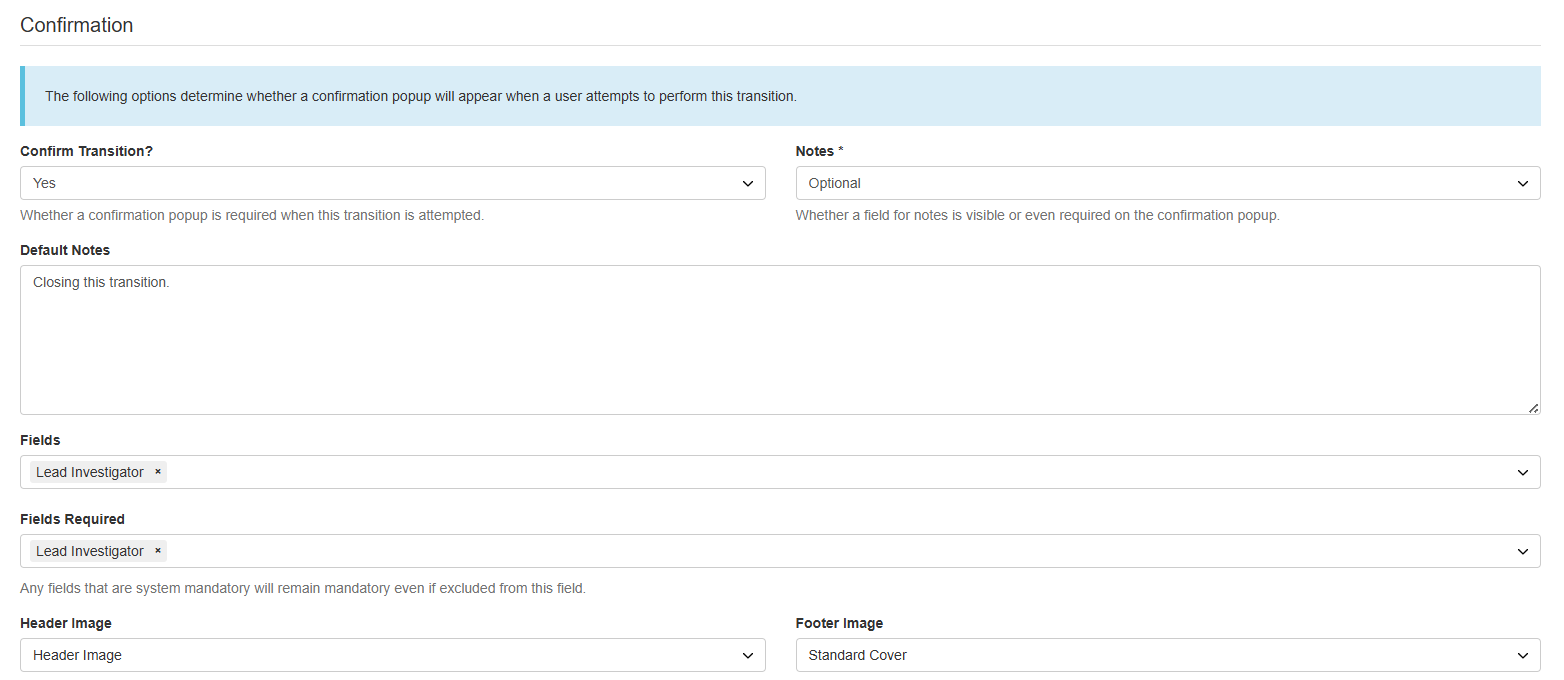
The Confirmation section of the transition form (part 1).
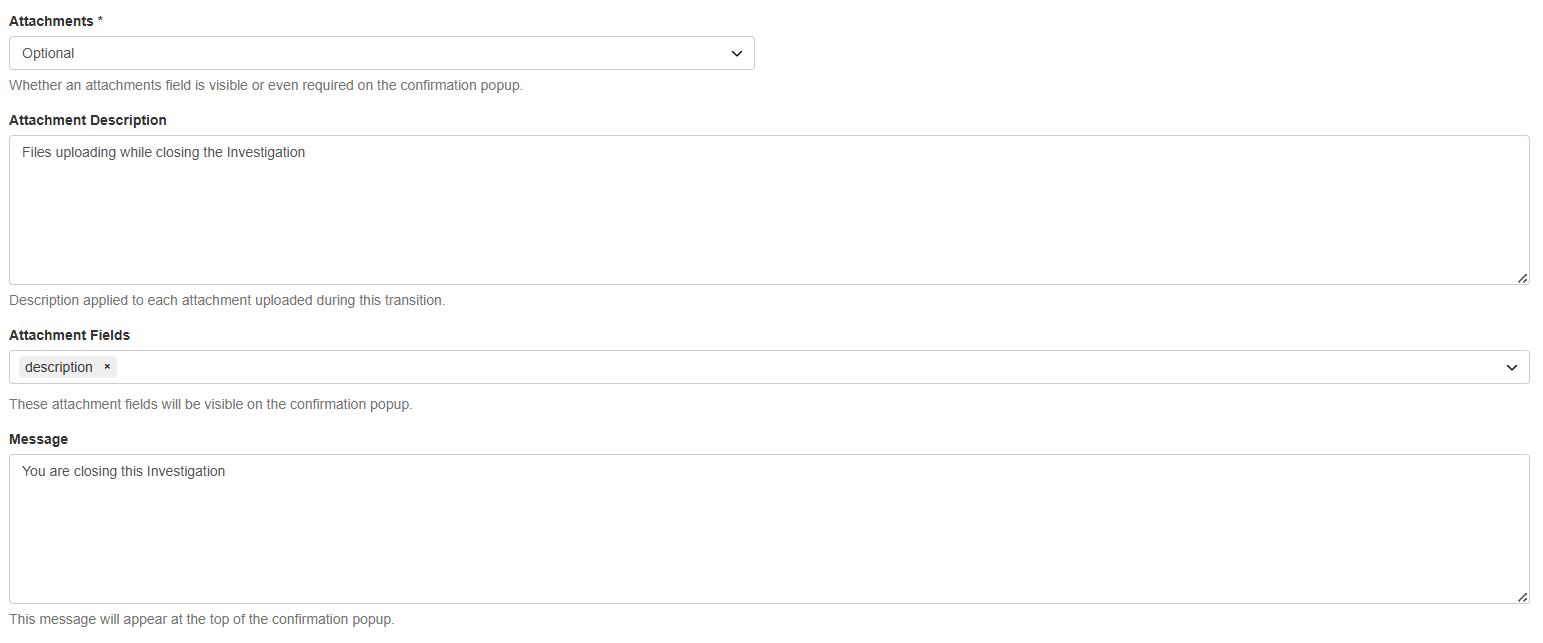
The Confirmation section of the transition form (part 2).
Transition Form: Translations (Optional)
These fields allow you to define localised text for users across different languages and regions. They ensure transition labels and condition messages are presented in a way that is clear and relevant to the user's locale.
| Field | Description |
| Title Translations | Provides localised versions of the transition title for multilingual interfaces, ensuring users see the transition label in their preferred or system-defined language. |
| Translations for Message When Conditions Are Not Met | Translated versions of the custom alert message shown when transition conditions are not fulfilled. Helps users understand why a transition is unavailable, especially in non-English environments. |
| Message Translations | Translates the confirmation pop-up message shown at the top. Provides localised guidance to users while they are performing the transition. |
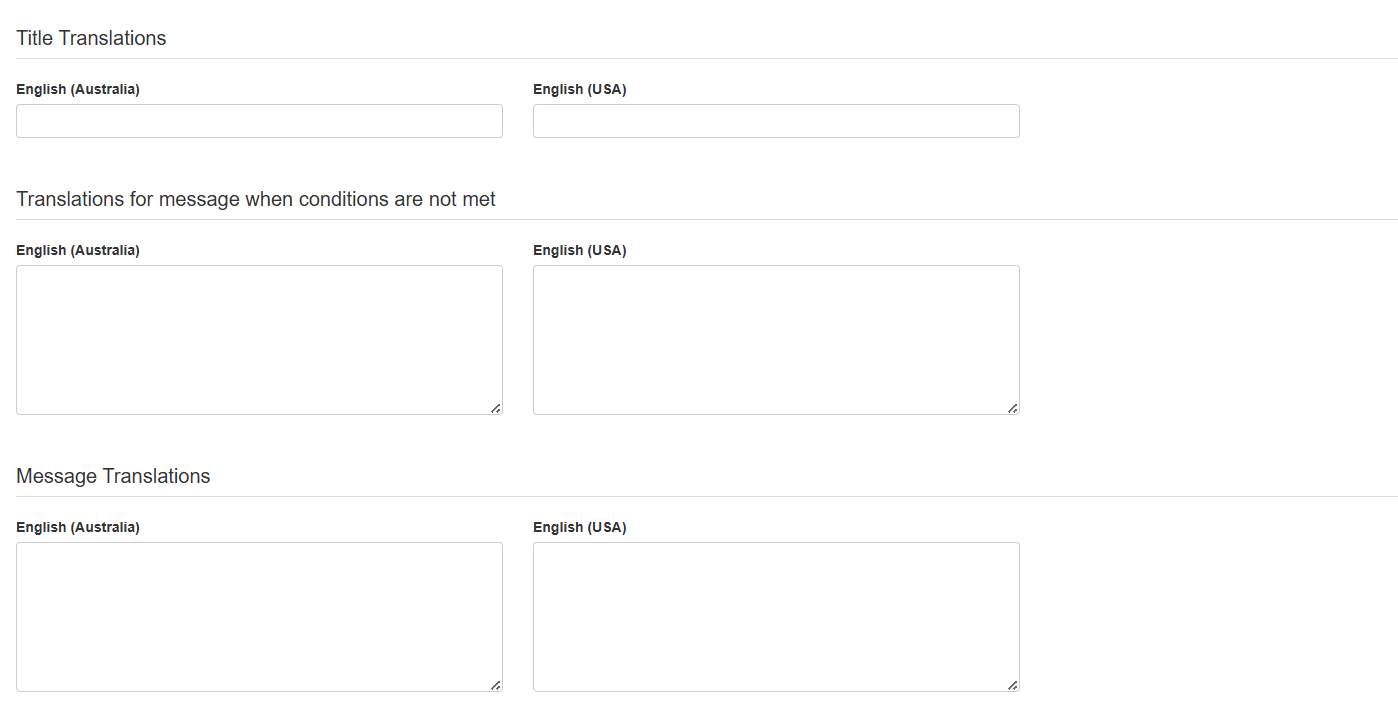
The Translations section of the transition form.
Transitions List: Quick-Access Features
The transitions list provides quick-access tools to help you manage and customise transitions without having to open each one individually.
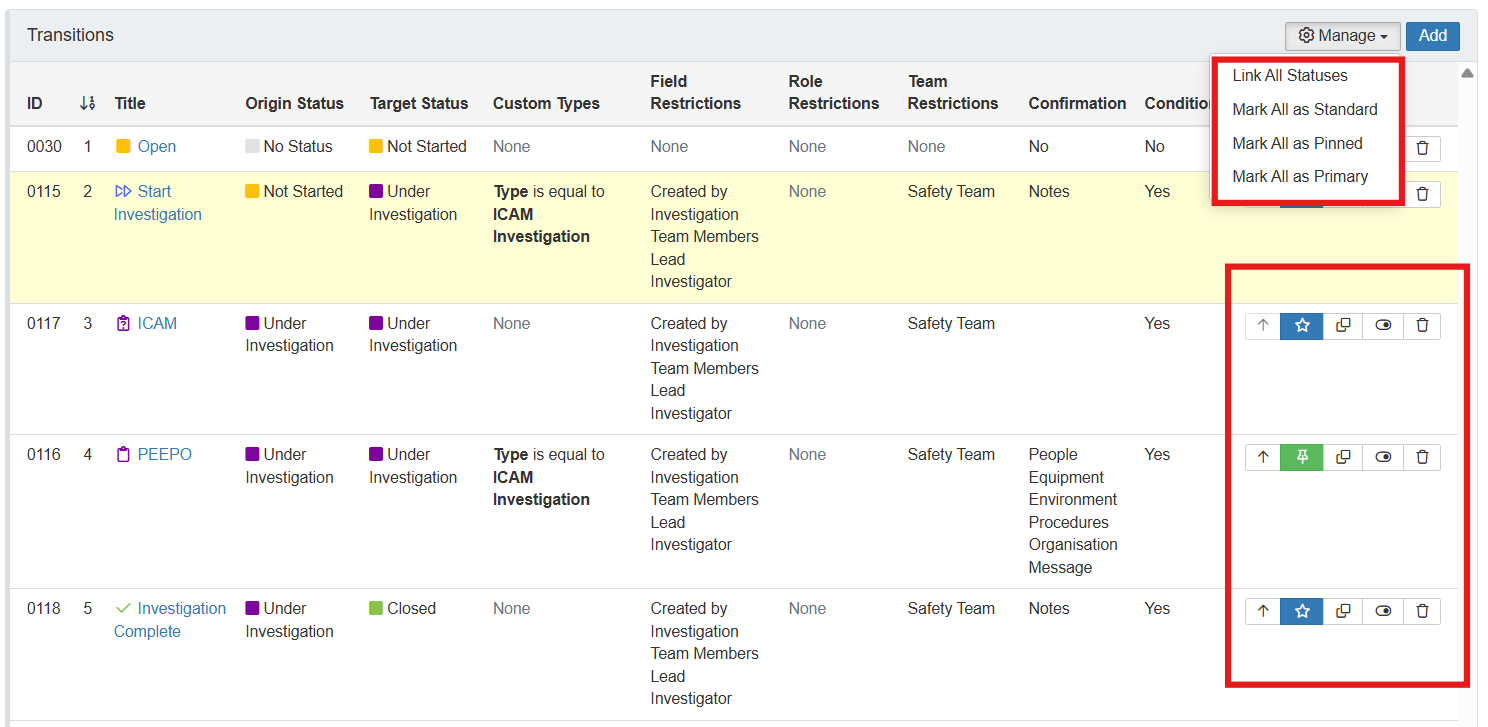
The Transitions list with quick-access management tools.
- Mass Edit Transition Types: Use the Managebutton to update the type of all transitions at once. Useful for applying a consistent style across the whole workflow. Options are:
- Mark all as Standard: Lists transitions within the Workflow button dropdown.
- Mark all as Pinned: Displays transitions as separate buttons at the top-right of the record view.
- Mark all as Primary: Similar to Pinned, but the selected colour is shown as the button background for additional emphasis. Primary transitions are always displayed to the right.
- Repositioning Transitions: Use the arrow icons or the Position field to define the display order of transitions, either within the Workflow dropdown or among pinned buttons (left to right).
- Clone: Creates a duplicate of an existing transition including all its settings (visuals, restrictions, confirmation, and other options). This speeds up setup when creating similar transitions.
- Deactivate: Temporarily hides a transition from users on the record view without deleting it. Deactivated transitions can be re-enabled at any time without losing their configuration.
- Delete: Permanently removes a transition from the workflow. This action is irreversible.
5. Common Issues & Troubleshooting
| Issue | Likely Cause | Solution |
| Transition button is not visible on a record | The user does not have Update access, or field, team, or role restrictions exclude them from this transition | Confirm the user has Update access on the record. Check the transition's restriction settings and confirm the user meets any field, team, or role criteria. Contact your system administrator if unsure. |
| Transition button is visible but cannot be clicked | The transition's conditions are not met, and Show When Conditions Are Not Met is enabled | Check the message displayed on the transition for guidance on what must be fulfilled first. Review the transition's Conditions field in the admin configuration. |
| Conditions field is not visible on the transition form | The transition has not been saved yet | Save the transition first, then reopen it to edit. The Conditions field only appears on existing transitions. |
| Pinned transition buttons appear in the wrong order | The Position values for pinned transitions have not been set correctly | Edit each pinned transition and update the Position field. Pinned and primary transitions display left to right based on this value. |
Best practices:
- Use the Link All Statuses option to create transitions quickly, then edit each one individually to add restrictions and confirmation settings.
- Enable Confirm Transition on irreversible or high-stakes transitions such as Approve or Close to prevent accidental submissions.
- Use Deactivate rather than deleting transitions you may need again. Configuration is preserved and the transition can be re-enabled at any time.
- Test transitions in a non-production environment before applying them to live data, especially when using conditions or required fields.
- Use the Clone feature to duplicate complex transitions that share the same restrictions or confirmation settings, then adjust the origin and target statuses.
Frequently Asked Questions
Why am I unable to see the transition on a record?
Only users with Update access on the record who also meet any field, team, or role-based restrictions can see and perform a transition. Contact your system administrator to confirm you have the necessary permissions.
Can I show a transition even if conditions are not met?
Yes. Enable Show When Conditions Are Not Met to keep the transition button visible. Pair this with a custom message in the Message When Conditions Are Not Met field to explain to users what they need to do before the transition becomes available.
What is the difference between Standard, Pinned, and Primary transitions?
Standard: Listed inside the Workflow button dropdown next to the Manage dropdown on the record view. Pinned: Displayed as separate buttons at the top-right of the record view. Primary: Same as Pinned but styled with the selected colour as the button background for additional visual prominence.
Use the reposition arrows next to each transition in the Transitions list, or edit the Position field on individual transitions. For pinned and primary transitions, buttons are displayed left to right based on the position value.
What happens if I deactivate a transition?
The transition is hidden from users on record views but is not deleted. All configuration is retained and the transition can be reactivated at any time without needing to be reconfigured.
Click a title to preview it here. Use the Open full article button to read the full version in a new tab.
▾How can I update the schema's order or conditions? Open full article »
Related article
How to synchronise and update schema forms so that workflow and status changes take effect for users.
▾Roles and Permissions Open full article »
Related section
Browse the Roles and Permissions articles, which cover the role and team settings that transition restrictions rely on.
▾Custom Types: Overview & Use Open full article »
Related article
Create distinct record types within a module, each of which can carry its own workflow, statuses, and transitions.
Was this article helpful?
That’s Great!
Thank you for your feedback
Sorry! We couldn't be helpful
Thank you for your feedback
Feedback sent
We appreciate your effort and will try to fix the article