Workflows
How to configure workflows and statuses to manage the lifecycle of records in the Clew Platform
Contents
- 1. Introduction & Context
- 2. Key Features & Functions
- 3. Requirements
- 4. Step-by-Step Guide
- 5. Common Issues & Troubleshooting
- 6. Related Articles
1. Introduction & Context
Workflows let you define the stages a record moves through in the Clew Platform, from creation to completion, so your team follows a consistent, auditable process at every step.
Each workflow is made up of statuses that represent different stages in that journey. You control which statuses exist, how records move between them, and what happens at each stage, such as locking records from further edits, triggering notifications, or restricting who can make changes.
Who is it for? System Administrators who configure workflows, and all users who manage records within a module.
What does it impact? Workflows affect every record in the modules they are applied to. Changes to statuses and transitions are reflected immediately for all users. Disabling a workflow removes the Status field from list views, item views, and add/edit forms.
Workflow Example Diagram
The diagram below shows a simple workflow moving from an initial status through to a closed state.

A sample workflow diagram illustrating how records move through statuses from creation to completion.
2. Key Features & Functions
- Status Management: Defines the different stages a record should move through to reach its final state (e.g. Open, In Progress, Completed). This provides clear visibility into where each item stands at any point in time.
- Status-Based Access Control: Workflows can lock records at specific statuses, preventing further edits or deletions. This ensures data integrity by restricting changes once a record reaches a critical stage such as Approved, Finalised, or Closed, helping enforce compliance and prevent accidental modifications.
- Automated Actions and Updates: Enables automatic actions such as sending notifications or updating fields based on triggers. For example, when a record's status changes to "Approved", specified users or roles can be notified automatically.
- Controlled Transitions: Records follow only pre-defined paths between statuses, ensuring work moves in an orderly, predictable sequence. Access to perform transitions can also be restricted by role, team, or other conditions.
- Auditing and Accountability: Provides a full history of a record's journey from creation to completion, including who did what and when. This supports accountability, auditing, and continuous process improvement.
3. Requirements
- System Administrator access is required to configure workflows and statuses.
- Users need Read access to view a record's workflow status.
- Users need Update access to move a record to a different workflow status.
- Modules shown with a pink background on the Workflow list view are currently inactive and can only be activated by Clew Administrators.
4. Step-by-Step Guide
- Click on your name in the top navigation and select Admin from the dropdown.
- Enter Workflows in the search bar and click the Workflows icon to go to the Admin Workflows list view.
Step 2: Add a New Workflow
- Click the Add button in the module's sub-panel to open the New Workflow form.
- Complete the fields as described in the table below, then click Save.
| Field | Description |
| Title | The display name for the workflow as it appears in the list view. |
| Admin Teams | Select the teams authorised to perform mass status updates from the list view. If left blank, all teams will have this permission by default. |
| Description | A brief summary outlining the purpose or use of the workflow. |
| Enabled | Set to Yes to make the workflow active, or No to disable it without deleting it. |
| Show Cards on Lists | Select Yes to display status cards and their item counts on the module's list view. |
| Translations (optional) | Provide locale-based translations for the workflow title and description. These override the default Title and Description fields. If left blank, the default text is shown. |
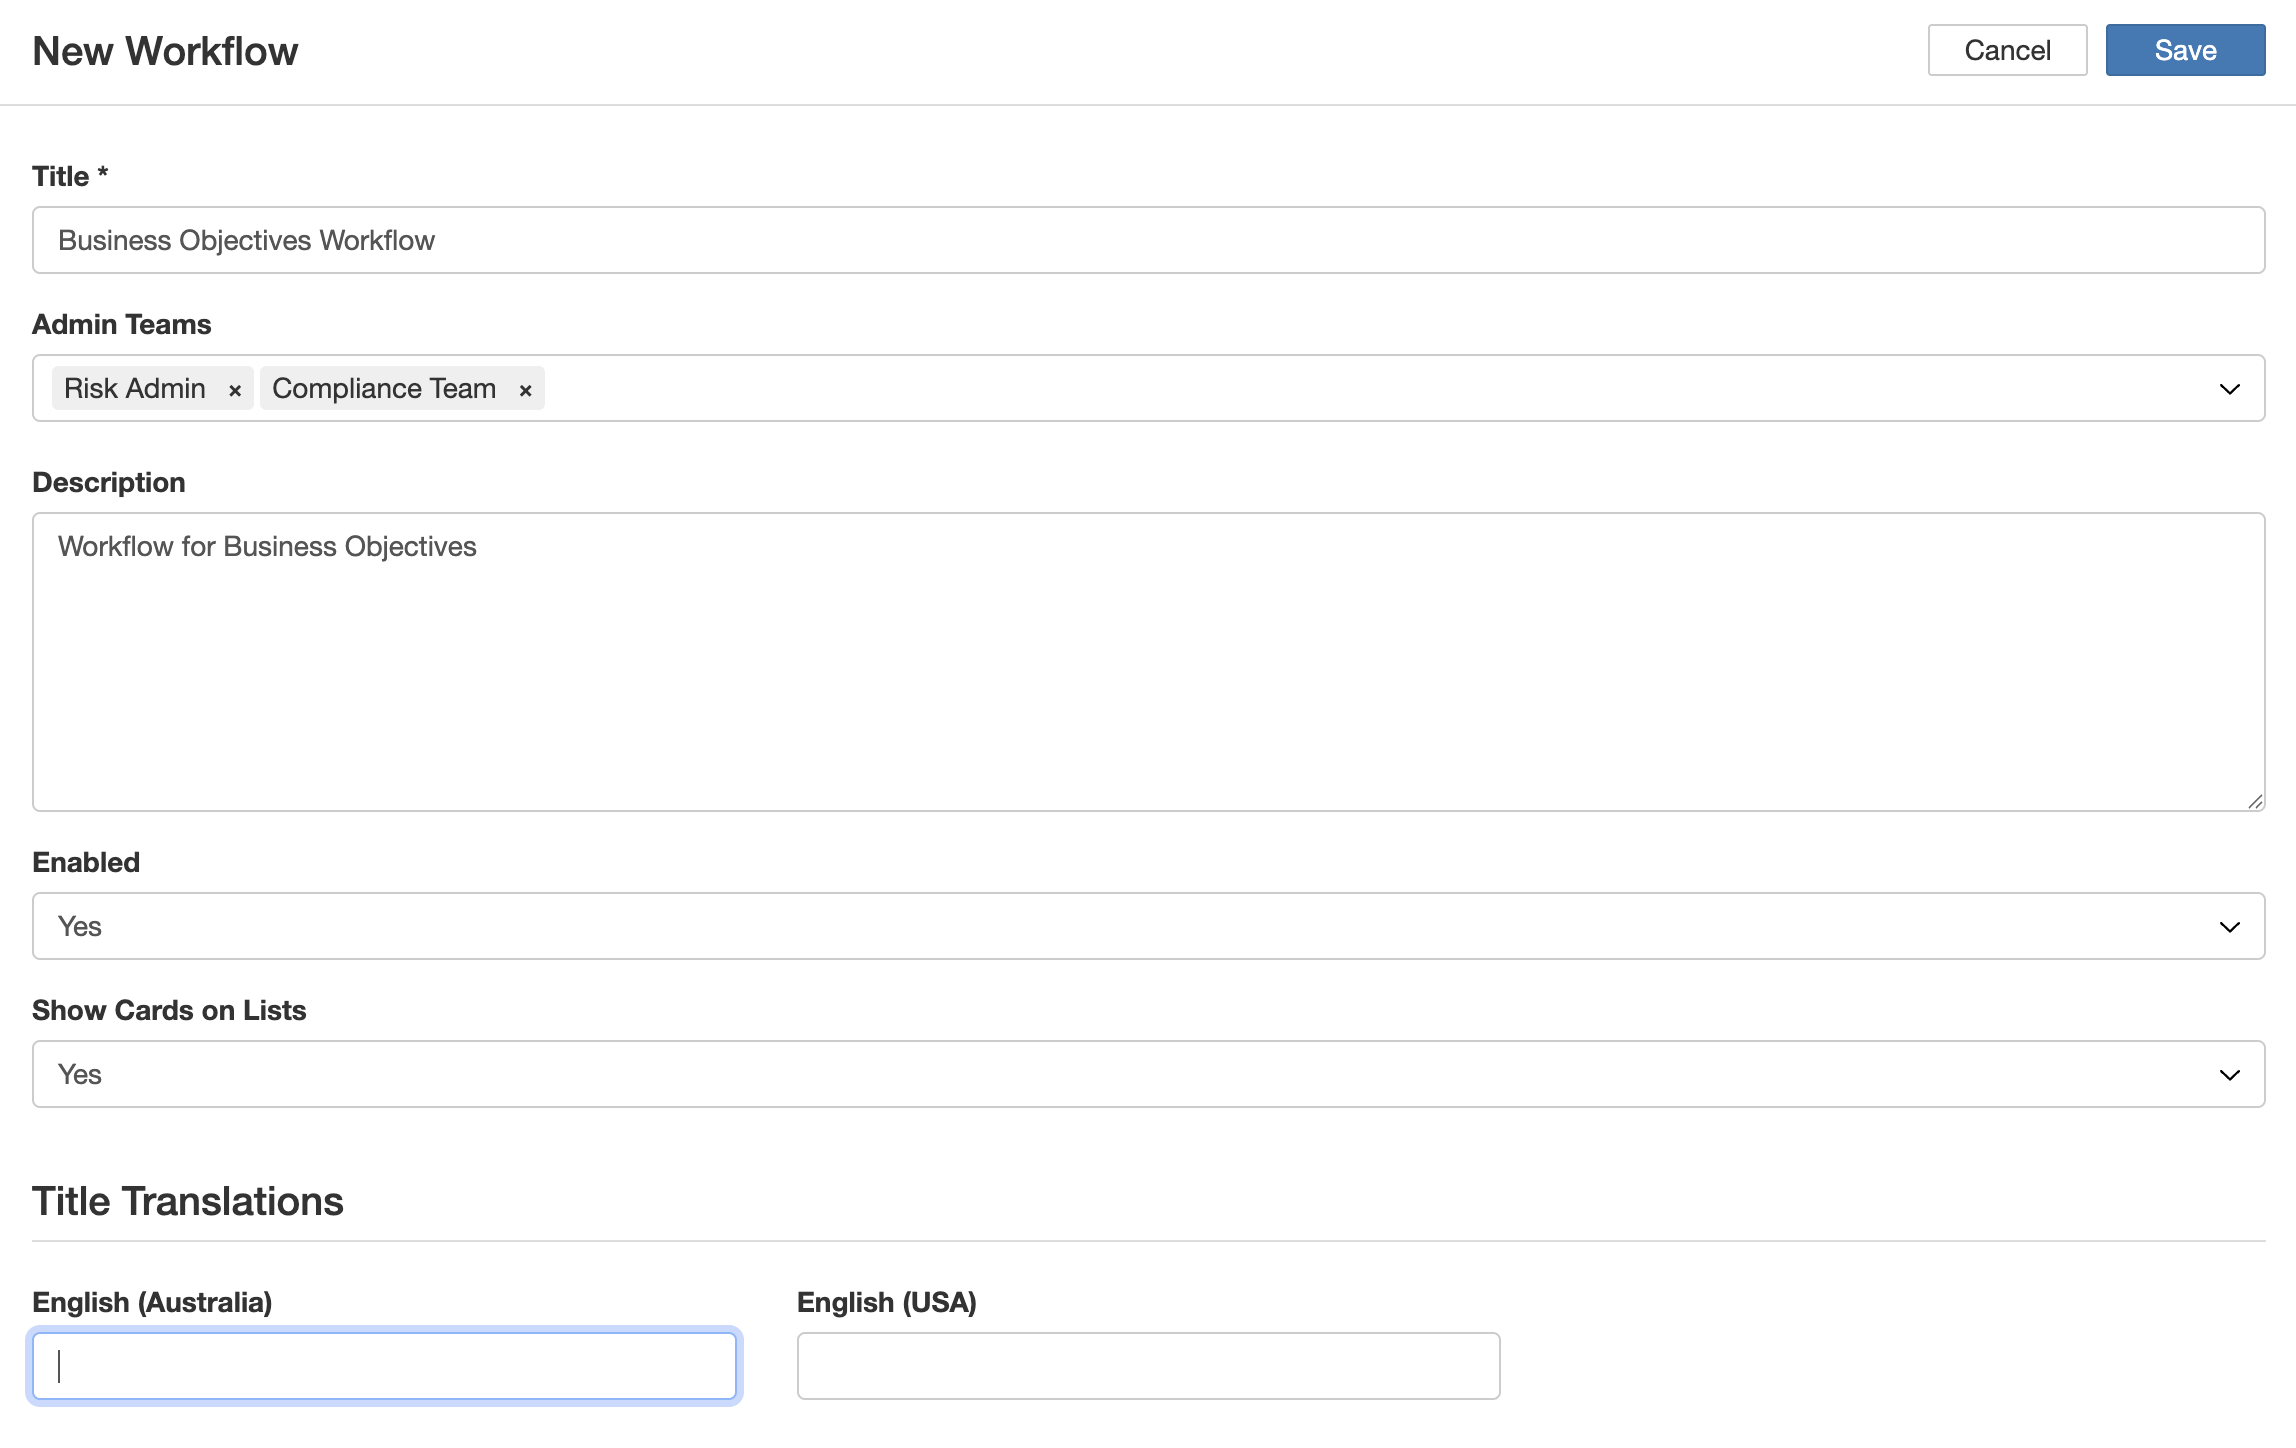
The New Workflow form with all configurable fields.
Step 3: Configure Workflow Statuses
- Click the Add button within the Statuses sub-panel to open the Add Status form.
- Complete the fields as described in the table below.
- Click Save to save the status and return to the workflow page. Repeat as needed to add all required statuses.
| Field | Description |
| Title | The name of the status as it will appear throughout the system, including item views, list views, and dropdowns. |
| Description | A brief explanation of the status, its purpose, or how it fits within the workflow. Useful for administrative reference. |
| Status Type | Select whether this is a Draft, Open, or Closed status type. Draft: Represents a work-in-progress status. The record is being prepared but is not yet ready for action. Open: Indicates the record is ready for processing, review, or action. Closed: Indicates an inactive status. Records in this status are hidden from list views and unavailable in autocomplete dropdowns by default. Note: Status Types are central to Module-level Authorisation Rules configured by Clew Administrators. Depending on these rules, users may be permitted to read or update records based on a Draft status, even without explicit Role or Security Group permissions. |
| Locked | Select Yes to prevent records in this status from being edited or deleted. Typically used for final or archived states. Locked records can still be transitioned to another status if the workflow allows it. |
| Enabled | Specifies whether the status is active and usable within the workflow. Set to No to temporarily disable the status without deleting it. |
| Colour | Choose a colour to visually distinguish this status in list and item views. |
| Add Note | |
| Add Note Button Enabled | Select Yes to show an Add Note button in the record's view for this status, allowing users to add comments or notes. |
| Show Extra Email Recipients (Users) | Select Yes to allow users to manually select specific users as additional email recipients when a note is added. |
| Show Extra Email Recipients (Roles) | Select Yes to allow users to specify roles to receive email notifications when a note is added. |
| Recipients (Users) | Select users who will always receive an email notification when a note is added to a record in this status. |
| Recipients (Roles) | Specify which roles should receive email notifications when a note is added to records in this status. |
| Translations | |
| Title and Description Translations | Provide locale-specific translations that override the default Title and Description fields for supported languages. |
- Email recipients of the Add Note feature will only receive emails if notifications are enabled on their profile.
- Recipients can only navigate to records if they have Read access.
- Locked records will not display the Add Note button, even if it is configured for the status.
- After configuring all required statuses, you can set up workflow transitions to complete the workflow configuration for the module.
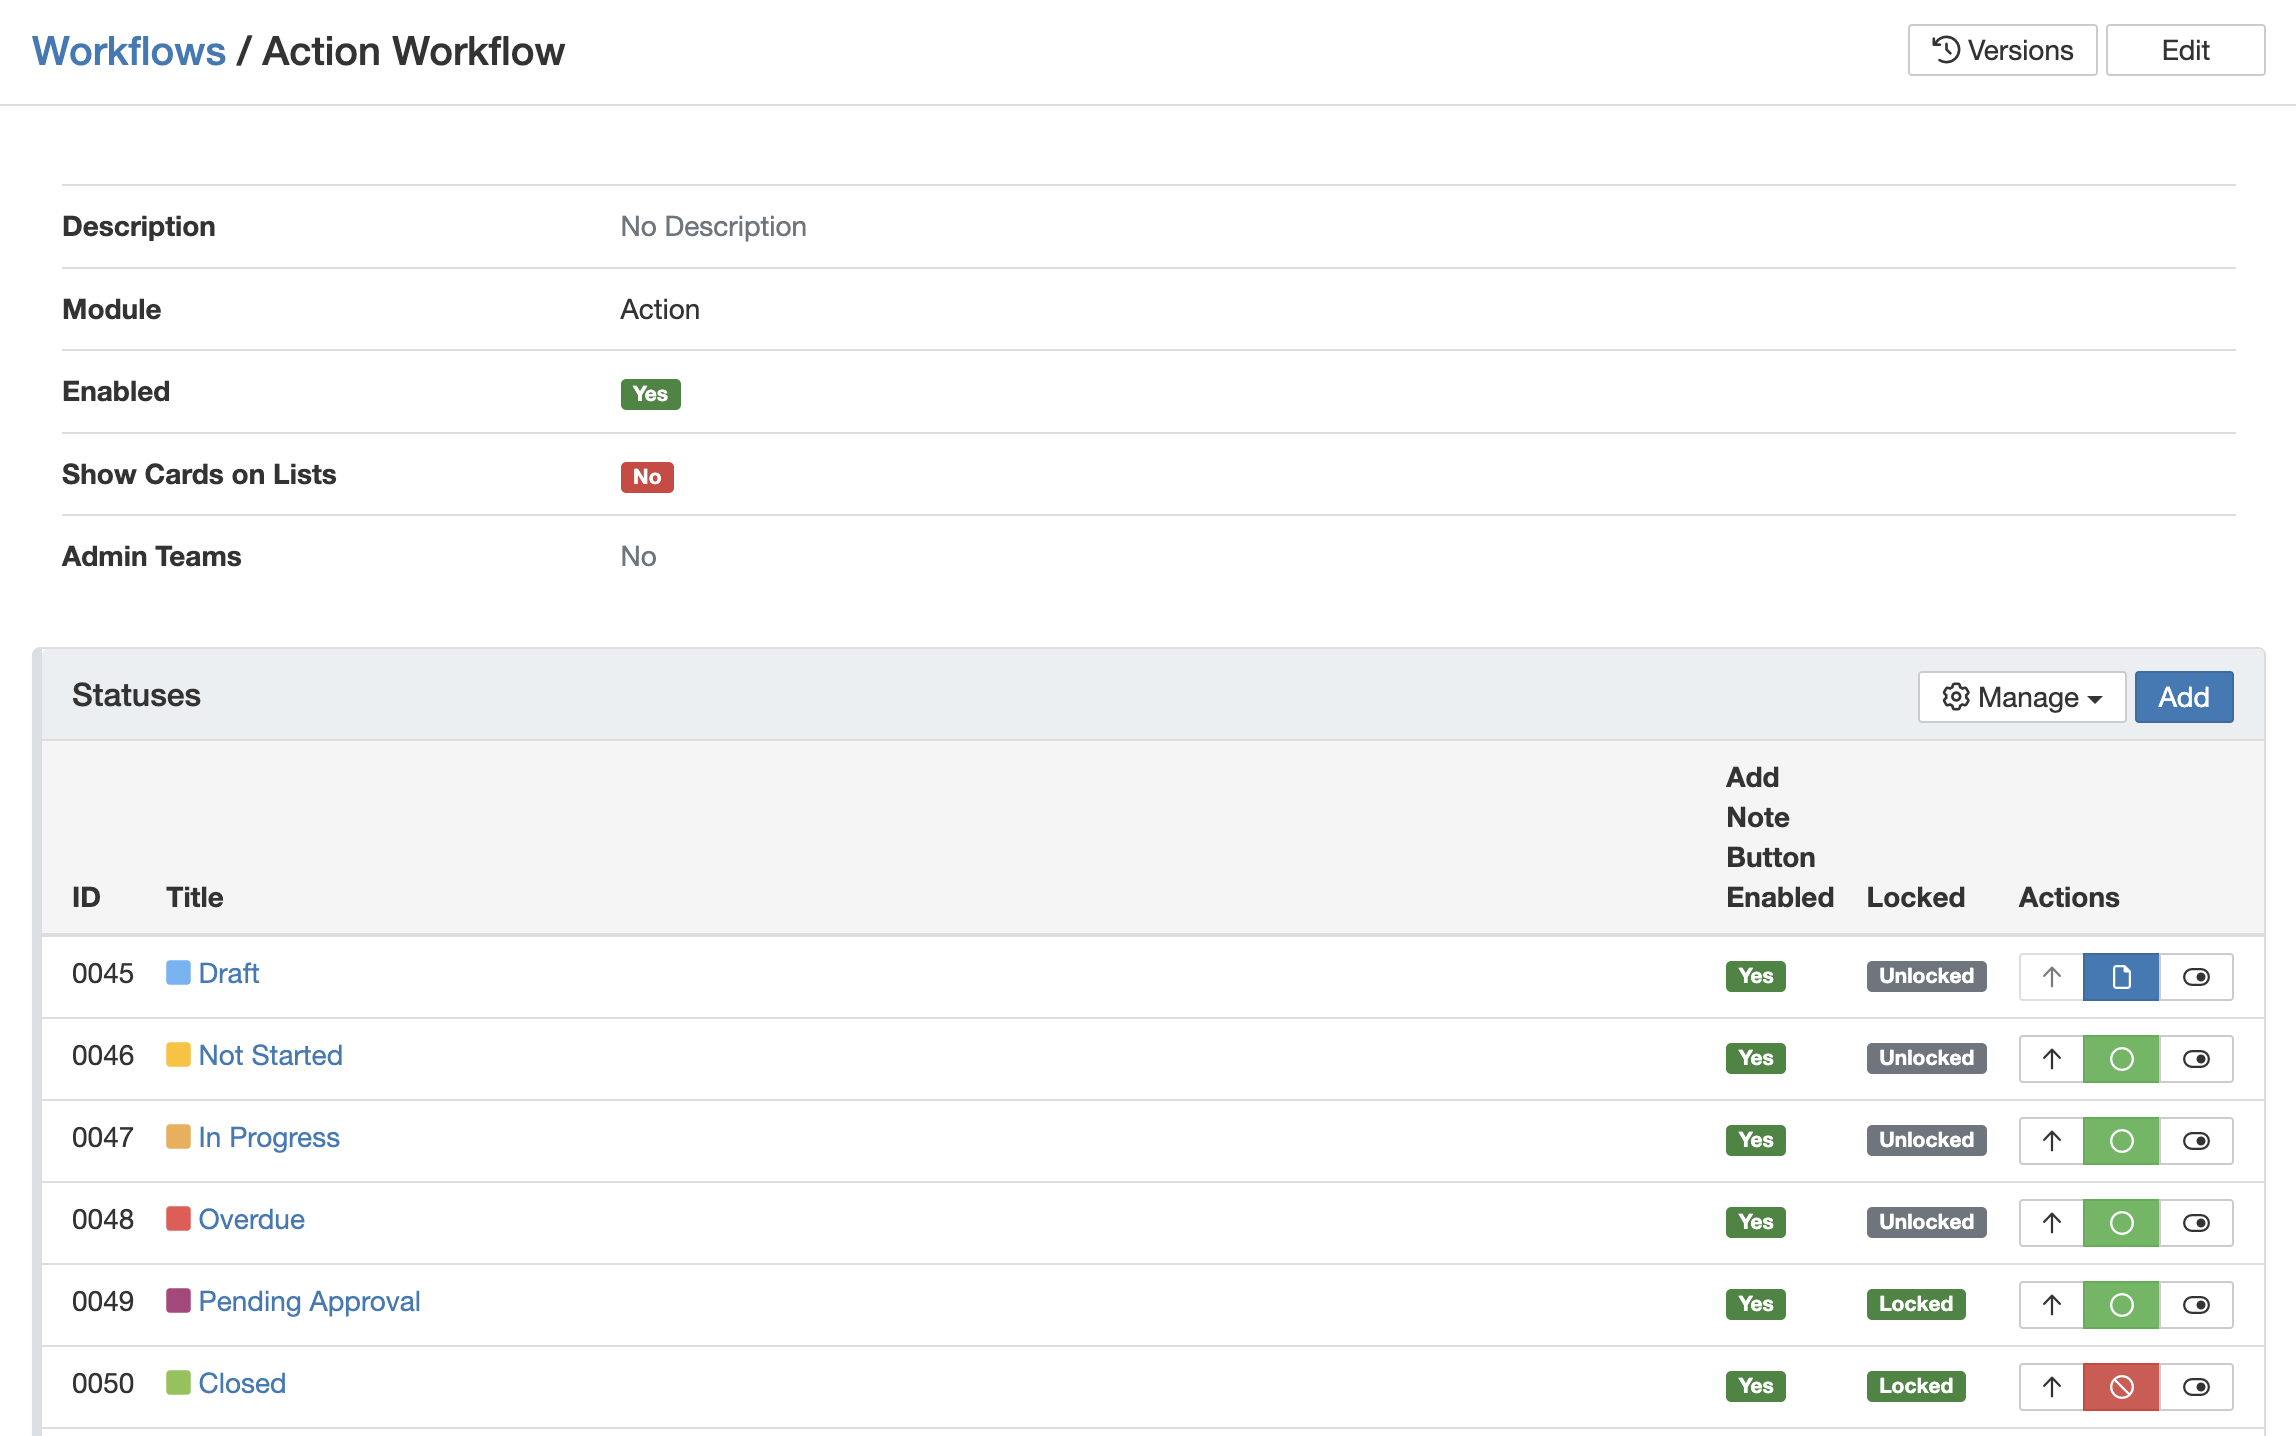
The Add Status form with all configurable fields including Add Note and Translations settings.
Status Sub-panel Features
Once statuses have been added, the Statuses sub-panel provides quick-access actions for managing them. The following actions are available directly from the status list.
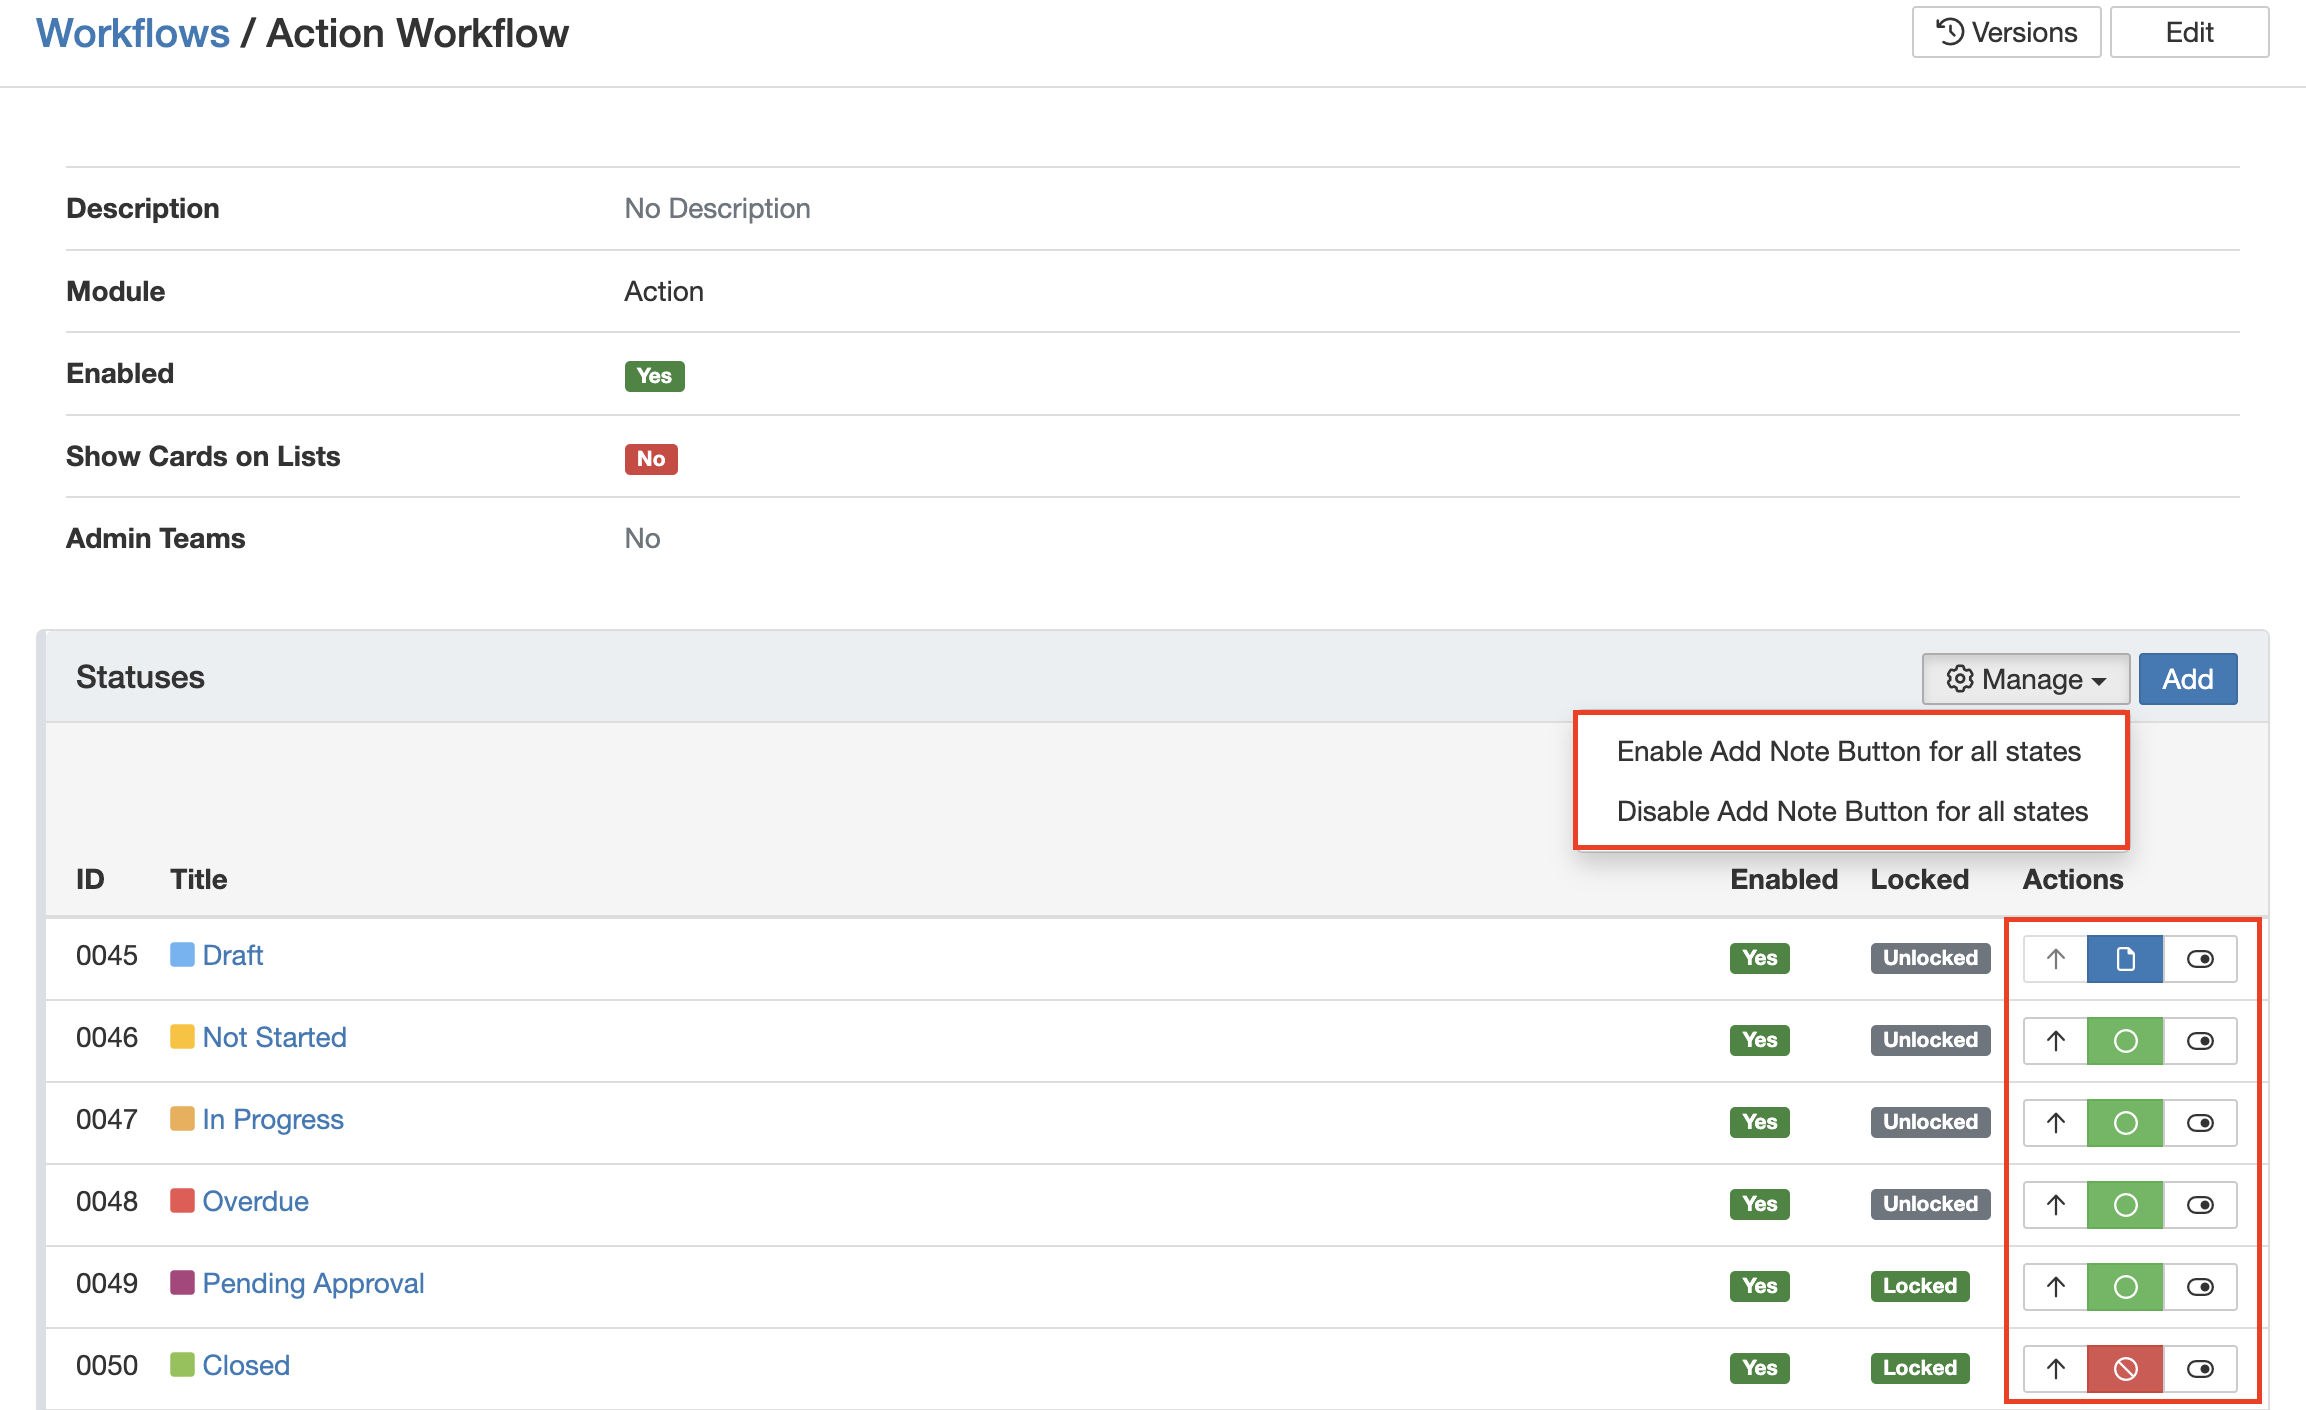
The Statuses sub-panel with quick-access management actions for each status.
- Reposition: The Clew Platform displays statuses in the same order they appear here. Click the arrow icon to the right of a status to reposition it within the sequence.
- Edit Status Type:Click the Status Type field to cycle it to the next value in the sequence: Draft, then Open, then Closed. Status types are displayed with colour-coded icons:
- Draft is denoted with a blue icon.
- Open is denoted with a yellow icon.
- Closed is denoted with a red icon.
- Deactivate Status: Temporarily disables a status without deleting it. Inactive statuses and their related transitions are hidden from users in record views. Records that were previously in the deactivated status will display as No status – Was [status name]. The status can be re-enabled at any time.
- Mass Edit Add Note Button: The Manage button enables bulk editing of the Add Note feature, allowing you to enable or disable the Add Note button across all statuses at once.
Admin Workflows List View Features
The following actions are available for each workflow via the action menu on the right of the list view.
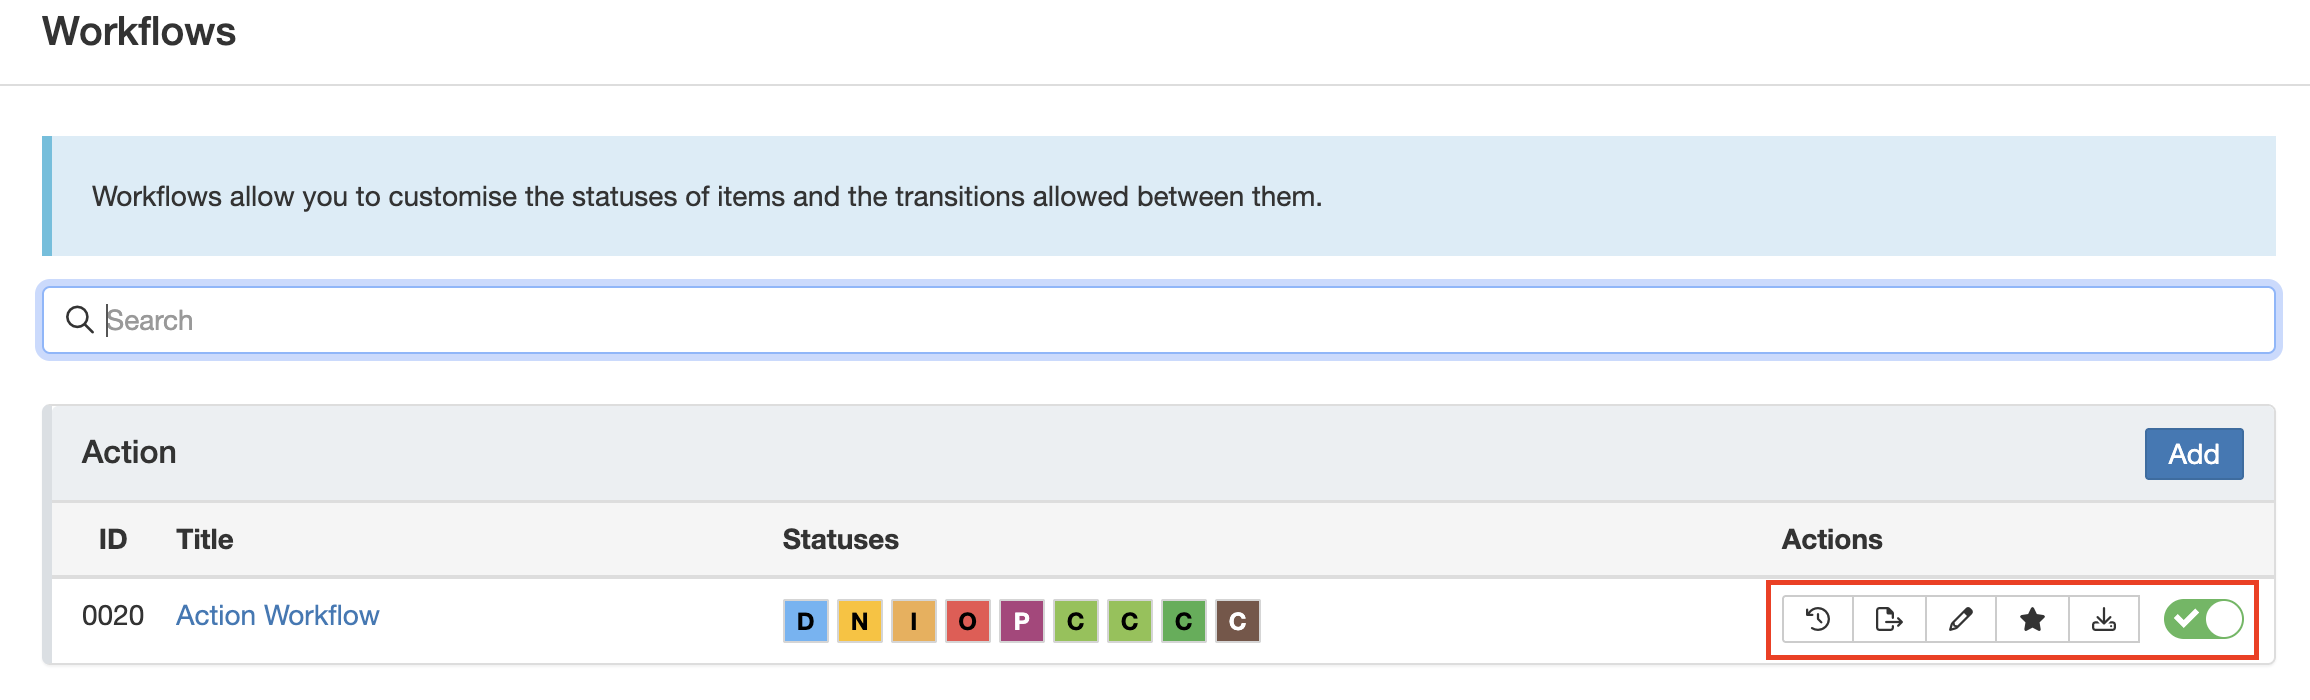
The Admin Workflows list view with the action menu open for a workflow.
- Versions: Displays a complete modification history for the workflow, including added, edited, or deleted statuses and transitions. Each entry shows the user who made the change and the timestamp.
- Export JSON: Exports the full workflow in JSON format. This file can be imported into another server to replicate the workflow configuration.
- Edit: Opens the Edit Workflow form, allowing you to modify the title, description, and other settings.
- Primary: Marks the workflow as primary. Once set as primary, it will be applied to all newly created records. Existing records retain their current workflow.
- Export CSV: Exports all workflow transitions along with their associated fields into a CSV file for review or reporting.
- Enabled: Toggles the workflow between active and inactive. When a workflow is disabled, the associated Status field is removed from list views, item views, and add/edit forms. Schema forms must be synchronised to reflect this change.
5. Common Issues & Troubleshooting
| Issue | Likely Cause | Solution |
| Record shows "No status – Was [name]" after a status was changed | The status the record was in has been deactivated | Re-enable the status in the Statuses sub-panel, or transition the record to a currently active status. |
| Workflow changes are not reflected in the list view after enabling or disabling a workflow | Schema forms have not been synchronised | Contact your Clew Administrator to synchronise the schema forms so the changes take effect. |
| A user cannot change the status of a record | The user does not have Update access, or the current status is Locked | Confirm the user has Update access via their Role or Security Group. If the record is Locked, it must first be transitioned to an unlocked status by an authorised user. |
| Email recipients are not receiving note notifications | The user's notification settings are disabled, or they lack Read access to the record | Check the user's notification preferences in their profile, and confirm they have Read access to the relevant records. |
| Add Note button is not visible on a record | The record is Locked, or Add Note Button Enabled is set to No for that status | Check the status configuration. Locked records do not display the Add Note button regardless of the setting. For unlocked records, confirm Add Note Button Enabled is set to Yes for the current status. |
Best practices:
- Plan your full status sequence before configuring transitions. Adding statuses out of order requires repositioning later.
- Use the Locked setting on final or approved statuses to prevent accidental edits once a record has been completed.
- Set exactly one workflow as Primary per module to ensure all new records are assigned the correct workflow automatically.
- Use Deactivate rather than deleting a status where possible. Deleting a status that records currently hold can cause data display issues.
- Test workflow changes in a non-production environment before applying them to live data.
Frequently Asked Questions
Only users with System Administrator permissions can create, modify, or configure statuses.
What is the difference between an Open and Closed status type?
Open statuses keep the record visible in list views and dropdowns, indicating ongoing activity. Closed statuses hide the record from active lists by default, unless the Show inactive filter is enabled.
What does the Locked setting do?
When a status is set to Locked, users cannot edit or delete the record in that status. However, the record can still be transitioned to another status if the workflow permits it.
Can users update the status of a record without Update access?
No. Update access is required for users to change the status of a record.
How do email notifications work with statuses?
You can use the Add Note functionality to define specific roles or users who receive email alerts when a record reaches a certain status or when a note is added. Notifications are only sent if the user's notification settings are enabled and they have Read access to the record.
What happens if I disable a status?
Disabling a status prevents it from being used going forward, but existing records that held that status will continue to display it as a historical status until it is manually changed.
Can a status have translated labels?
Yes. You can provide localised translations for each status. These override the default title and description in the interface for supported languages.
Can transitions between statuses be restricted?
Yes. Transitions can be configured to control which statuses can follow one another. Access to perform specific transitions can also be restricted based on roles, users, teams, or other conditions.
Click a title to preview it here. Use the Open full article button to read the full version in a new tab.
▾How to Configure Workflow Transitions Open full article »
Related article
Configure the transitions that move records between statuses, controlling the sequence records follow and who is allowed to perform each move.
▾Custom Types Open full article »
Related article
Create distinct record types within a module, each of which can carry its own workflow and statuses.
Was this article helpful?
That’s Great!
Thank you for your feedback
Sorry! We couldn't be helpful
Thank you for your feedback
Feedback sent
We appreciate your effort and will try to fix the article