Create a Tutorial
How to create context-based tutorials that give your users in-app guidance through the help menu
Contents
- 1. Introduction & Context
- 2. Key Features & Functions
- 3. Requirements
- 4. Step-by-Step Guide
- 5. Common Issues & Troubleshooting
- 6. Related Articles
1. Introduction & Context
Tutorials let you build in-app help articles that appear in the Clew Platform help menu, so your users get relevant guidance on the exact page they are working on. You can use them to explain the platform itself or your own business context and rules, such as your risk framework or your approvals process.
Who is it for? System administrators create tutorials. All users can view them, no admin access is needed to read a tutorial.
What does it impact? Tutorials only add help content to the platform. They do not change any records, workflows, or data. Users see them by clicking the ? help button in the interface.
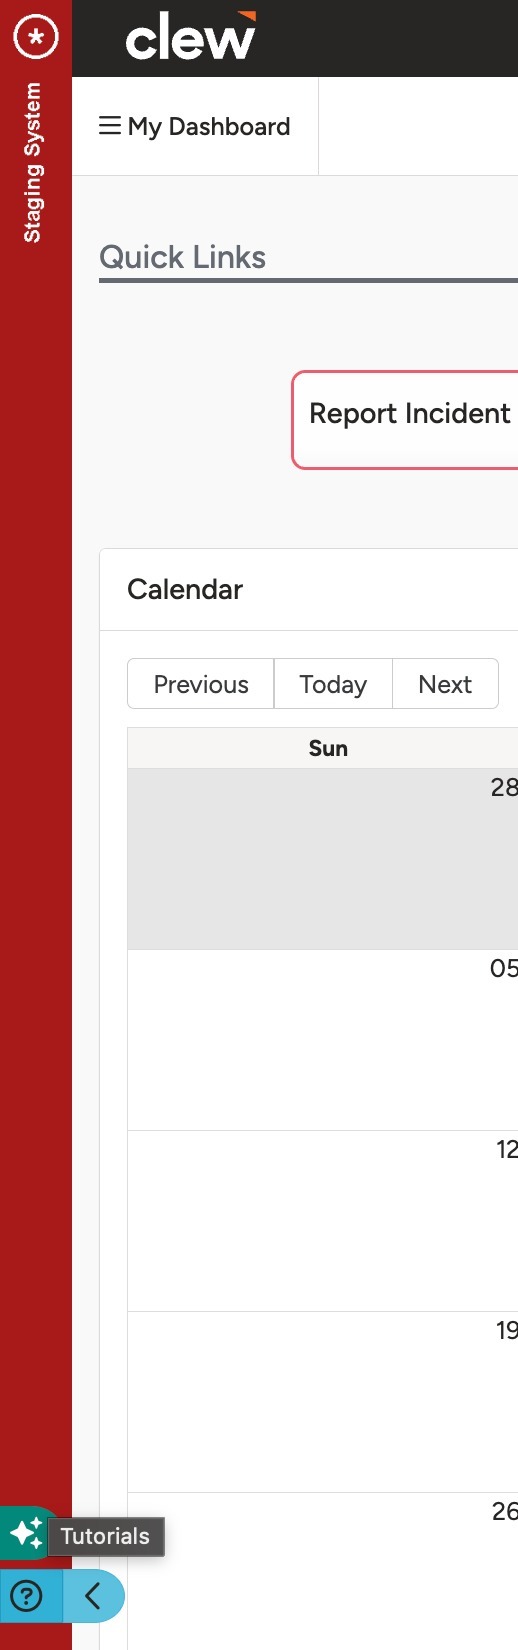
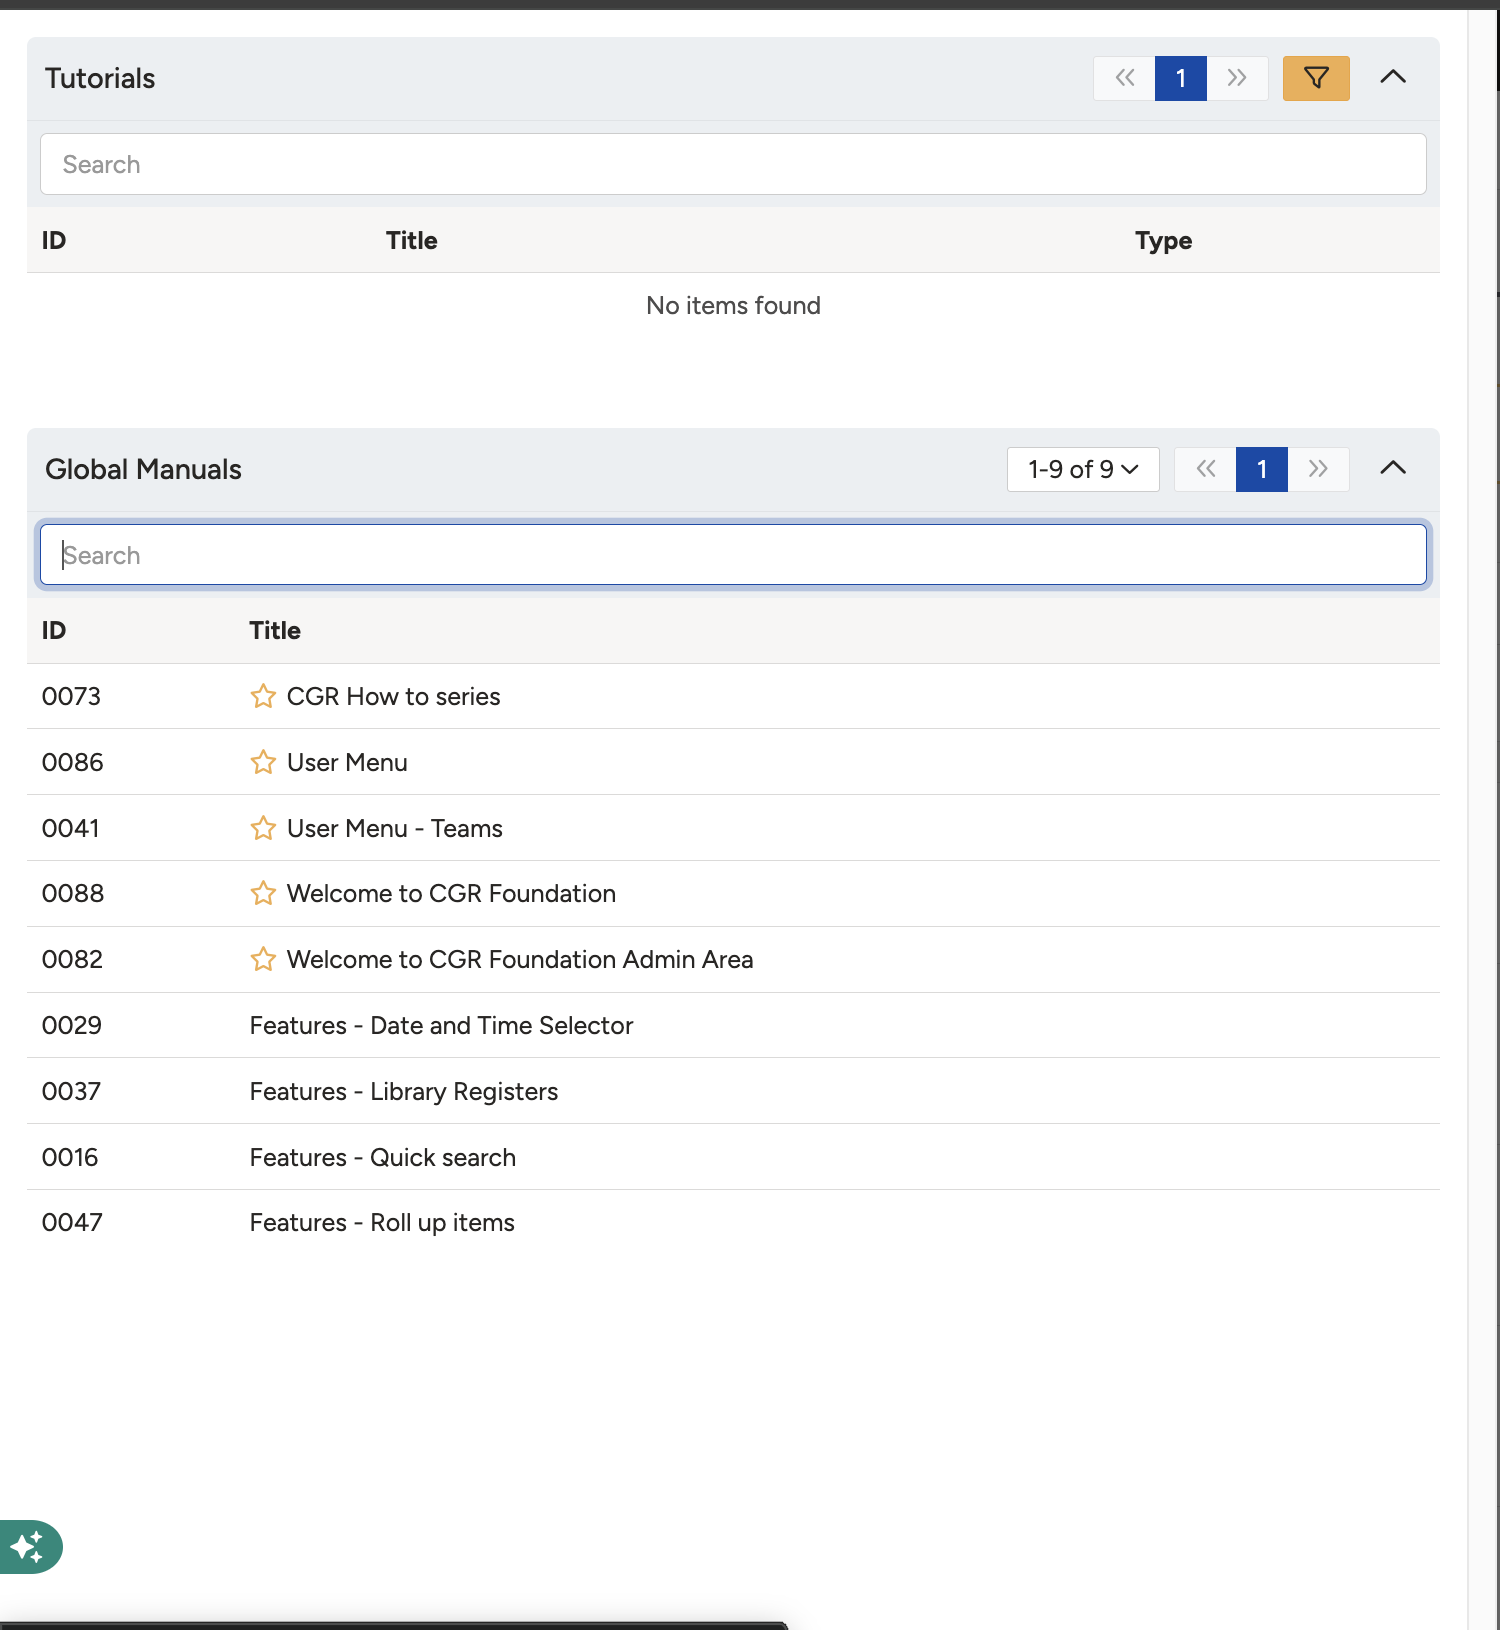
The ? help button opens the help menu on any page, with its two sections: Tutorials and Manuals.
2. Key Features & Functions
- Context-based display: tutorials are linked to specific pages or modules. As a user navigates around the platform, the ? help button shows only the tutorials relevant to the page they are on, so users are never presented with unrelated content.
- Two help menu sections: the help menu is divided into Tutorials and Manuals. Tutorials are created by your own system administrators. Manuals are created and managed by Clew only.
- Search key phrases: key phrases surface your tutorial in search results, showing all matching tutorials rather than only those linked to the current page.
- Categories: categories create a hierarchical structure of parent and child articles. The Special category is treated as starred for all users, and those tutorials appear first in the help menu.
- Rich content editor: a free text editor lets you customise fonts, adjust the layout, and insert images, with a built-in preview.
3. Requirements
- You must be an admin user to create a tutorial.
- You do not need to be an admin user to view a tutorial. Any user can open the ? help menu.
- Tutorials only appear on the pages or modules you link them to, so decide where your tutorial should show before you start.
4. Step-by-Step Guide
Open the Tutorials Admin Page
- Navigate to Admin > Tutorials. This displays a list of all existing tutorials, if any.
- Click Add to start a new tutorial.
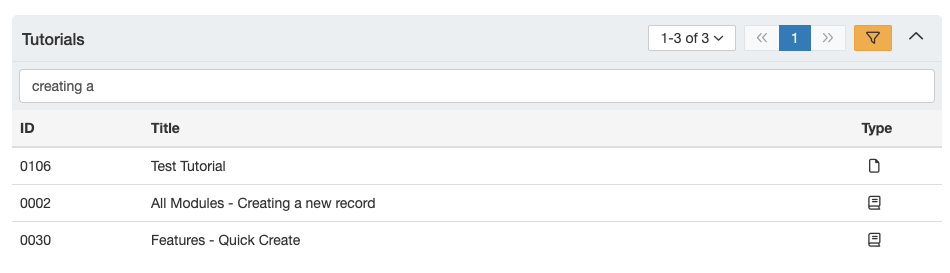
The Tutorials list under Admin > Tutorials, with the Add button.
Complete the Core Form
The tutorial form is divided into two sections: Core and Page Linking. Complete the Core form first. Each field is described below.
| Field | Description |
| Title | The name of your tutorial. This is the name users see when they open the tutorial help menu. |
| Key Phrases | Key phrases help surface your tutorial in search results by showing all matching tutorials, rather than only those directly linked to the current page. |
| Category | A tag used to create a hierarchical structure of parent and child articles, or Special. Special tutorials are treated as starred for all users and appear first in the help menu. |
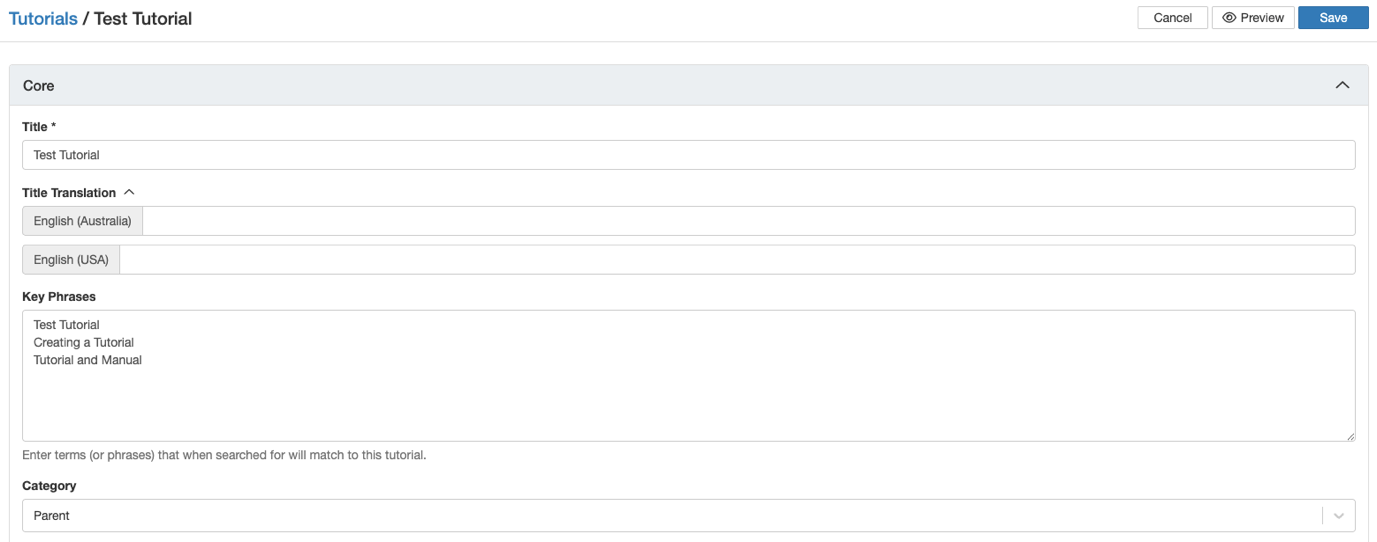
The Core form with the Title, Key Phrases, and Category fields.
Complete the Page Linking Form
The Page Linking form controls where your tutorial appears in the platform. You customise this using dropdown fields: Page Linkage Type, Page, Modules, and Custom Types.
- Select a Page Linkage Type. Based on your selection, an additional dropdown appears so you can specify the linkage further. The three options are described below.
| Page Linkage Type | Description |
| Through modules and/or custom types | Links your tutorial to specific modules or custom types, for example Risk or Opportunity. When those modules or custom types are in use, the tutorial appears under the help icon. |
| Through admin controller page | The tutorial appears on a specific page in the Admin section. |
| Through controller | A more advanced option that makes the tutorial available on more general pages, for example the Dashboard or My Items. |
- Select a Pageto choose the specific view where the tutorial shows for a given module:
- List: the list view, where many records are shown in a table.
- Show: the detailed view of a single record.
- Create: when creating a record.
- Edit: when editing a record.
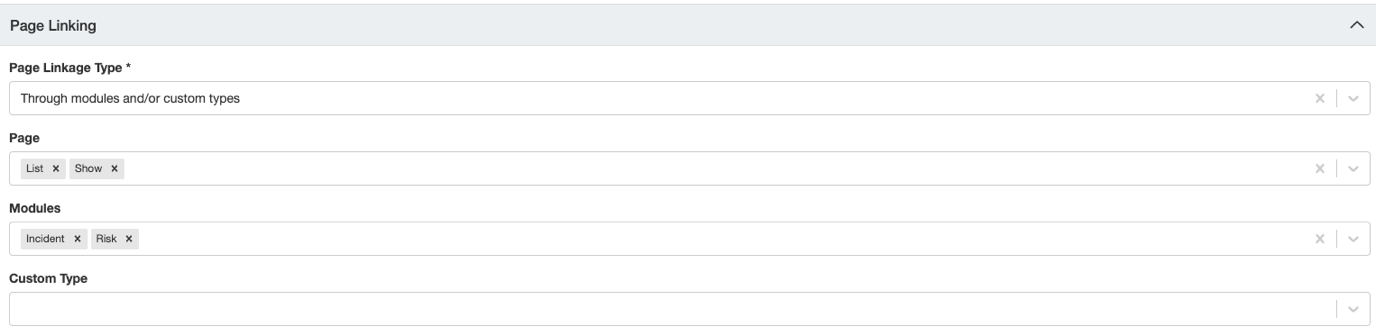
The Page Linking form with its dropdown fields.
Example: to show a tutorial explaining your risk assessment process whenever someone creates a new risk, set the Page Linkage Type to Through modules and/or custom types, choose the Risk module, and set the Page to Create. The tutorial then appears under the ? help button on the new risk form.
Write and Preview Your Content
- Use the free text area below the forms to write your article. You can customise the font, adjust the layout, and insert images as needed to enhance the content.
- To review your tutorial, click the eye icon in the top left corner to preview it.
The content editor, with the preview eye icon in the top left corner.
5. Common Issues & Troubleshooting
| Issue | Likely Cause | Solution |
| The tutorial does not appear on the page you linked it to | Changes to the Page Linkage Type made after the tutorial was first created may not always be processed correctly | Create a new tutorial, configure it with the correct linkage settings from the start, then copy and paste the content from the original |
| You cannot see Admin > Tutorials | Your account does not have admin permissions | Ask your system administrator to create the tutorial or to grant you admin access |
| The tutorial does not show in search results | No key phrases have been set, so the tutorial only appears on its directly linked pages | Add Key Phrases to the Core form using the terms your users are likely to search for |
Best practices:
- Decide where the tutorial should appear before creating it, and set the correct Page Linkage Type from the start.
- Give each tutorial a clear, descriptive Title, as this is what users see in the help menu.
- Use the Special category sparingly, reserving it for the tutorials every user should see first.
- Preview your tutorial with the eye icon before saving, to check the layout and images display as intended.
Click a title to preview it here. Use the Open full article button to read the full version in a new tab.
▾Administration - Configuration Open full article »
Related section
Browse the Administration and Configuration articles covering how to set up and manage the admin area settings of the Clew Platform.
Was this article helpful?
That’s Great!
Thank you for your feedback
Sorry! We couldn't be helpful
Thank you for your feedback
Feedback sent
We appreciate your effort and will try to fix the article