Custom Fields
How to create, configure, and manage custom fields across modules in the Clew Platform
Contents
- 1. Introduction & Context
- 2. Key Features & Functions
- 3. Requirements
- 4. Step-by-Step Guide
- 5. Common Issues & Troubleshooting
- 6. Related Articles
1. Introduction & Context
Custom Fields let you extend the data your team captures on records in the Clew Platform by adding tailored fields to specific modules and custom types, so each form only shows the fields that are relevant for that record.
For example, you can configure a custom field to appear on Audit Action records but not on Treatment Action records. Once created, a field can be displayed across the New Form, Edit Form, Mass Edit Form, Show View, and Mobile View, depending on the visibility options you select during configuration.
Who is this for? System administrators who manage module configuration and form layouts in the Clew Platform.
What does it impact? Creating or editing a custom field changes what fields appear on forms for the affected module and custom types. Disabling a field removes it from all forms but does not delete data that has already been entered.
2. Key Features & Functions
- Per-module configuration: Custom fields are created at the module level, so fields for one module do not appear in others.
- Custom type scoping: Enable a field for specific custom types within a module so it appears only where relevant. A field can be active for Audit Actions but hidden for Treatment Actions.
- Flexible visibility controls: Choose independently whether a field appears on the New Form, Edit Form, Mass Edit Form, Show View, and Mobile View for each custom type.
- 16 field types: Choose from Boolean, Custom Matrix, Date, DateTime, Decimal, Item Lookup, Lookup, Number, Body Parts, URL, Email Address, Heading, HTML, Percent, Phone Number, Text, and Textarea.
- Lookup options management: After saving a Lookup field, add and manage its selectable values via the Lookup Options sub-panel on the field record.
- Compliance lookup: Lookup fields can be marked as compliance lookups and applied to audit templates, enabling a broader range of outcome options in compliance summary tables.
- Report filter integration: Fields can be made visible in report filters so they are available when generating reports for the module.
3. Requirements
- System administrator access is required to create, edit, or disable custom fields via the Admin area.
- For Lookup fields, lookup options must be added via the Lookup Options sub-panel after the field is saved before users can select any values.
- For Custom Matrix fields, a matrix must already be configured in Admin before it can be selected as a field type.
- For Item Lookup fields, the items you want to link (for example, Risk records) must already exist in the system.
- Images used in the Info Image (System Image) help configuration must be uploaded to Admin > Images before they appear in the selection list.
4. Step-by-Step Guide
Creating a New Custom Field
- Navigate to Admin > Custom Fields. Click your name at the top to open Admin, then find Custom Fields in the left sidebar or using the search bar. The page shows all existing custom fields grouped by module.
- Click Add on the panel for the module you want to add the field to.
- Complete the Custom Field form. Use the Field Configuration Reference table below for guidance on each setting.
- Click Save to create the custom field.
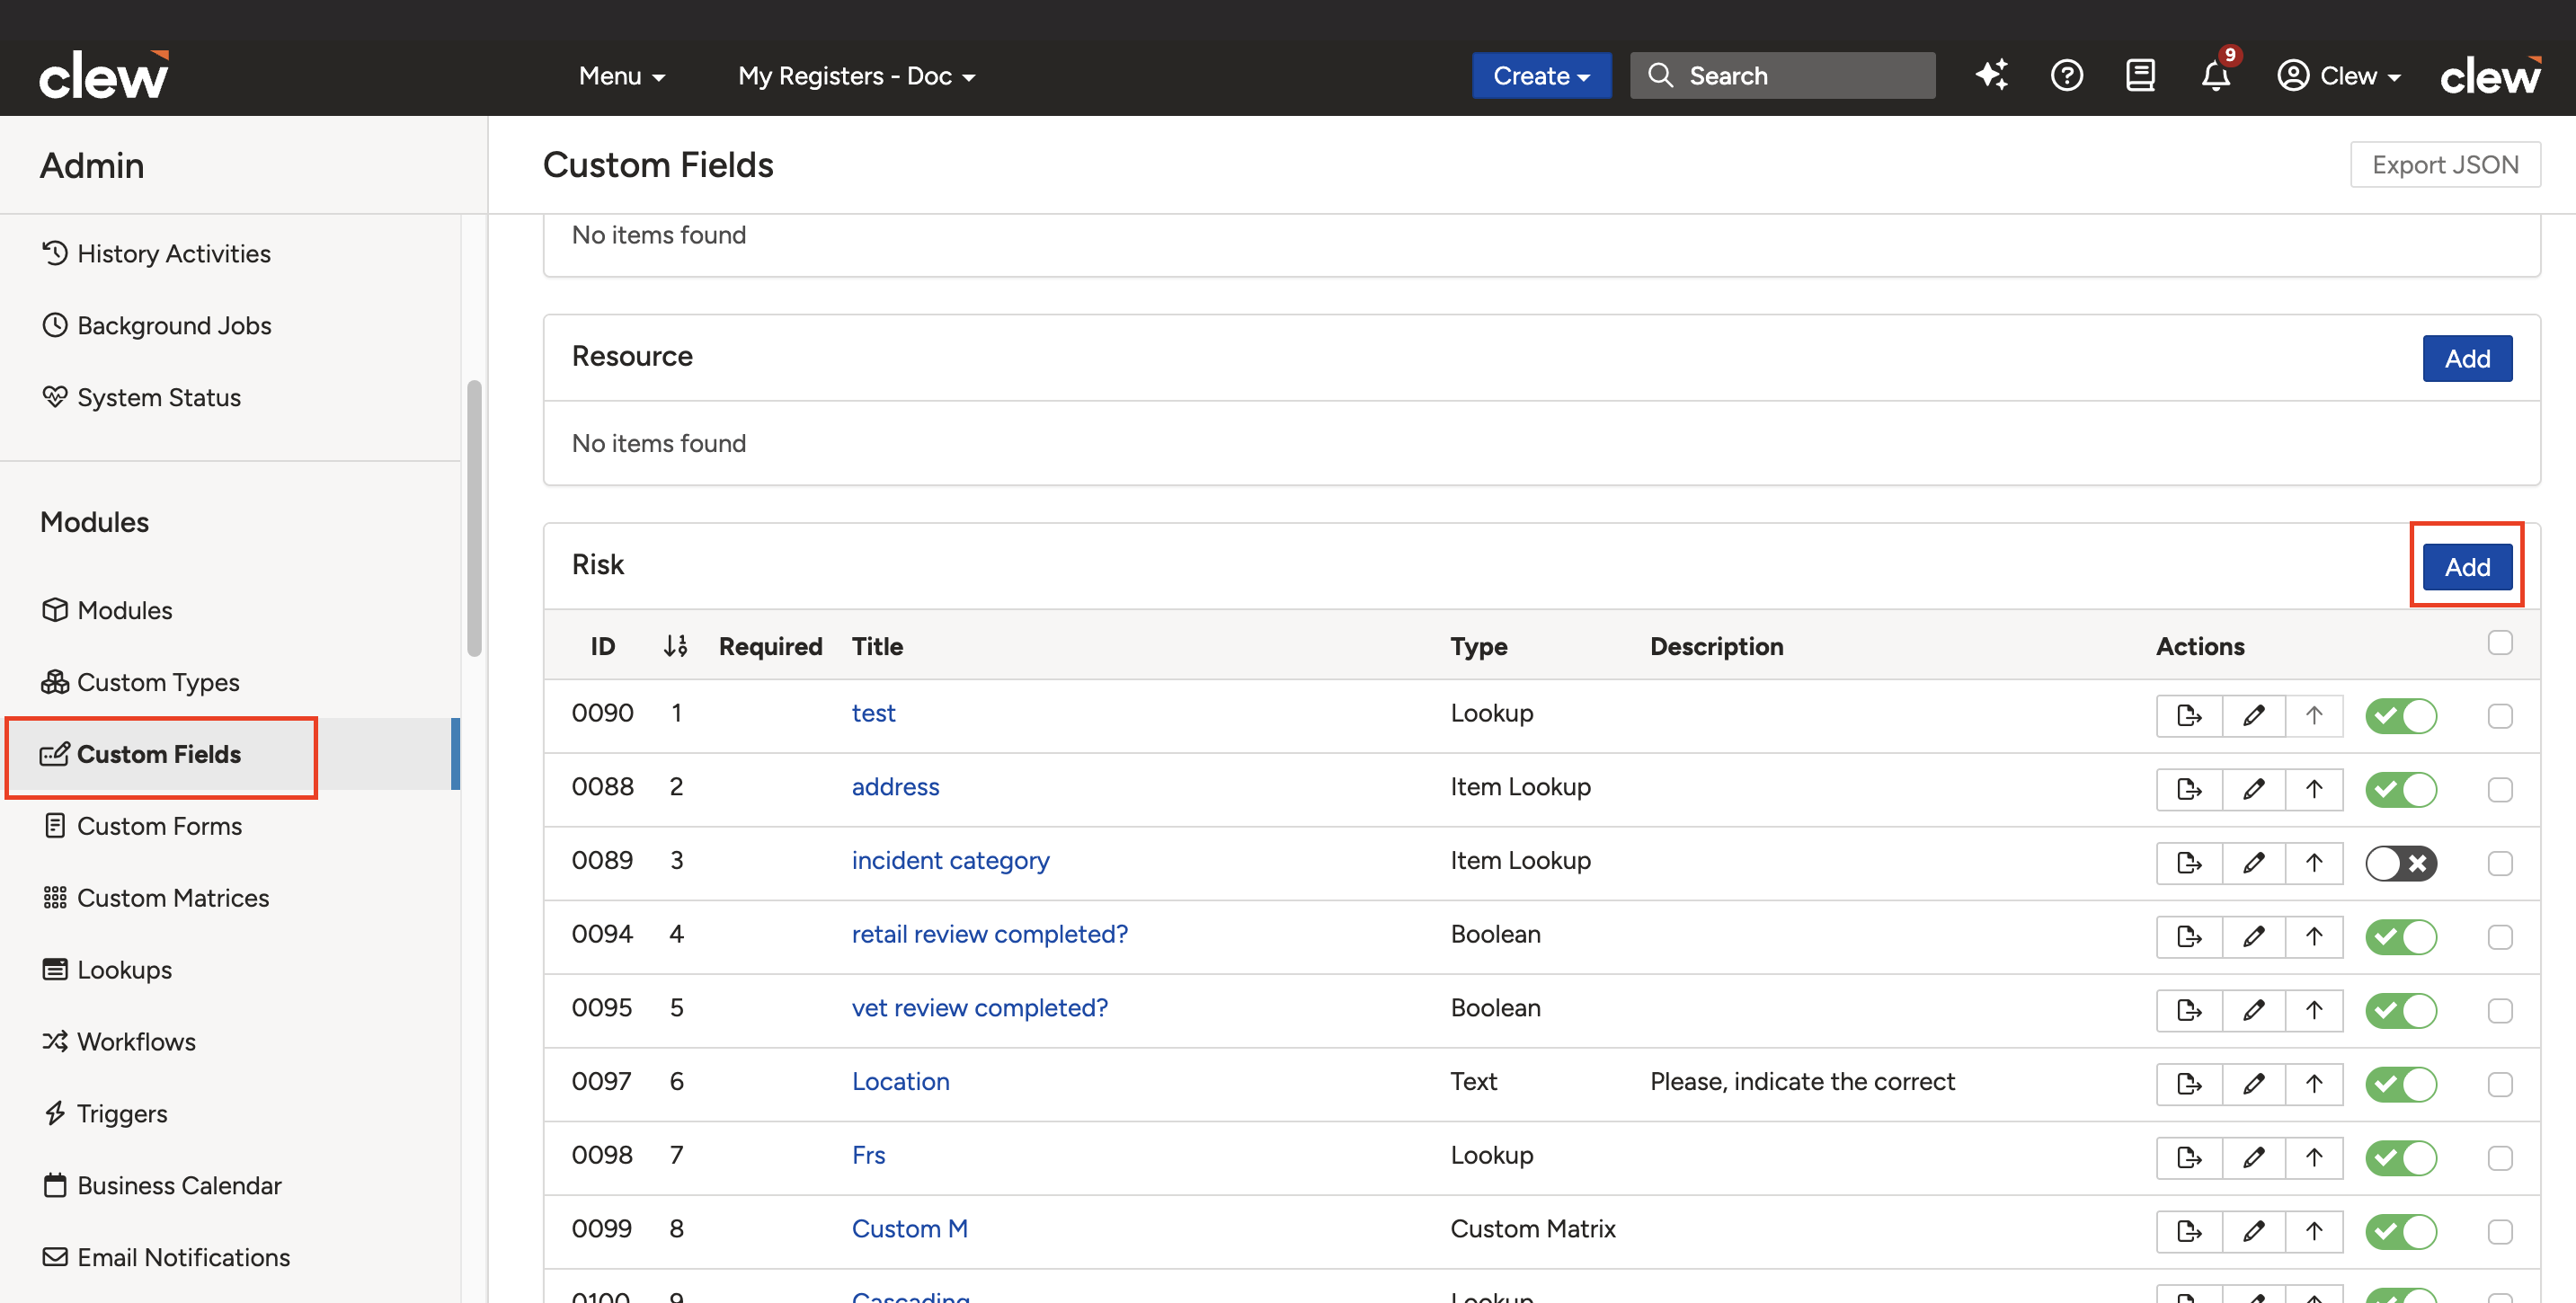
The Custom Fields admin page showing module panels with the Add button highlighted.
Field Configuration Reference
The Custom Field form is divided into four groups of settings.
| Field | Description |
| Field Configuration | |
| Title | Enter a brief name for the field. This is the label displayed to end users on forms, and the name you use to find the field in Admin if you need to edit it later. |
| Description | Optional. Enter a description to display just below the field title for end users. Plain text only. |
| Type | Select the field type (for example, Text, Lookup, Date). Each type is described in the Field Type Reference section below. Type is locked after saving, with one exception (see Editing section). |
| Help Configuration | |
| Info Image (System Image) | Select an image from the system to display as help content alongside the field. Images must be uploaded to Admin > Images before they appear in this list. |
| Info Image URL | Enter the URL of an external image to display as help content alongside the field. |
| Hint Text | Short guidance text that appears below the field in a lighter colour to assist users during data entry. |
| Properties | |
| Required | Set to Yes if the field must be completed before a record can be saved. Default is No. |
| Sortable | Leave as Yes to allow users to sort list views by this field. Default is Yes. |
| Visible on Lists | Set to Yes to display this field as a column in list views. Default is No. |
| Visible on Report Filters | Set to Yes to make this field available as a filter when generating reports for this module. |
| Custom Type Settings | |
| Enable | Tick the box next to each custom type where this field should be active. For example, tick Audit Action to show the field on Audit Action records only. |
| Visibility Settings | For each enabled custom type, choose where the field appears. Options are: Visible on New Form, Visible on Edit Form, Visible on Mass Edit Form, Visible on Show View, and Visible on Mobile. |
Field Type Reference
Certain field types have additional configuration options that appear in the form when that type is selected. The table below describes each type and any special settings.
| Type | Description | Special Settings |
| Boolean | A true/false field representing binary states such as Yes/No or On/Off. | Display as: Choose how the field renders (default: Lookup). False Label: Customise the label shown when the value is false (default: No). True Label: Customise the label shown when the value is true (default: Yes). |
| Custom Matrix | A matrix-based field that lets users select from a grid of values instead of a simple dropdown. | Custom Matrix: Select a predefined matrix from existing matrices in Admin. Number of Cells That May Be Selected: Set how many cells a user can select (default: One cell). |
| Date / DateTime | A Date field stores a calendar date, for example 11/12/2025. A DateTime field also captures time, for example 11/12/2025 10:30. Use DateTime when capturing a specific moment such as an incident occurrence. | Show Overdue Label: Set to Yes to display an overdue label when the date has passed (default: No). Past Dates Only: Restrict the calendar picker to past dates, future dates, or all dates (default: All dates). |
| Decimal | Stores numbers with fractional parts. Example: 19.99. Use for values requiring decimal precision. | Decimal Places: Specify how many decimal places the field should support. |
| Item Lookup | Links to items that already exist in the system, such as a Risk record linked from the Incidents module. | Multi-Select Lookup: Set to Yes to allow users to link multiple items (default: No). |
| Lookup | A dropdown field that lets users select from a predefined list of options, such as Risk Type or Control Effectiveness. Options are managed via the Lookup Options sub-panel after saving. | Scoped Lookup: Set to Yes to limit options based on team or group. Multi-Select Lookup: Allow selection of multiple options (default: No). Dynamic Lookup: Allow users to add new options directly from the field (default: No). Compliance Lookup: Mark this lookup for use on audit templates to display outcome options in compliance summary tables. |
| Number | Stores whole numeric values without decimal precision, such as integers or counts. | Format Number: Set to Yes to display large numbers with comma separators for readability, for example 123,456,789 (default: No). |
| Body Parts | An interactive body diagram that lets users indicate which part of the body was affected during an event. Typically used in the Incidents module. | No additional settings. |
| URL | Captures and stores a web address. Example: https://example.com | No additional settings. |
| Email Address | Captures a valid email address. Example: contact@example.com | No additional settings. |
| Heading | A non-data field used as a visual section label above a group of related fields on the form. Example: "Reporter's Details". | No additional settings. |
| HTML | Used to display content brought in via integrations, such as the Lexis Nexis Integration. | No additional settings. |
| Percent | Captures a numeric value representing a percentage. Used for ratios, progress, grades, or statistical data. Example: 99%. | No additional settings. |
| Phone Number | Captures a phone number, typically in numeric format including country or area codes. Example: +61456782456. | No additional settings. |
| Text | A single-line plain text field supporting up to 255 characters. Suitable for names, titles, usernames, or short values. | Can be converted to Textarea after saving (see Editing section). Conversion back to Text is not supported. |
| Textarea | A multi-line text field supporting up to 20,000 characters. Use for comments, descriptions, notes, or longer text content. | No additional settings. |
Editing an Existing Custom Field
- Navigate to Admin > Custom Fields.
- Use the search box at the top of the list to locate the field you want to change.
- Click the Edit icon (pencil) in that row to open the field settings.
- Make your changes and click Save.
Converting a field type
Once a field type has been saved, it generally cannot be changed. If you need a different type, disable the existing field and create a new one with the correct type.
Exception: A Text field (up to 255 characters) can be converted to a Textarea field (up to 20,000 characters) by editing the field and changing the type. Conversion back from Textarea to Text is not supported.
Disabling a Custom Field
You can disable a field for a specific custom type only, or turn it off across the entire platform.
To disable for a specific custom type:
- Click the Edit icon (pencil) for the custom field.
- In the Custom Type Settings section, untick the Enable checkbox next to the relevant custom type.
- Click Save.
To disable across the entire platform:
- Locate the custom field in the list.
- Click the toggle switch in that row to disable the field globally.
5. Common Issues & Troubleshooting
| Issue | Likely Cause | Solution |
| Custom field is not visible on the form | The field is not enabled for the current custom type, or the relevant visibility option is not ticked. | Edit the field. In Custom Type Settings, confirm the Enable box is ticked for the relevant custom type and the correct visibility options are selected (for example, Visible on New Form or Visible on Edit Form). |
| A default lookup option is not appearing on the Add Item form | The field is not enabled for the current custom type, or Visible on New Form is not selected. | Check the field's Custom Type Settings. Confirm the relevant custom type is enabled and Visible on New Form is ticked. |
| A lookup option is not appearing in the dropdown | The option may be scoped to a different custom type, or it has not been added to the Lookup Options sub-panel. | Click the field title to open the field record. Check the Lookup Options sub-panel to confirm the option exists and is active. If Scoped Lookup is enabled, review the scope settings. |
| A lookup option is visible but cannot be selected | The option is set to read-only in its lookup option settings. | Open the lookup option record and check whether a read-only restriction is applied. Remove it if appropriate. |
| Cannot change the field type after saving | Field types are locked after saving, with one exception. | Disable the existing field and create a new one with the correct type. If converting from Text to Textarea, this is supported directly in the Edit form. |
| Dynamic Lookup is creating duplicate options | Users are adding new options without checking for existing entries first. | Consider disabling Dynamic Lookup and managing all options centrally via the Lookup Options sub-panel in Admin. |
| The field description format cannot be changed | The Description field only supports plain text. | The description appears below the field title on forms and is plain text only. Rich formatting such as bold or links is not supported in this field. |
Best practices:
- Before disabling a custom field, confirm it is not used in any active report filters, dashboards, or required form configurations.
- Use Hint Text to add brief guidance for fields with specific formatting requirements, such as phone numbers or dates.
- Manage lookup options centrally via the Lookup Options sub-panel rather than enabling Dynamic Lookup, to prevent duplicate or inconsistent entries across records.
- Use the Heading field type to group related custom fields visually on longer forms, improving clarity for end users.
- If a compliance lookup is needed, plan the lookup options carefully before enabling the field on audit templates, as changes to lookup values can affect compliance summary reporting.
Click a title to preview it here. Use the Open full article button to read the full version in a new tab.
▾Custom Types Open full article »
Related article
Create distinct forms within a module, each with its own fields and workflow, and enable the sub-panels and custom fields that appear on each record type.
Was this article helpful?
That’s Great!
Thank you for your feedback
Sorry! We couldn't be helpful
Thank you for your feedback
Feedback sent
We appreciate your effort and will try to fix the article