Risk Bowtie CSV Import
How to build complete bowtie risks in bulk from a CSV file
Contents
- 1. Introduction & Context
- 2. Key Features & Functions
- 3. Requirements
- 4. Step-by-Step Guide
- 5. Common Issues & Troubleshooting
- 6. Related Articles
1. Introduction & Context
The Risk Bowtie CSV Import lets you create complete bowtie risks in bulk from a spreadsheet, so you can move a workshop output or an existing register into Clew in one upload instead of building each risk by hand.
A bowtie sets out a risk with its causes on one side and its consequences on the other. Preventing controls sit under each cause, mitigating controls sit under each consequence, and actions sit against the risk itself. The import builds all of that in a single pass: the risk, its causes, its preventing controls, its consequences, its mitigating controls, its actions, and its ratings.
Who is it for? Risk owners, risk coordinators, and system administrators who need to load a number of risks at once, for example after a risk workshop, during an initial data migration, or when adopting a new register.
What does it impact? The import creates new risk records and everything attached to them. It runs as a single all-or-nothing operation, so either every row in the file is valid and all of the risks are created, or nothing is created at all.
2. Key Features & Functions
- Builds the full bowtie in one upload: risk, causes, preventing controls, consequences, mitigating controls, actions, and ratings all come from the same file.
- Creates new risks only: there is no update mode. Existing risks are never changed by this import.
- Template download: you can download a ready-made template, either empty with sample rows to overwrite, or pre-filled with risks you have selected.
- Structure comes from the columns, not the layout: the import works out what each row means from which columns have a value in it, so you do not need to indent or group anything.
- Not limited to the template columns: you can add a column for any active field on a risk, an action, or a control. Custom fields can be imported on the risk itself.
- Date format control: dates are detected automatically, or you can set the format yourself before uploading.
- All-or-nothing import: one bad row stops the whole file, so you never end up with a half-loaded register.
- Full error report: if the import fails, you get a table listing every error with its row, its column, and a message, so you can fix them all before re-uploading.
3. Requirements
Both of the following must be true before you can use the import. If either is missing, the import is blocked before your file is read.
- The feature is switched on for your team. An administrator enables Enable Risk Bowtie CSV Imports in your team's admin settings. It is switched off by default.
- You have permission to create risks. If you cannot create a risk manually, you cannot create one through the import.
- A CSV file. A comma separated values file, saved from any spreadsheet application. A plain text file with commas between the values also works.
There is no single fixed list of required columns that applies to everyone. Which fields are required depends on how your organisation has configured risks, including any custom fields and custom risk types. Title is always needed, because it is the column that starts each risk.
4. Step-by-Step Guide
Download the template
Always start from a fresh template. It carries the exact column names the system reads, which saves you from the most common import errors.
- Open your risk list view, or open a single risk.
- Open the menu that holds the CSV and PDF export options. The import options sit in the same menu.
- Click Download Template.
- If you had risks selected when you downloaded, those risks are already filled in and you can use them as a worked example. If nothing was selected, the file contains sample rows that you can overwrite.
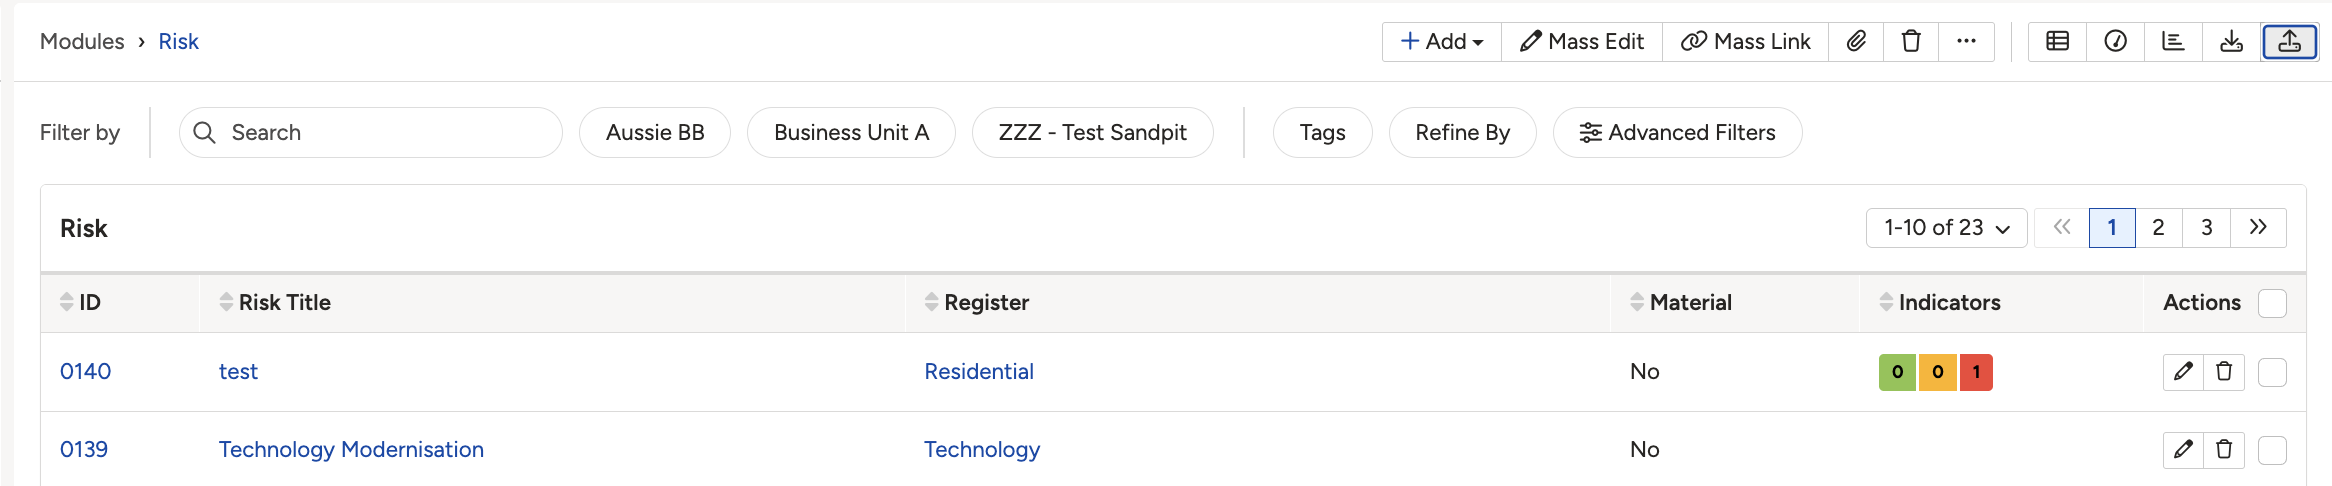
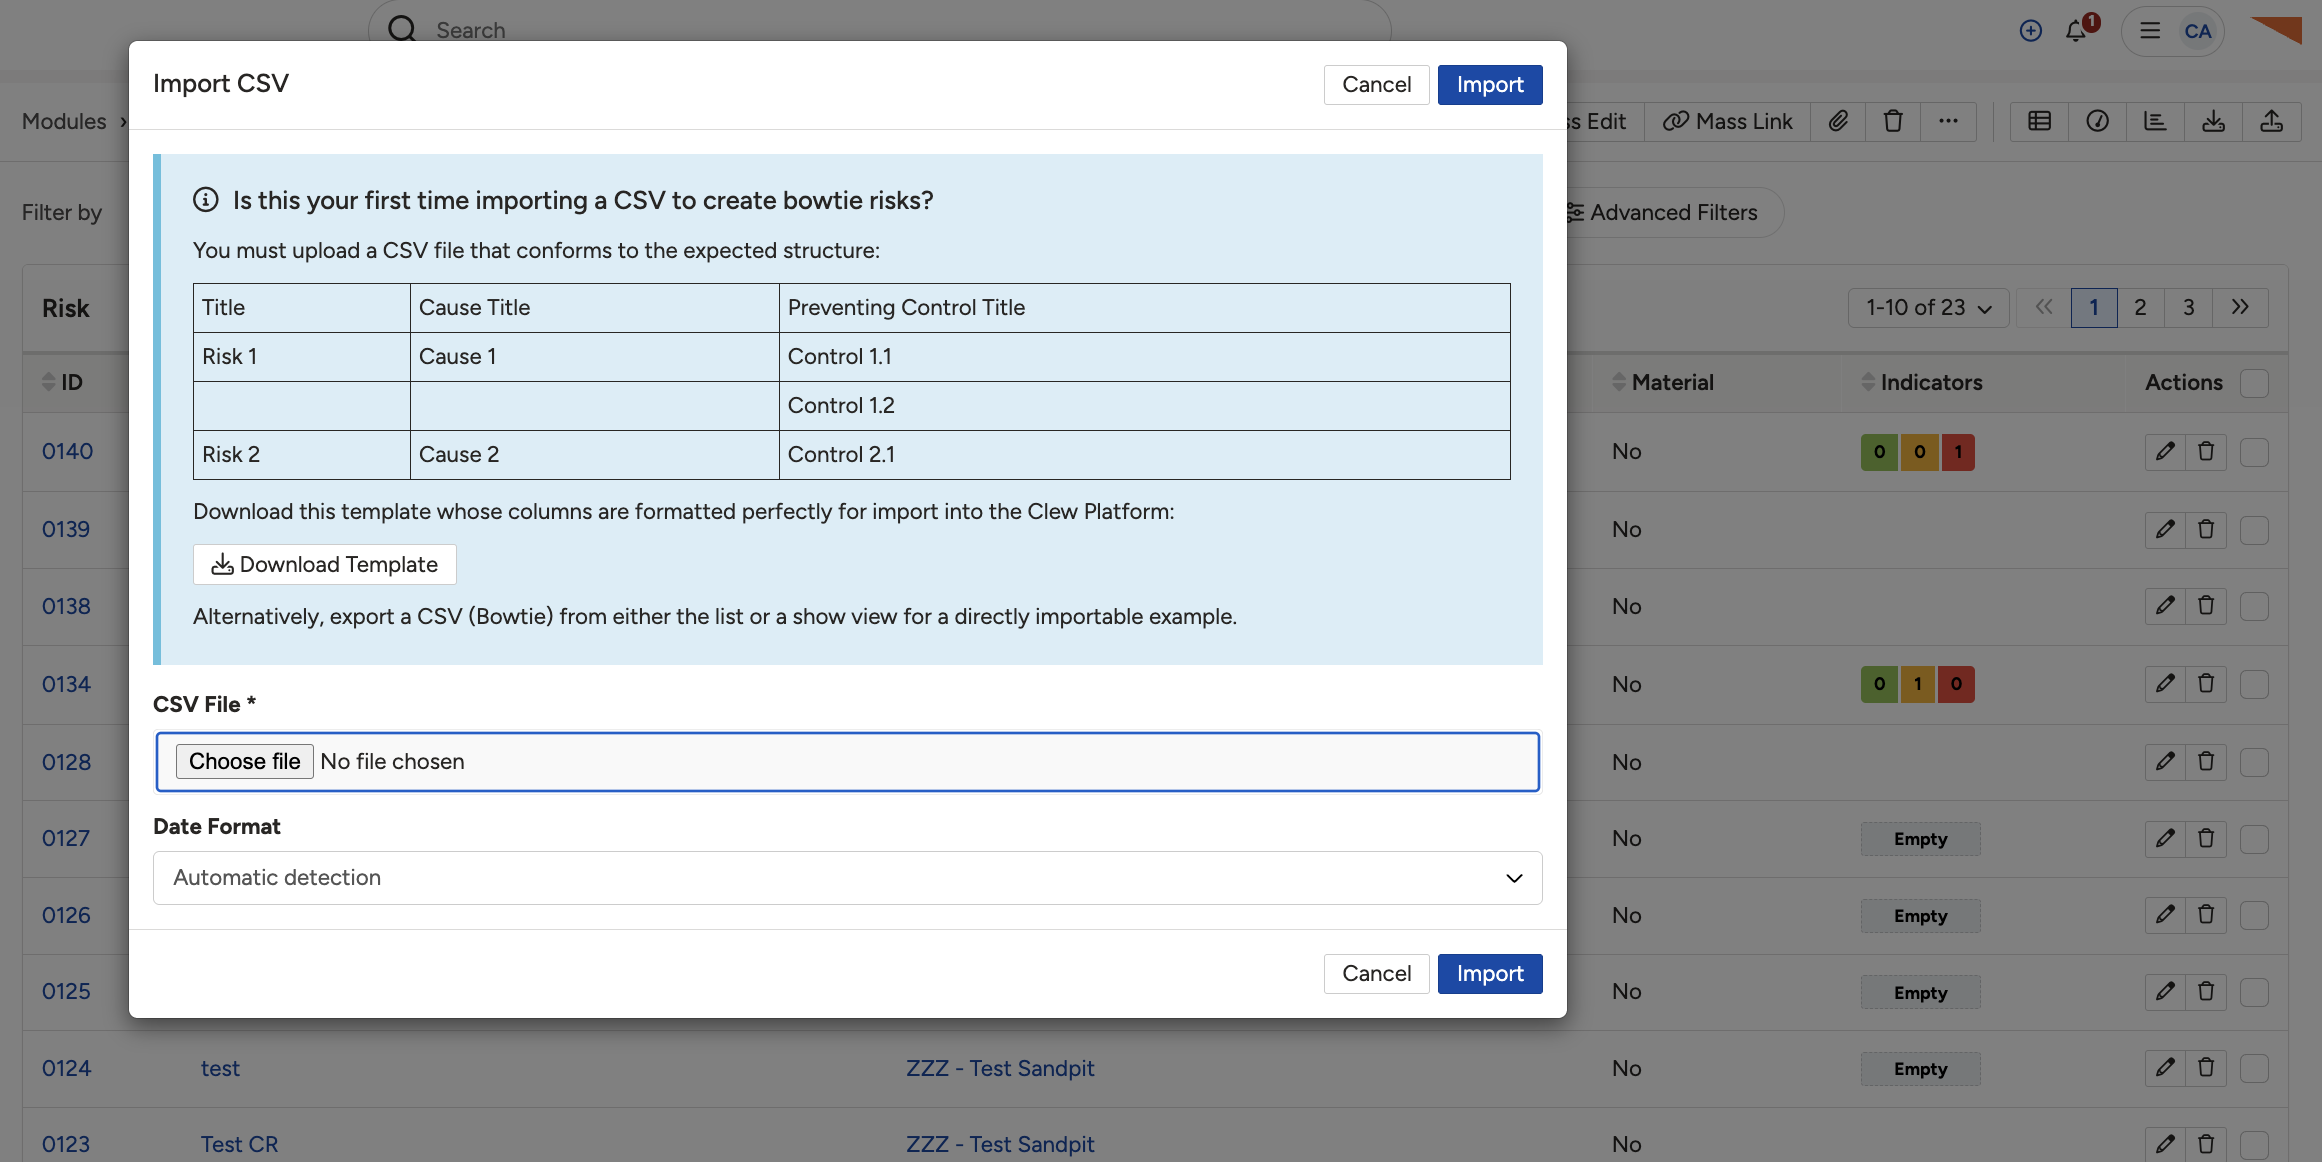
The risk list view with the export and import menu open, showing the Download Template and Import options.
Understand the file layout
The template has two header rows before your data begins.
- Row 1 is the label row. It holds plain-language names such as Preventing Controls - Title. It is there to help you read the file. The system ignores the wording, so you can change it if it helps your team.
- Row 2 is the mapping row. It holds the exact column names the system reads, such as preventing_control.title. Do not edit, rename, or reorder this row.
- Row 3 onwards is your data.
Two more rules apply to the cells themselves:
- Multiple values in one cell: where a field accepts more than one value, such as tags, start a new line inside the cell for each value. Do not separate them with commas.
- Dates: leave the date format on Automatic detection, or choose DD/MM/YYYY, MM/DD/YYYY, or YYYY-MM-DD at upload time if your dates are not being read correctly.

The downloaded template opened in a spreadsheet, showing the label row, the mapping row, and the first data row.
How rows build a bowtie
This is the part worth getting right. The import reads your file from top to bottom and works out what each row means from which columns have a value in it. Indenting, grouping, colouring, or blank rows make no difference.
- A value in Title starts a new risk. Every row below it belongs to that risk until the next Title value appears.
- A value in Cause - Title starts a new cause under the current risk.
- A value in Preventing Controls - Title adds a preventing control under the cause above it. Several of these rows in a row, with no new cause in between, add several controls to the same cause.
- A value in Consequence - Title starts a new consequence under the current risk.
- A value in Mitigating Controls - Title adds a mitigating control under the consequence above it, in the same way preventing controls attach to a cause.
- A value in Actions - Title adds an action to the risk itself, not to a particular cause or consequence.
Worked example. Reading the rows below in order builds one complete bowtie, then starts a second risk:
| Row | Column with a value | What it creates |
| 3 | Title: Loss of site power | The risk. Everything below belongs to it until the next Title value. |
| 4 | Cause - Title: Generator failure | A cause on the left side of the bowtie. |
| 5 | Preventing Controls - Title: Monthly generator test | A preventing control under Generator failure. |
| 6 | Preventing Controls - Title: Fuel level monitoring | A second preventing control under the same cause, because no new cause appeared in between. |
| 7 | Consequence - Title: Extended production outage | A consequence on the right side of the bowtie. |
| 8 | Mitigating Controls - Title: Standby supply agreement | A mitigating control under Extended production outage. |
| 9 | Actions - Title: Review outage response plan | An action against the risk itself. |
| 10 | Title: Unauthorised site access | A second risk. The first bowtie is now closed off. |
Add risk ratings
Each rating type has its own set of columns, for example one set for Inherent and another for Residual. Fill in the set that matches the rating you want to create.
- Required for each rating: a likelihood, a severity, and a severity category.
- Optional for each rating: a description, an alternative description, and an exposure value.
Add your own columns
The template only includes a starter set of columns, such as title, owner, and owner role. You are not limited to those. You can add a column for any active field that exists on a risk, an action, or a control in your system, as long as you write the name in the mapping row in the correct format.
| Field type | Format | Example |
| A field on the risk | The field name on its own | due_date |
| A field on an action | action. then the field name | action.due_date |
| A field on a preventing control | preventing_control. then the field name | preventing_control.title |
| A field on a mitigating control | mitigating_control. then the field name | mitigating_control.title |
| A custom field on the risk | The field key your administrator set when the field was created, on its own with no prefix | Ask your administrator for the key |
Upload and import the file
- Save your completed spreadsheet as a CSV file.
- Go back to the risk list view and open the same menu that holds the export options.
- Choose the import option and select your file.
- Leave the date format on Automatic detection, or choose the format your dates are written in.
- Click Import.
The import does not finish instantly. The page shows a processing state and updates itself every few seconds, so stay on the page until it reports a result.
- If it succeeds: you see a list of the risks that were created, with a link back to the risk list view.
- If it fails: you see a count of the errors and a table of every error with its row, its column, and a message. No risks are created.
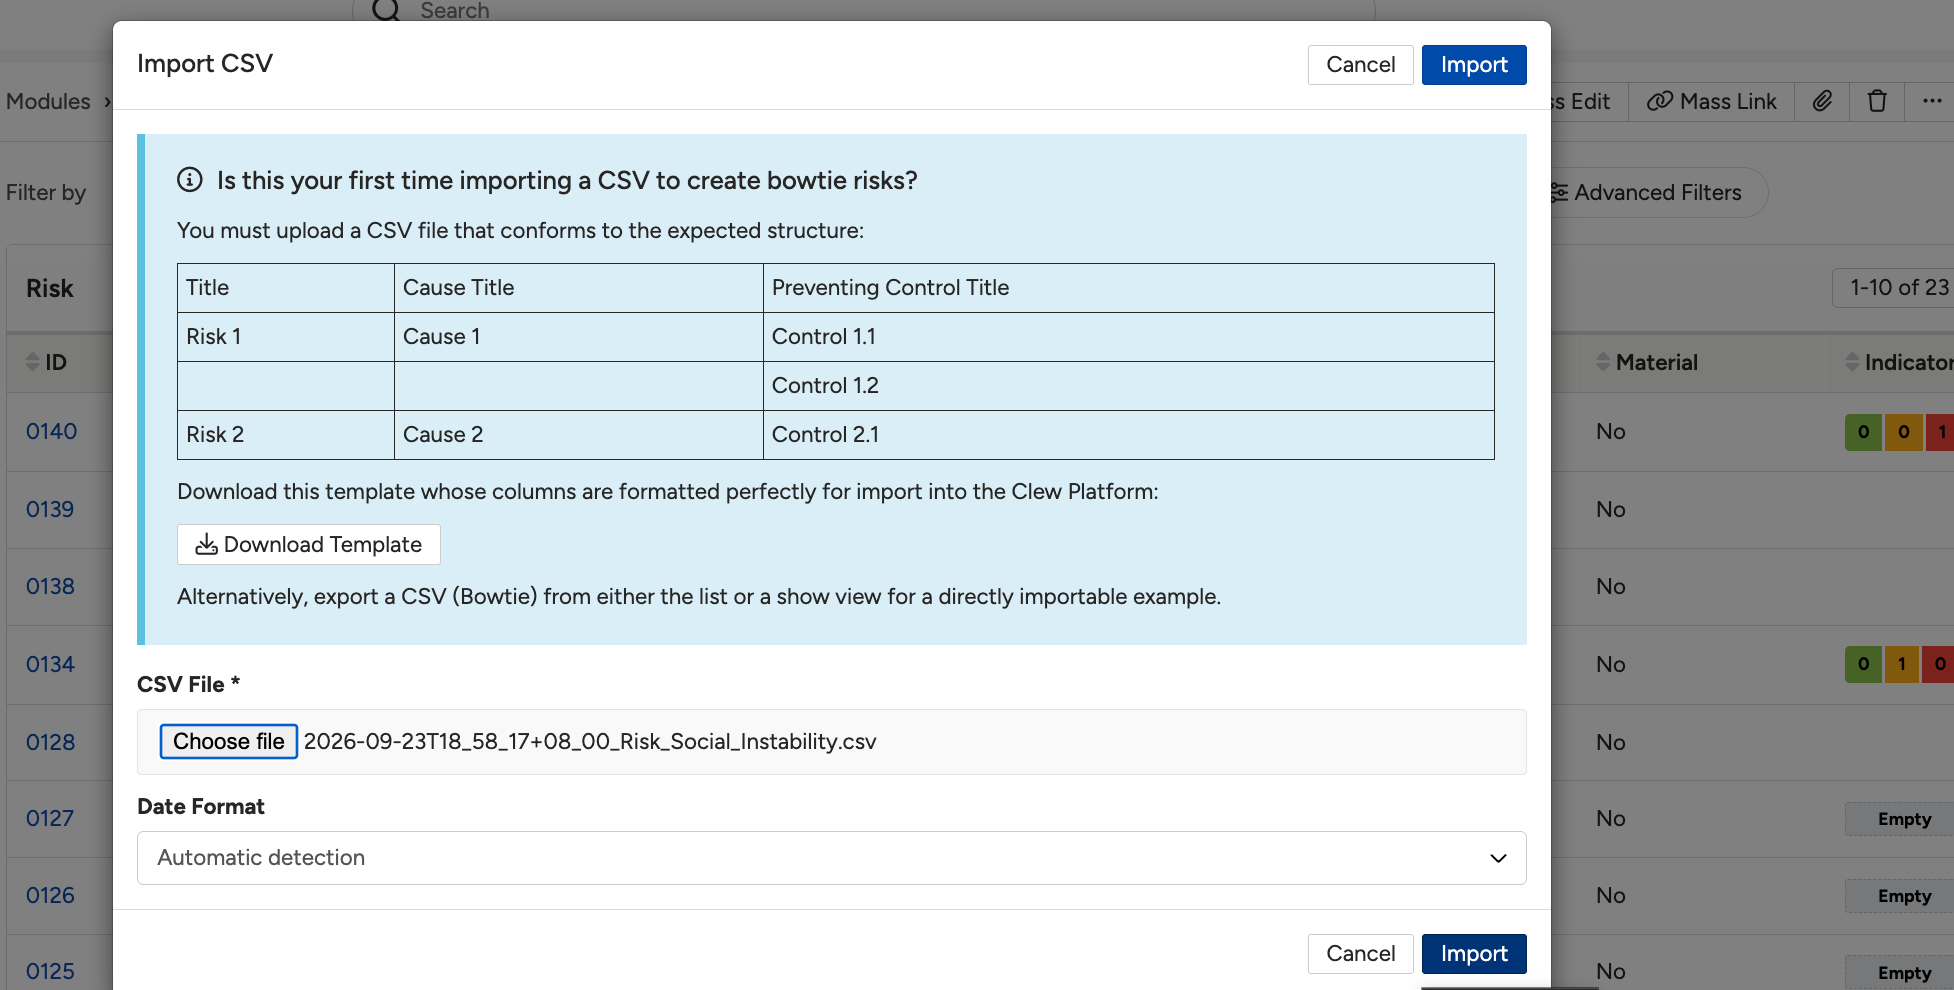
The import screen with a file selected and the date format options shown.
5. Common Issues & Troubleshooting
The error table tells you the row and the column for every problem. Work through the list below to interpret each message.
| Issue | Likely Cause | Solution |
| There is no import option in the menu | The feature is not switched on for your team, or you do not have permission to create risks | Ask your administrator to switch on Enable Risk Bowtie CSV Imports in the team's admin settings and to confirm your permissions |
| Nothing imported even though most rows were fine | The import is all or nothing, so one error stops the whole file | Fix every error listed in the results table, then upload the complete file again |
| A value is required here | A cell that needed a value was empty. This most often means a preventing control with no cause above it, or a mitigating control with no consequence above it | Fill in the missing value, or move the row so its cause or consequence appears above it |
| Value not recognised, valid options include: ... | The value does not match any of the options configured for that field | Copy one of the options listed in the message exactly, including spelling and capitalisation |
| Invalid mapping column | A name in the mapping row is not one the system recognises, usually because row 2 was edited or a column was added by hand | Download a fresh template, restore the mapping row exactly, and check any column you added against the naming formats in section 4 |
| Missing required column: ... | A column your configuration requires was deleted from the file | Add the column back with the exact name shown in the message |
| Duplicate column: ... detected | The same column name appears more than once in the mapping row | Delete the duplicate column, keeping the data you need in the one that remains |
| Unable to process date | The date in that cell could not be read in the format selected | Make every date in the file follow one format, then choose that format at upload time instead of automatic detection |
| Record not found | The value was expected to match something that already exists in Clew, such as a user, and nothing matched | Check the spelling against the record in Clew, or create the record first and then re-import |
| Multiple records found | The value matched more than one existing record, so the system could not tell which one you meant | Use a value that identifies one record only, for example a full name or an email address rather than a first name |
| CSV file could not be read | The file is not valid CSV, often a formatting or encoding problem from the application it was saved in | Open the file in a spreadsheet application and save it again as CSV, then re-upload |
| Invalid [type] with a message in brackets | The row broke one of the normal validation rules for that kind of record | Read the message in brackets, which names the rule, and correct the row to match |
| Unexpected error | Something went wrong that the system has no specific message for | Contact support and include the file you uploaded and the row number shown |
| The import fails on location, and your organisation does not use the Location feature | On version 4.23, the system still expects a location on each risk even when the Location feature is switched off | Version 4.24 and later supplies a default location automatically. Ask your administrator which version you are on, and contact support if you are still on 4.23 |
Best practices:
- Start every import from a freshly downloaded template rather than an old copy, so the mapping row always matches your current configuration.
- Never edit or reorder row 2. Change the labels in row 1 instead if you want friendlier column names.
- Write each bowtie in order: the risk, then a cause with its preventing controls, then a consequence with its mitigating controls, then any actions.
- Test with one or two risks before uploading a large file. It is much faster to find a column problem in a small file.
- Keep your working spreadsheet, not just the CSV, so you can correct errors and export a new CSV quickly.
- Check whether a risk already exists before you import it. The import always creates new risks, so re-importing a file produces duplicates.
- If you are importing a custom risk type, confirm the required fields and custom field keys with your administrator first.
▾CSV Imports Open full article »
Related article
How the standard CSV import works for records in a module, the general import that this bowtie import builds on.
▾Custom Type Open full article »
Related article
How a System Administrator configures a module's Custom Type, including custom risk types and the fields you can add as columns in the import.
Was this article helpful?
That’s Great!
Thank you for your feedback
Sorry! We couldn't be helpful
Thank you for your feedback
Feedback sent
We appreciate your effort and will try to fix the article