Custom Filters
How to create, configure, and use filters in the Clew Platform
Contents
- 1. Introduction & Context
- 2. Key Features & Functions
- 3. Requirements
- 4. Step-by-Step Guide
- 5. Common Issues & Troubleshooting
- 6. Related Articles
1. Introduction & Context
Custom Filters let you define conditions that narrow down datasets in the Clew Platform, so users see only the records that match specific criteria, such as risks that are active AND rated high.
Filters are used across the platform in data grid views and dashboard widgets. Administrators create and configure filters, and can share them with all users or mark them as favourites so they appear automatically in filter panels.
Who is this for? System administrators who need to create and manage filters. End users can access filters shared with them via the My Filters page, opened by clicking the cog icon in any filter panel.
What does it impact? A filter on its own does not change anything in the platform. It only has an effect when applied to a data grid view, dashboard widget, or other area that supports filtering.
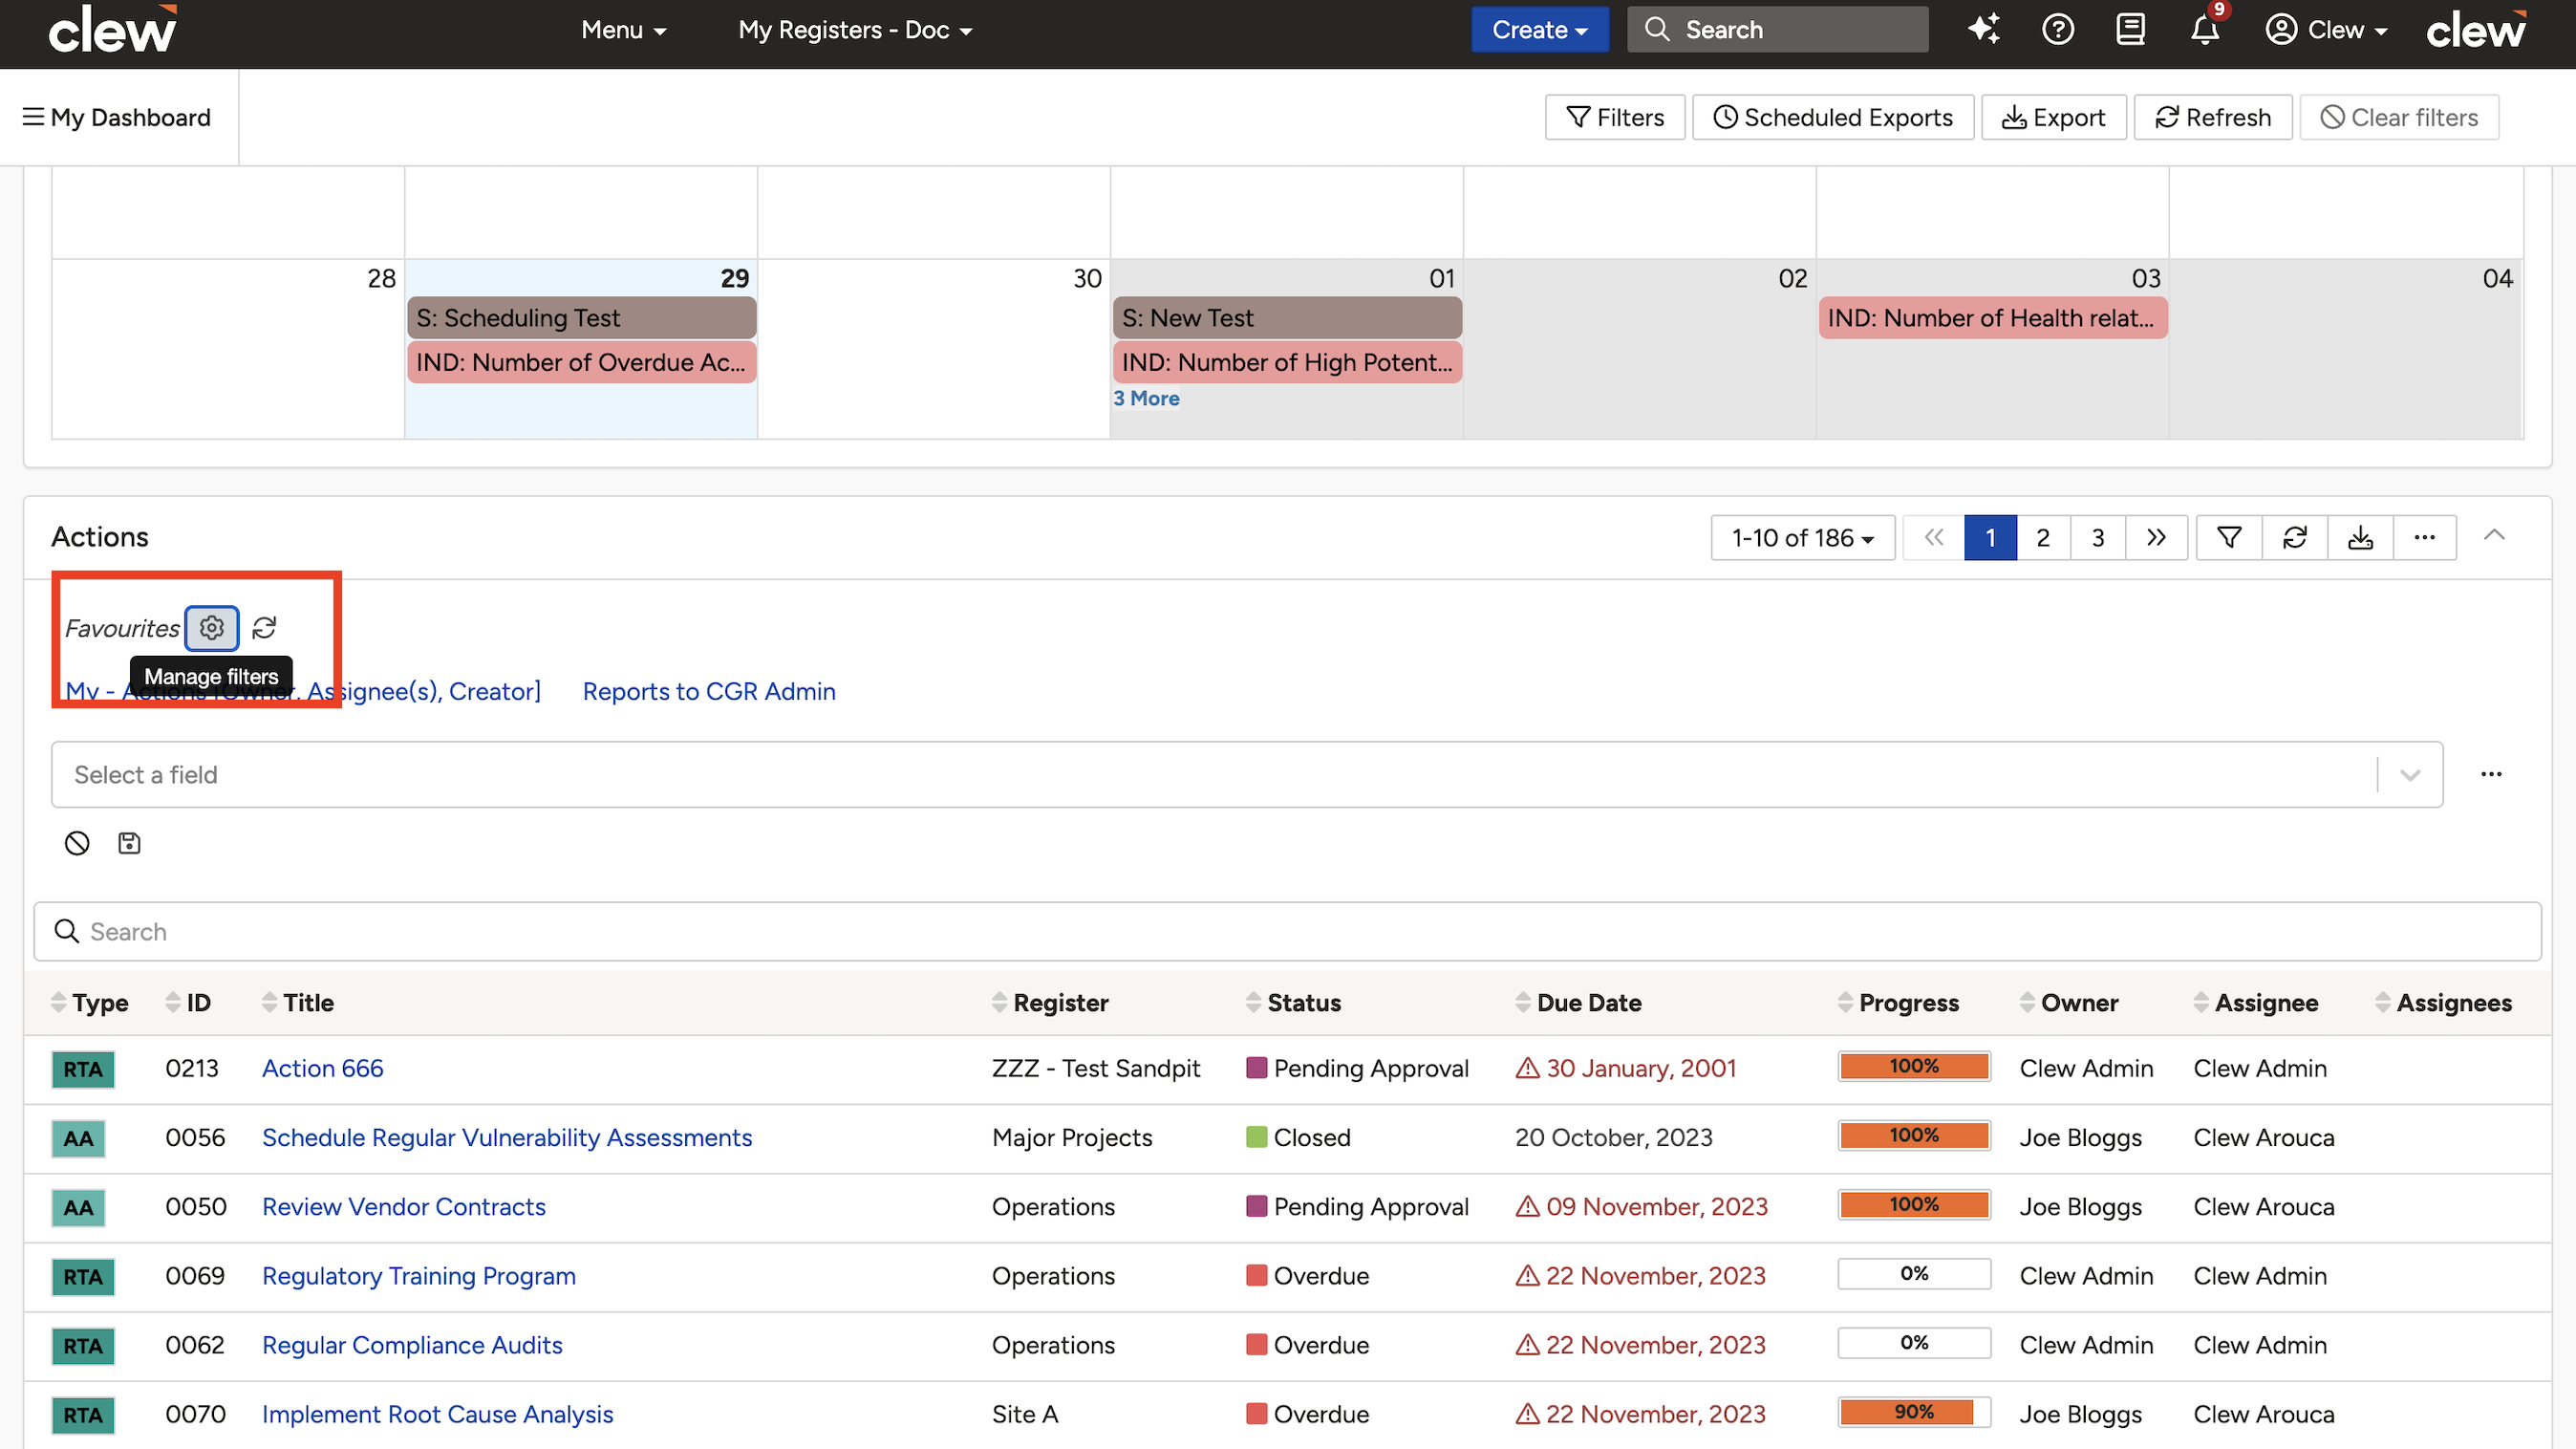
A filter panel in a dashboard widget. Click the cog icon to access the My Filters page.
2. Key Features & Functions
- Per-module filters: Create filters scoped to a specific module, available for use in dashboards and data grid views for that module.
- Shared filters: Share a filter with all users in the organisation so they can apply it without building it themselves.
- Favourite filters: Mark a filter as a favourite for all users. A favourited filter appears by default when a user opens a filter panel for the relevant module.
- Conditional logic: Apply AND, OR, and NOT logic between conditions to build everything from simple to complex data queries.
- Nested conditions: Nest conditions within one another to create layered query logic, such as an OR statement inside an overall AND statement.
- Sub-filters: Create filters specifically for use inside other filters, allowing you to query records based on the values of their related items, such as actions that have at least one material risk linked to them.
3. Requirements
- System administrator access is required to create and configure filters via the Admin section.
- End users can access filters shared with them or created by them via the My Filters page in any filter panel.
- To use sub-filters, you need at least two filters: the sub-filter itself, and a parent filter that references it.
- To test a filter, you need at least one dashboard with a widget that supports filtering. See the Related Articles section for links to the dashboards guides.
4. Step-by-Step Guide
Creating or Editing a Filter
- Navigate to Admin > Filters.
- Click the blue Addbutton.
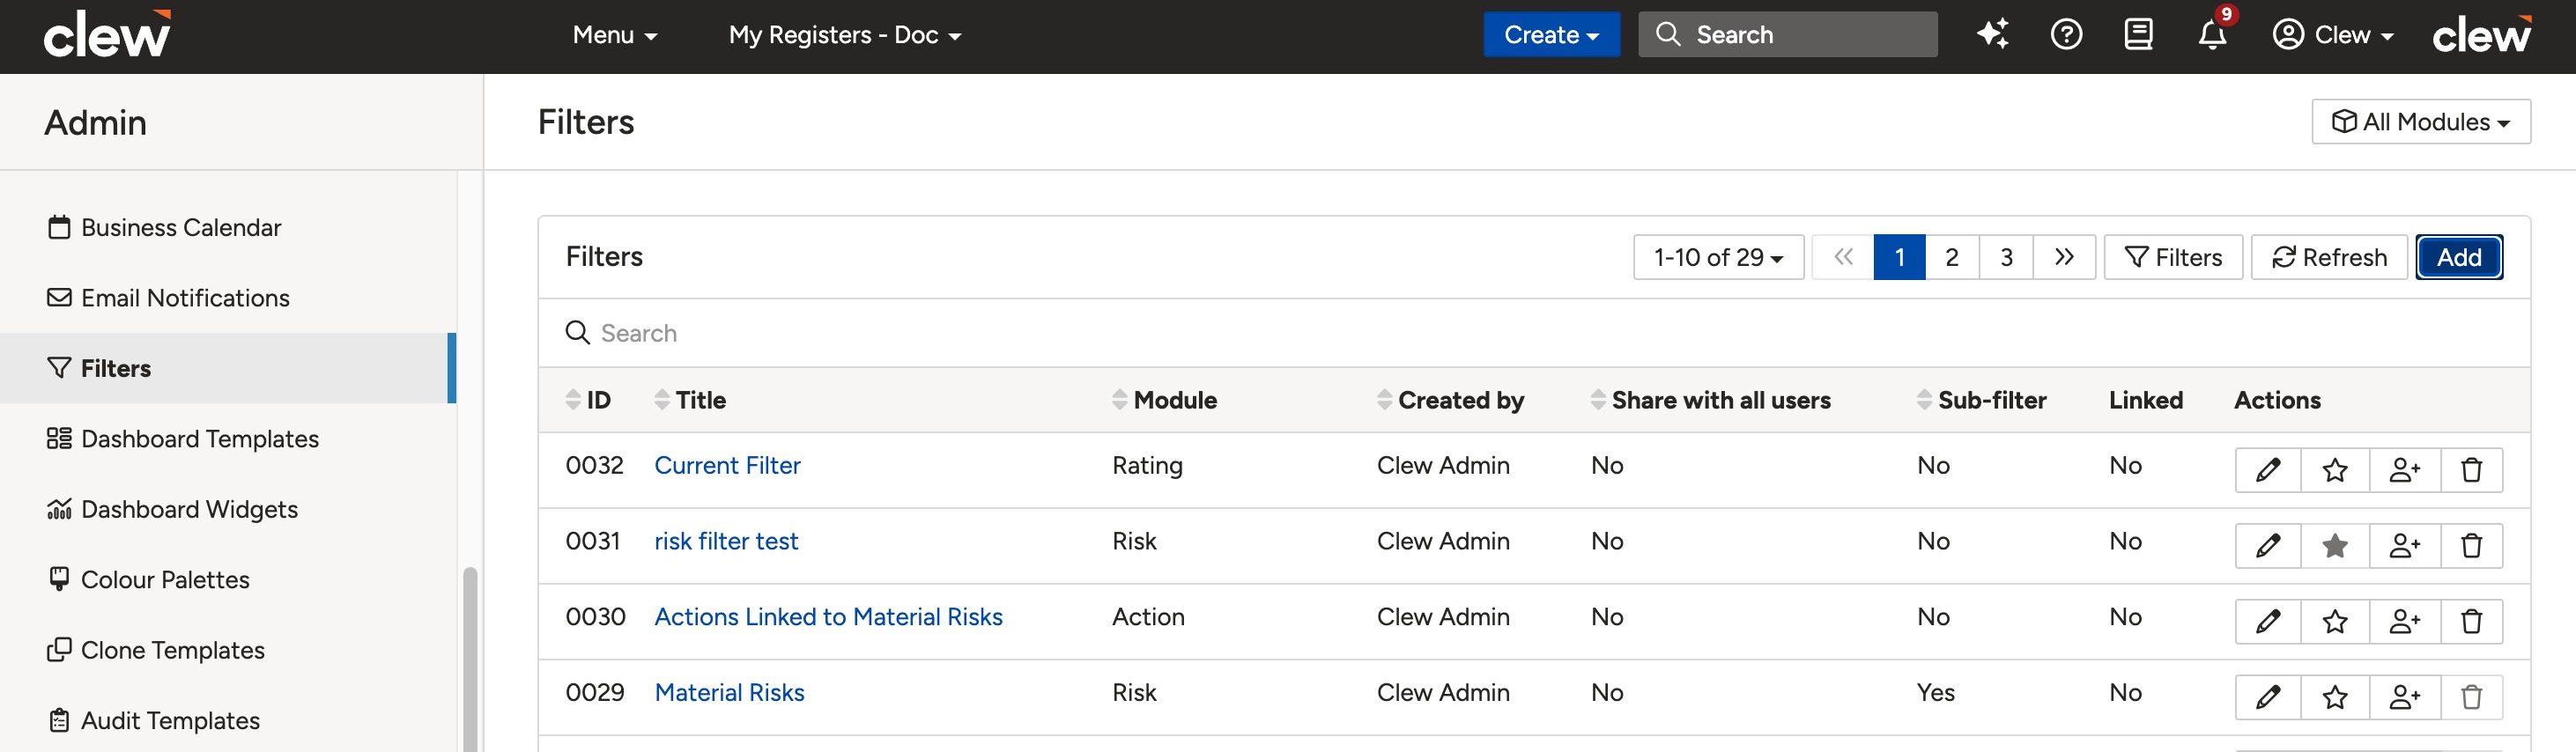
Click the Add button.
- From the dropdown, select the module you want to create the filter for.
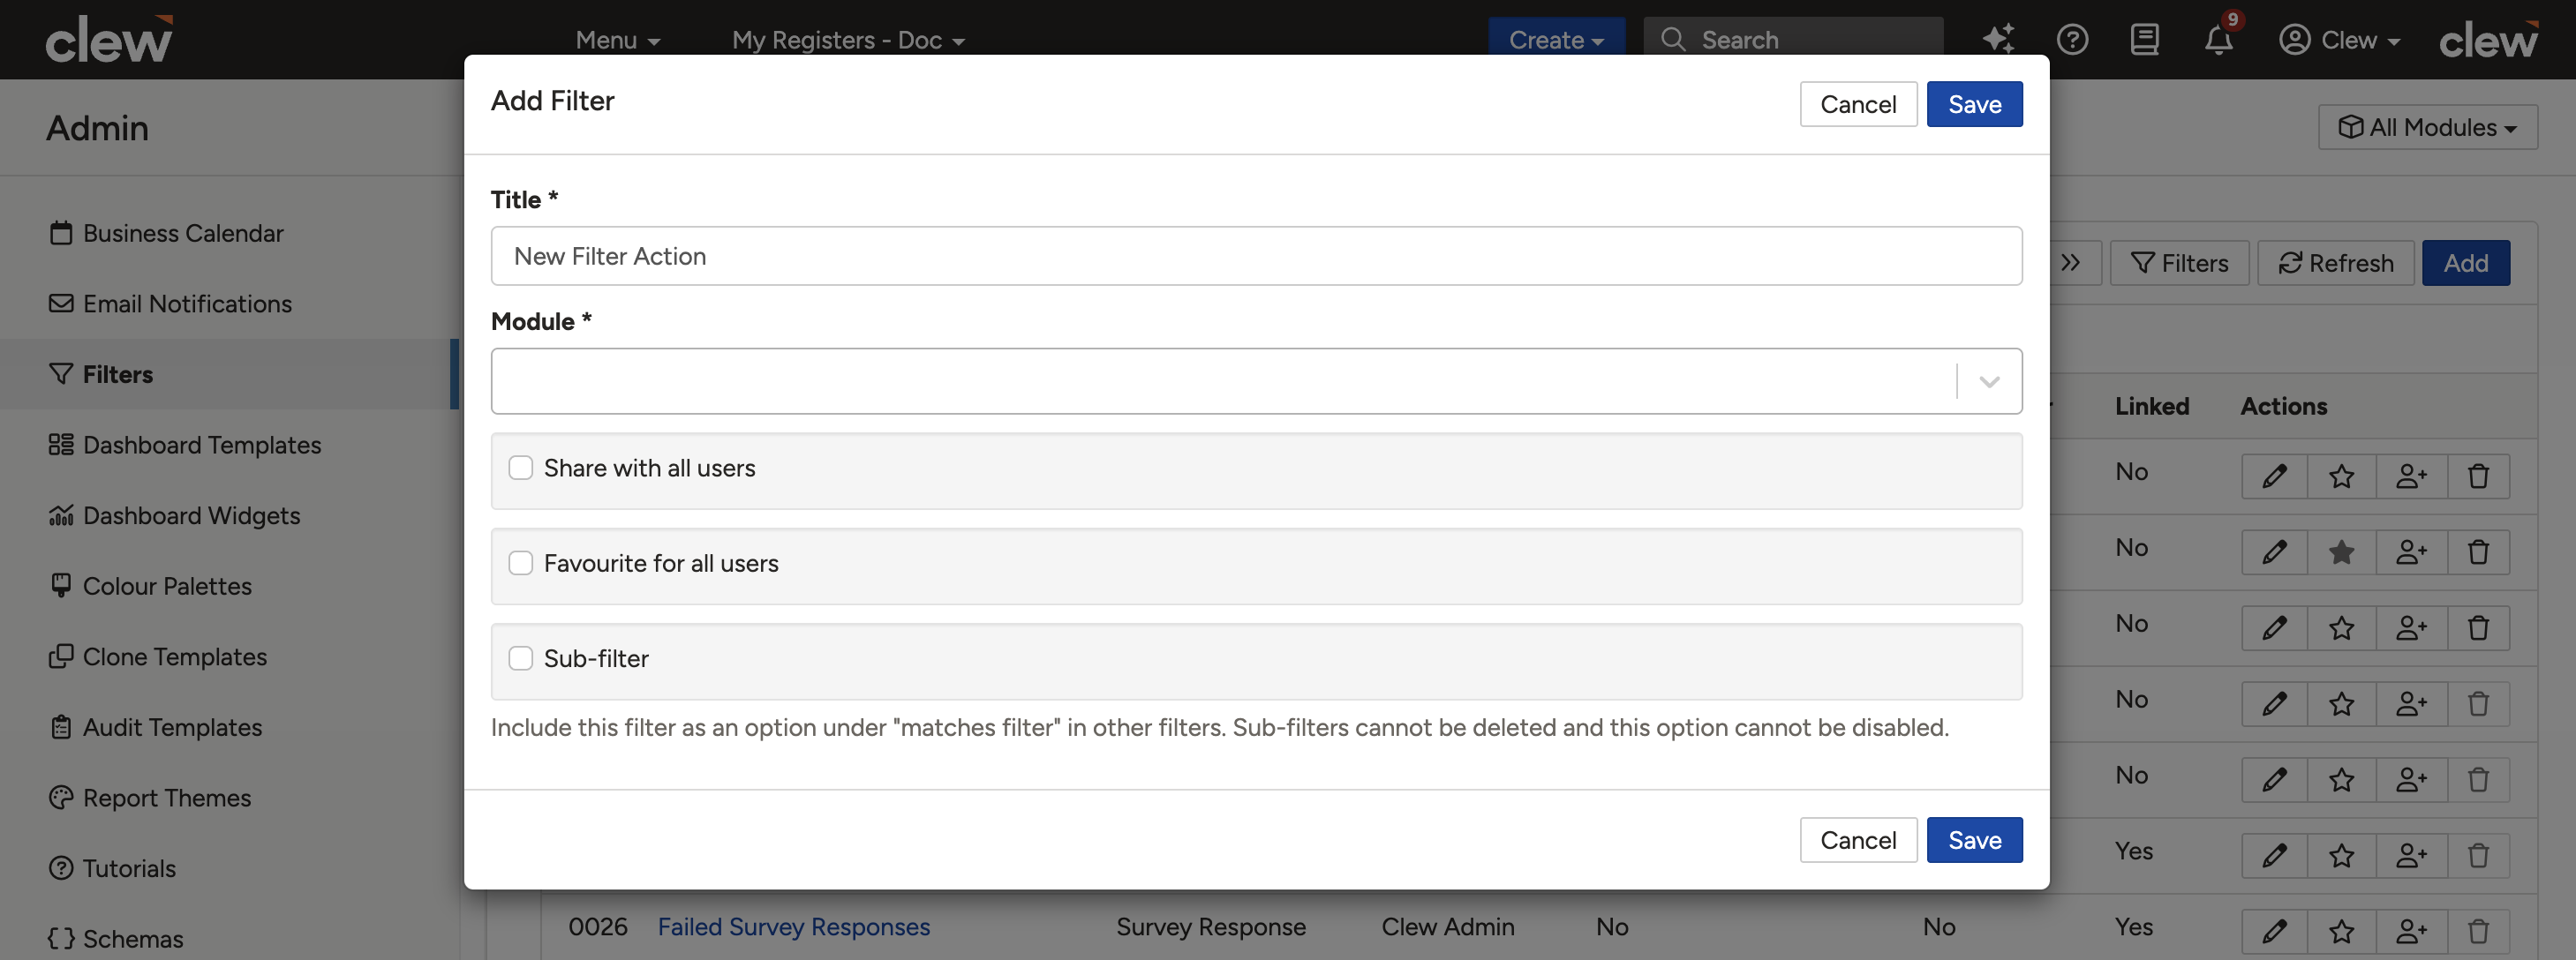
The module selection dropdown.
- The Conditions fields will open once a module is selected. Complete the fields using the table below, then click Save.
Add Filter form fields:
| Field | Description |
| Title | The name of the filter. Maximum 256 characters. |
| Conditions | Define the filter conditions. See Building Conditions below for full details. |
| Share with all users | Tick this checkbox to give all users access to the filter. |
| Favourite for all users | Tick this checkbox to have the filter appear under Favourites for all users on the relevant module. |
| Sub-filter | Tick this checkbox to make this filter available as a sub-filter inside other filters. Once marked as a sub-filter, it cannot be used directly as a standalone filter. |
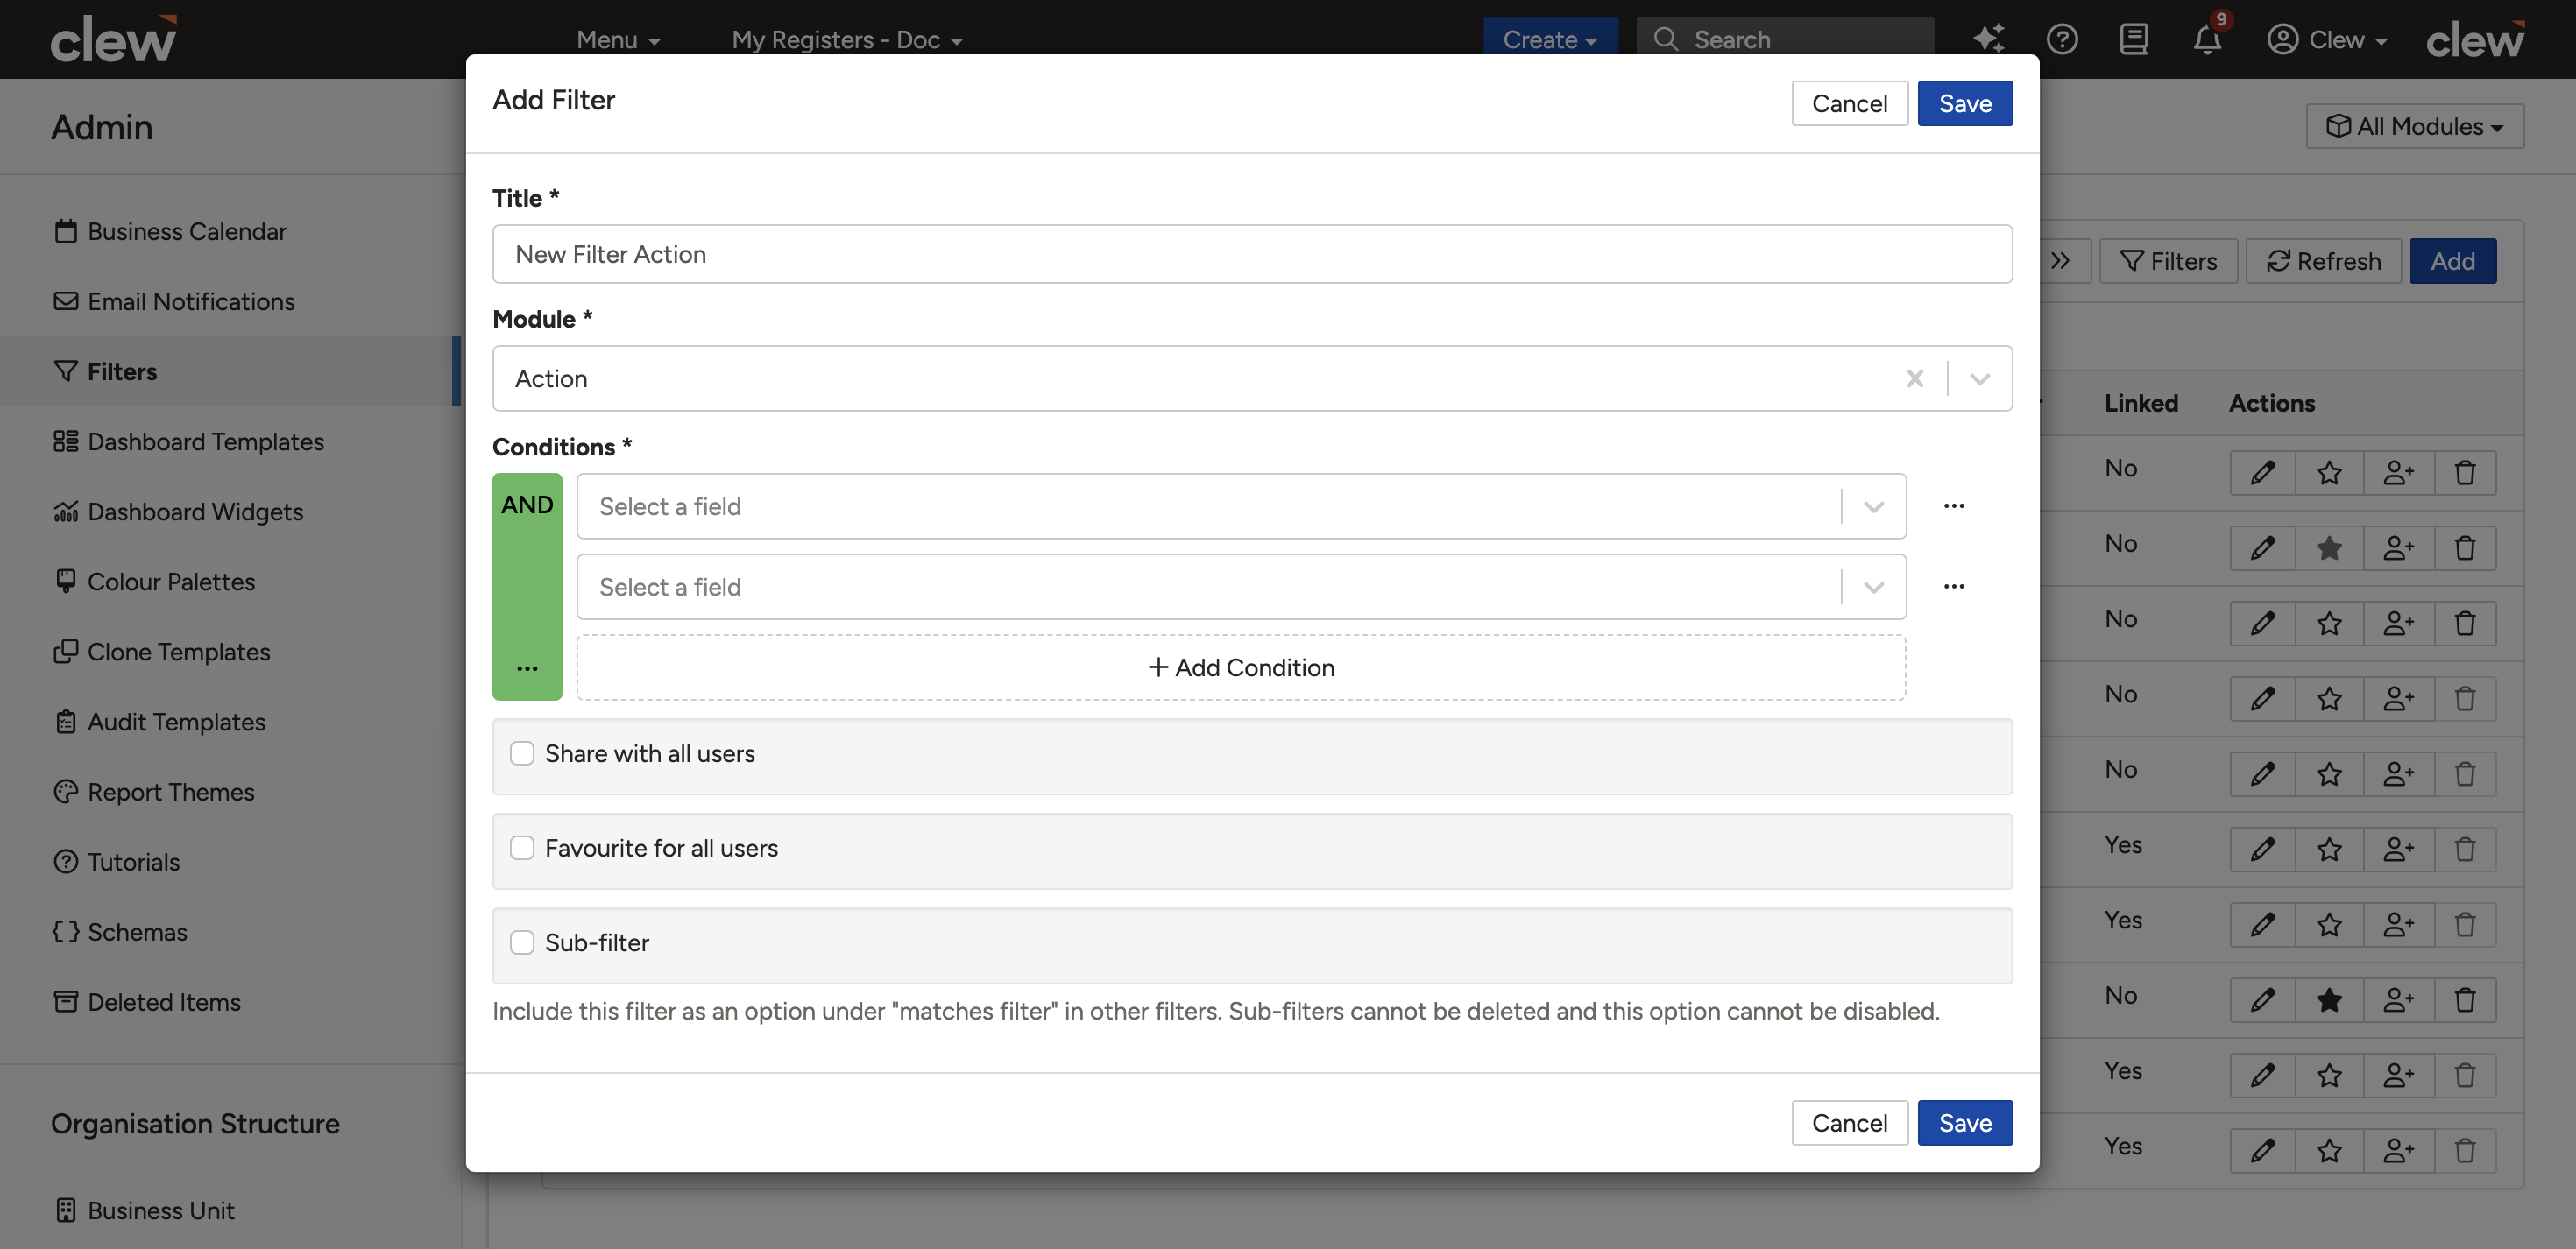
The Filter form.
Building Conditions
When you click into the Conditions field, you will see a list of fields and linked modules available to filter on. Each condition uses logical operators to determine what is returned.
Logic operators:
| Logic | Definition |
| AND | All conditions must equal TRUE. |
| OR | Only one of the conditions needs to equal TRUE. If two equal TRUE, it returns FALSE. |
| NOT | The condition must equal FALSE to return TRUE. |
Steps to build conditions:
- Start by selecting the logic that will wrap all conditions. The platform defaults to AND. To change it, click the ellipsis (...) at the bottom-left of the AND block.
- Select the field you want to use as a condition. The available fields and relations for the selected module will populate automatically. See the Condition Options table below for available operators.
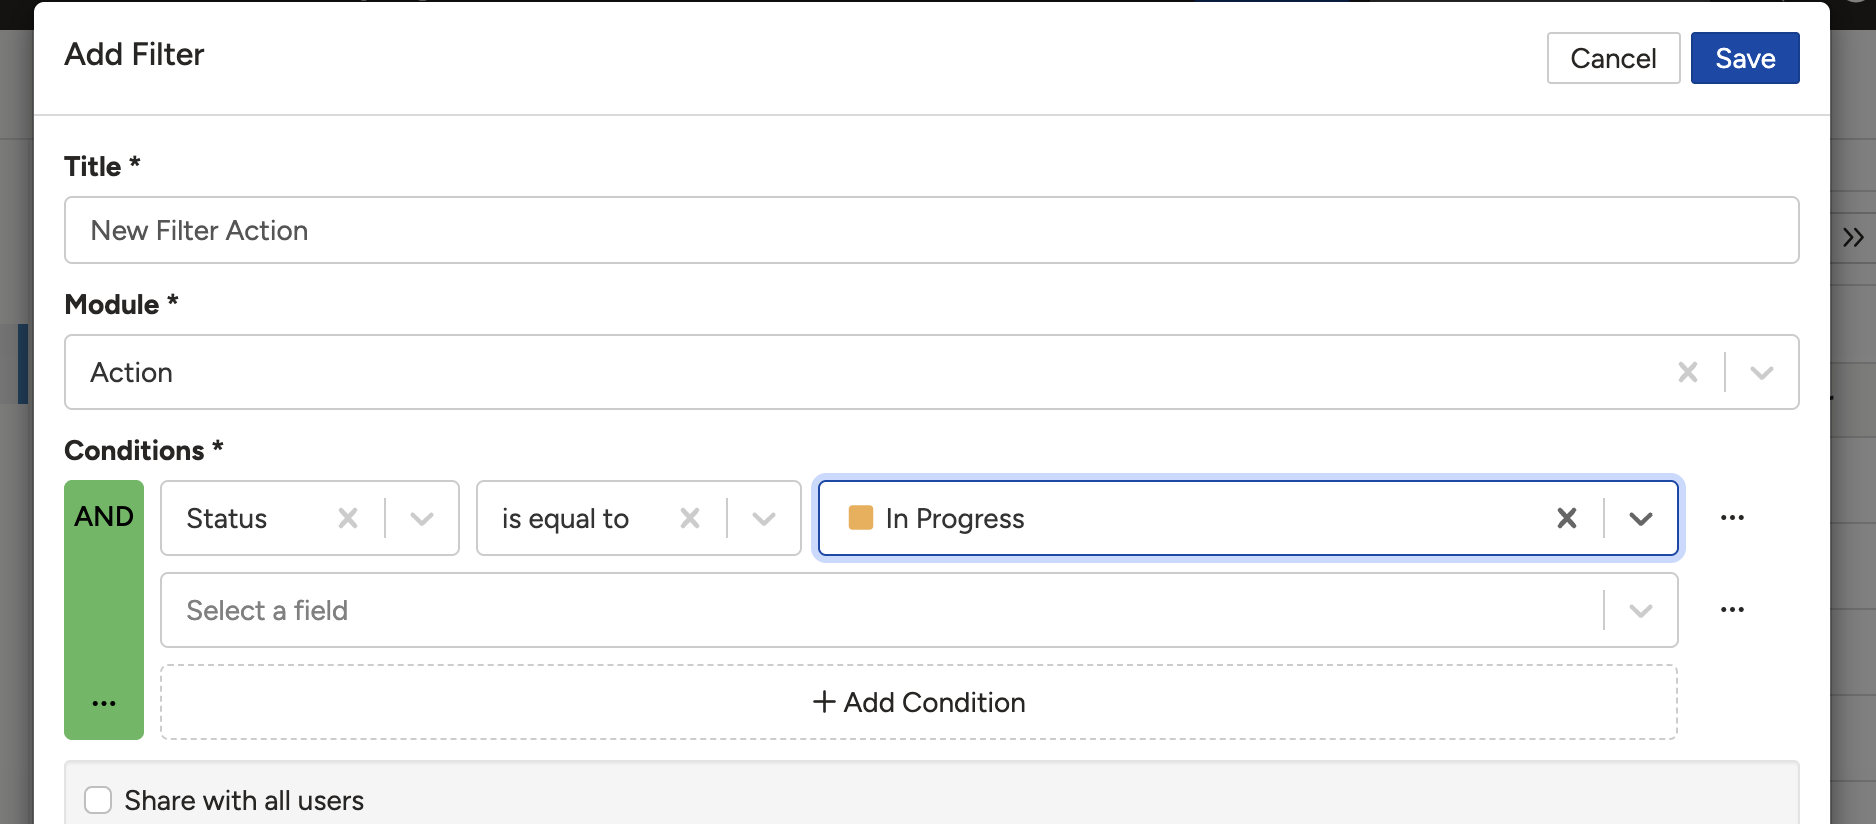
The conditions builder showing available fields and relations.
- To nest a condition, such as adding an OR statement inside an overall AND, click the ellipsis (...) on the right-hand side of the first condition statement.Note: You cannot add a condition to the left of an existing one. New conditions must be added within the current condition using the ellipsis on the right-hand side.
- Click Save once the conditions are complete.
To test the filter, apply it to a widget on a dashboard. See the Related Articles section for links to the dashboards guides.
Condition options reference:
| Condition | Description | ||
| Generic | |||
| Is equal to | Must be an exact match to a single value to return TRUE. | ||
| Is not equal to | Must not match a single value to return TRUE. | ||
| Is blank | Returns TRUE when the field has no value. | ||
| Matches filter | Used with a sub-filter. | ||
| User field specific | |||
| Reports to | If the Supervisor field is enabled on users, filters to all users that have the selected user as their supervisor. | ||
| Is myself | User fields only. Returns TRUE when the currently logged-in user is the user in the field. | ||
| Reports to me | Similar to Reports to, but filters for anyone that has the currently logged-in user in the supervisor field. | ||
| Number specific | |||
| Is less than | Field value is lower than the specified value (e.g. less than 5 means 4 and below, including negatives). | ||
| Is less than or equal to | Field value is lower than or equal to the specified value (e.g. 5 and below, including negatives). | ||
| Is greater than | Field value is higher than the specified value (e.g. greater than 5 means 6 and above). | ||
| Is greater than or equal to | Field value is higher than or equal to the specified value (e.g. 5 and above). | ||
| Date specific: uses the same conditions as Number, with additional date options. The selected value is treated as 0; past dates are negative, future dates are positive. | |||
| Condition | Option | How to input | Behaviour |
| Is less than | A specific date | Select from calendar | The selected date is treated as 0. Anything in the past from that date is less than (e.g. the previous day is -1). |
| A date relative to today | Enter an integer (positive = future, negative = past), then toggle day/month/year. | ||
| Is less than or equal to | A specific date | Select from calendar | The selected date is treated as 0. Anything in the past from that date is less than (e.g. the previous day is -1). |
| A date relative to today | Enter an integer (positive = future, negative = past), then toggle day/month/year. | ||
| Is greater than | A specific date | Select from calendar | The selected date is treated as 0. Anything after that date is greater than (e.g. the following day is +1). |
| A date relative to today | Enter an integer (positive = future, negative = past), then toggle day/month/year. | ||
| Is greater than or equal to | A specific date | Select from calendar | The selected date is treated as 0. Anything on or after that date is included (e.g. the following day is +1). |
| A date relative to today | Enter an integer (positive = future, negative = past), then toggle day/month/year. | ||
| Occurs in month | A specific month | Month/Year value from calendar | The selected month is treated as 0. Future months are positive (e.g. the following month is +1). |
| Month relative to today | Enter an integer (positive = future, negative = past). | ||
| Occurs in year | A specific year | Year value from calendar | The selected year is treated as 0. Future years are positive (e.g. the following year is +1). |
| A year relative to today | Enter an integer (positive = future, negative = past). | ||
| Occurs in financial year ending | A specific financial year | Year value from calendar | The selected financial year is treated as 0. Future financial years are positive (e.g. the following financial year is +1). |
| A financial year relative to today | Enter an integer (positive = future, negative = past). | ||
| Relation specific | |||
| All match filter | Select a sub-filter. All related items must meet the sub-filter condition to return TRUE. If the field is blank, no sub-filter is available for the selected relation. | ||
| Any match filter | Select a sub-filter. At least one related item must meet the sub-filter condition to return TRUE. If the field is blank, no sub-filter is available for the selected relation. | ||
| Overlaps with | Similar to "is any of" but selects specific items from the relation. | ||
Sub-Filters
Sub-filters let you filter records based on the values of their related items. To use them you need at least two filters: the sub-filter (built using the steps above, with the Sub-filter checkbox ticked), and a parent filter that references it via the Relation specific conditions.
Sub-filter example: Show actions linked to material risks
- Create a sub-filter for the Risks module using your criteria for "material risk", and tick the Sub-filter checkbox. Save this filter.
- Create a second filter for the Actions module. In the Conditions field, select Risksfrom the relation list instead of a field.
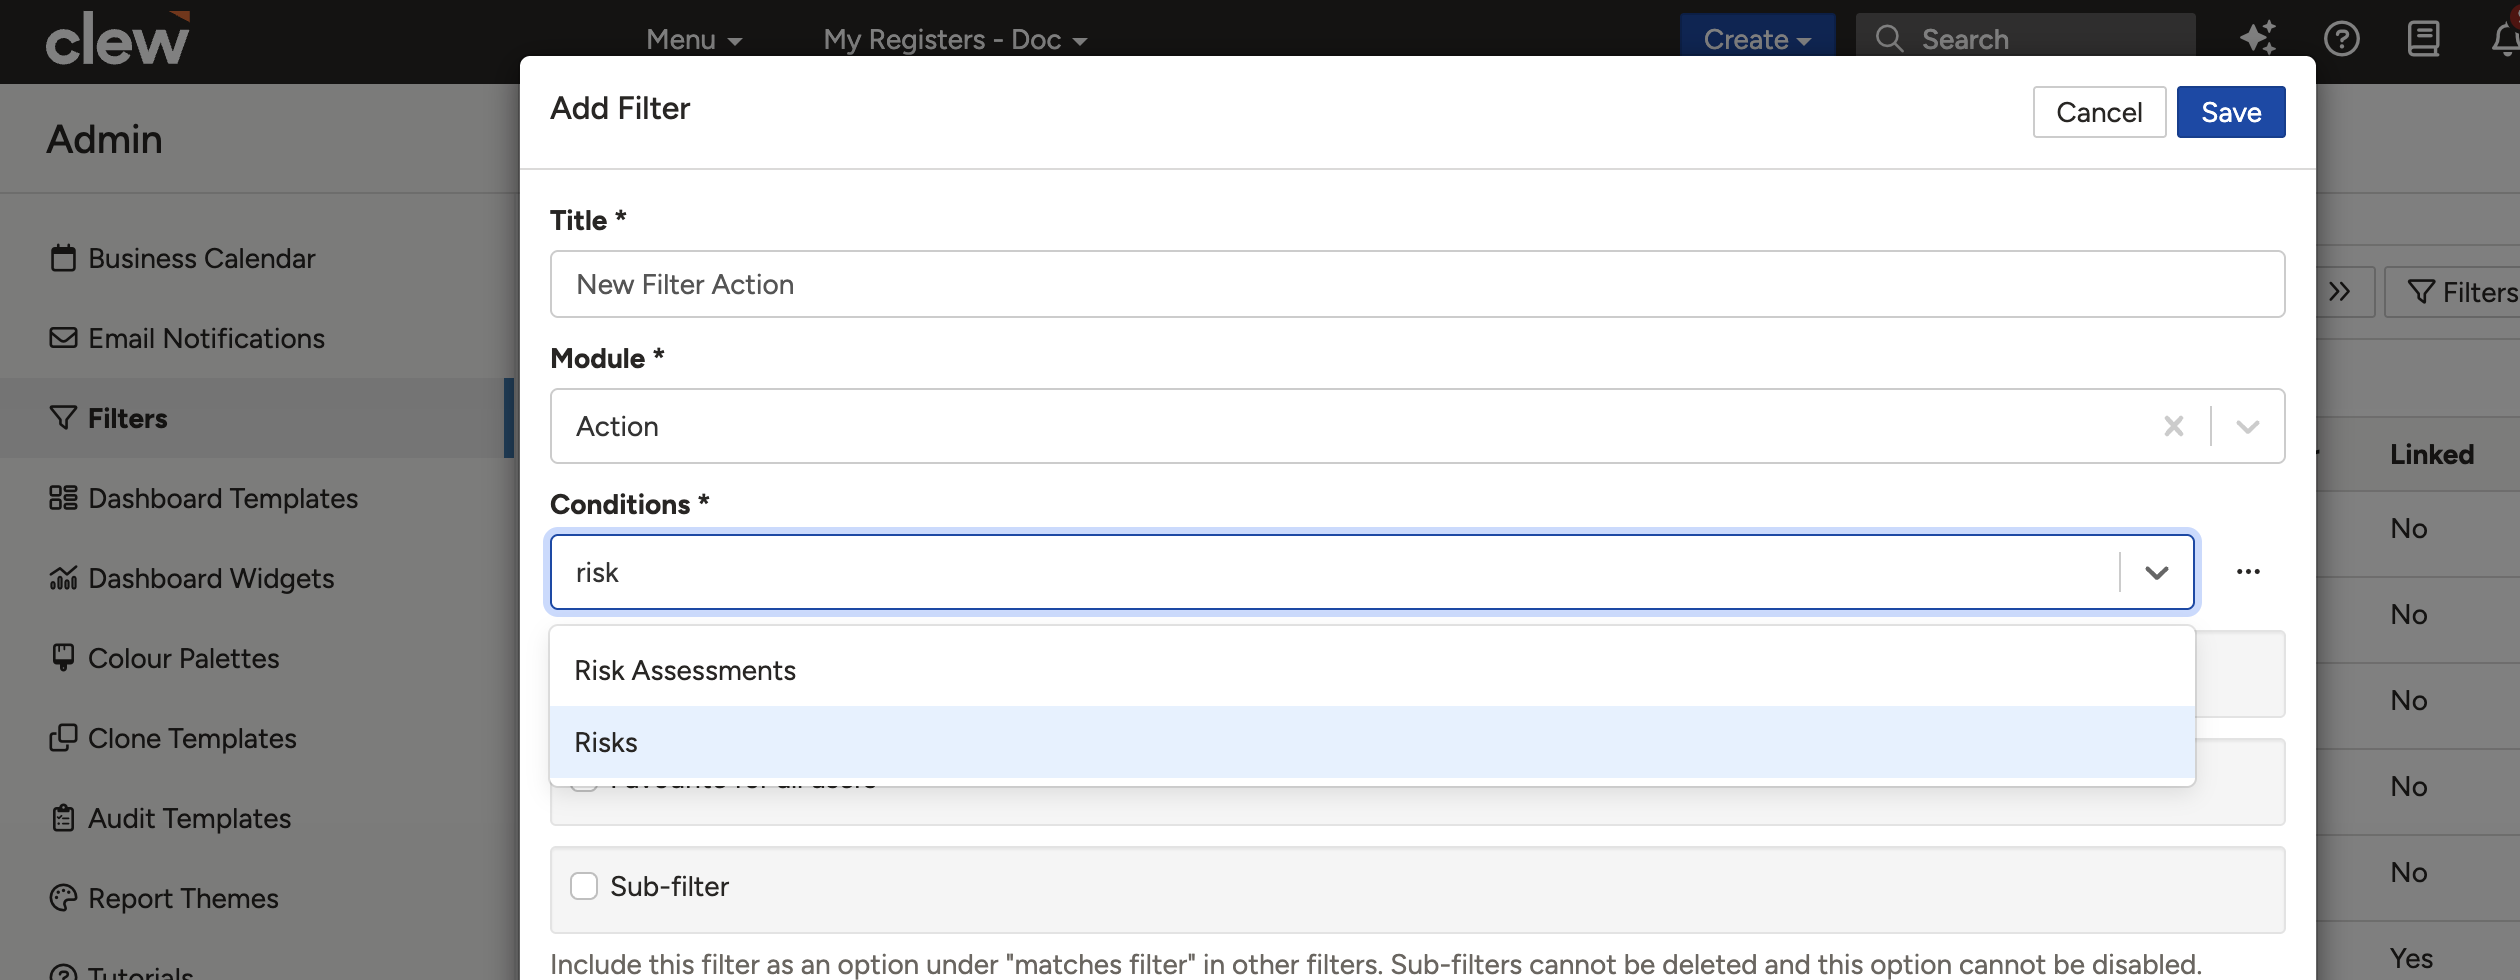
The conditions builder for an Actions filter with Risks selected as the relation.
- Select All match filter or Any match filterdepending on your needs. A final field will appear listing the available sub-filters. Select your material risk sub-filter.
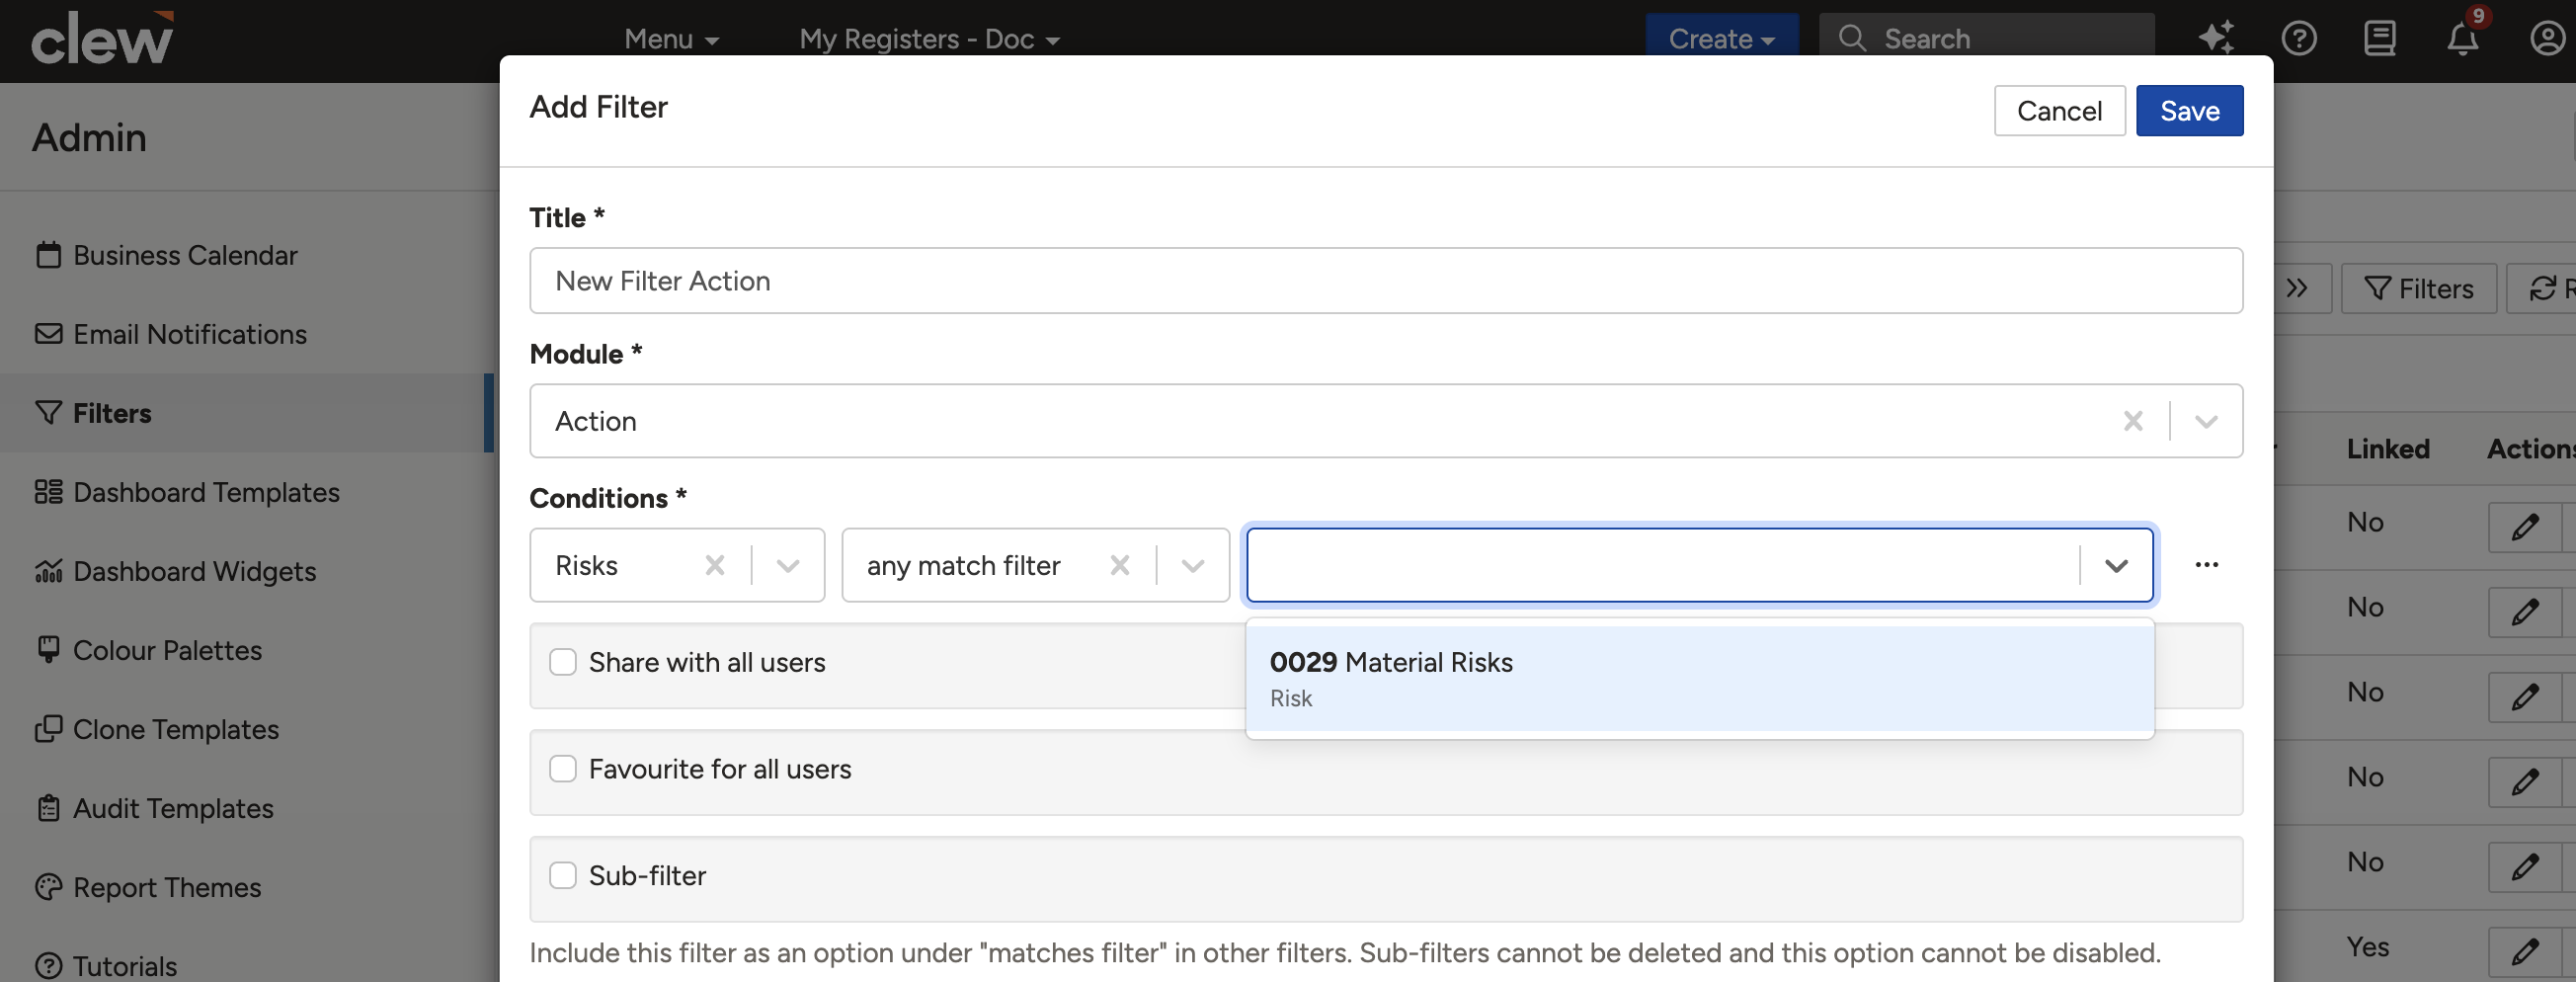
The sub-filter selection field showing available sub-filters.
- Click Save. The parent filter will now return only actions that have risks matching the sub-filter criteria.
5. Common Issues & Troubleshooting
| Issue | Likely Cause | Solution |
| Users cannot see the filter | The filter has not been shared, or the user has not added it to their own filters | Edit the filter and tick Share with all users. Alternatively, the user can find it via the cog icon in the filter panel under My Filters. |
| Filter is not returning the expected results | The logic operators or conditions may not be configured as intended | Review each condition and the wrapping logic (AND/OR/NOT). Test with simpler conditions first and build up gradually to isolate the issue. |
| Cannot add a condition to the left of another | This is by design. Conditions can only be nested within the current condition, not added to the left of it. | Use the ellipsis on the right-hand side of an existing condition to add a nested condition within it. |
| Sub-filter does not appear in the selection field | The filter was not marked as a sub-filter when created, or is for a different module than the relation selected | Edit the intended sub-filter and tick the Sub-filter checkbox. Confirm the sub-filter is scoped to the same module as the relation you are filtering on. |
Best practices:
- Give filters descriptive, specific titles so users can identify them quickly in the My Filters list. For example, use "Active High Risks" rather than "Risk Filter 1".
- Test every filter by applying it to a dashboard widget before sharing it with users. A misconfigured filter that is marked as a favourite can affect all users immediately.
- Use AND logic as your default outer wrapper and only add OR or NOT logic when the query specifically requires it. Simple logic is easier to maintain and troubleshoot.
- When building sub-filters, create and test the sub-filter in isolation before referencing it in a parent filter. This makes it much easier to identify where a query is breaking down.
Click a title to preview it here. Use the Open full article button to read the full version in a new tab.
▾Dashboards Open full article »
Related article
Build custom dashboards from a library of widgets and share them with users or teams, so you can apply your filters and visualise the data that matters most.
▾Advanced Dashboards Open full article »
Related article
Create and configure dashboard templates, report themes, and custom branding images to control how your dashboards look and export.
▾Creating Your Report Themes as a System Administrator Open full article »
Related article
How system administrators set up report themes to control the look of dashboards when they are exported as branded PDFs.
Was this article helpful?
That’s Great!
Thank you for your feedback
Sorry! We couldn't be helpful
Thank you for your feedback
Feedback sent
We appreciate your effort and will try to fix the article