Adding and managing users
What a user is, how the Users list works, how to add a new user, and answers to common user questions
Contents
- 1. Introduction & Context
- 2. Key Features & Functions
- 3. Requirements
- 4. Step-by-Step Guide
- 5. Common Issues & Troubleshooting
- 6. Related Articles
1. Introduction & Context
A user is a person created in Clew so they can access the system. As with any system, you create a user account to grant someone access. This article explains what the Users area is for, how to add a new user, and answers the questions that come up most often about user access and permissions.
Who is it for? Administrators who add and manage user accounts in Clew.
What does it impact? Creating a user grants access to the system, but what that user can actually see and do is controlled by their security groups and clearance level, not simply by having an account.
2. Key Features & Functions
The Users List View is the central place for managing users in Clew. From it you can:
- Add, update, and deactivate users.
- Define user access and permissions.
- Apply filters to retrieve users that meet your criteria.
- Mass-edit users.
- Export user data.
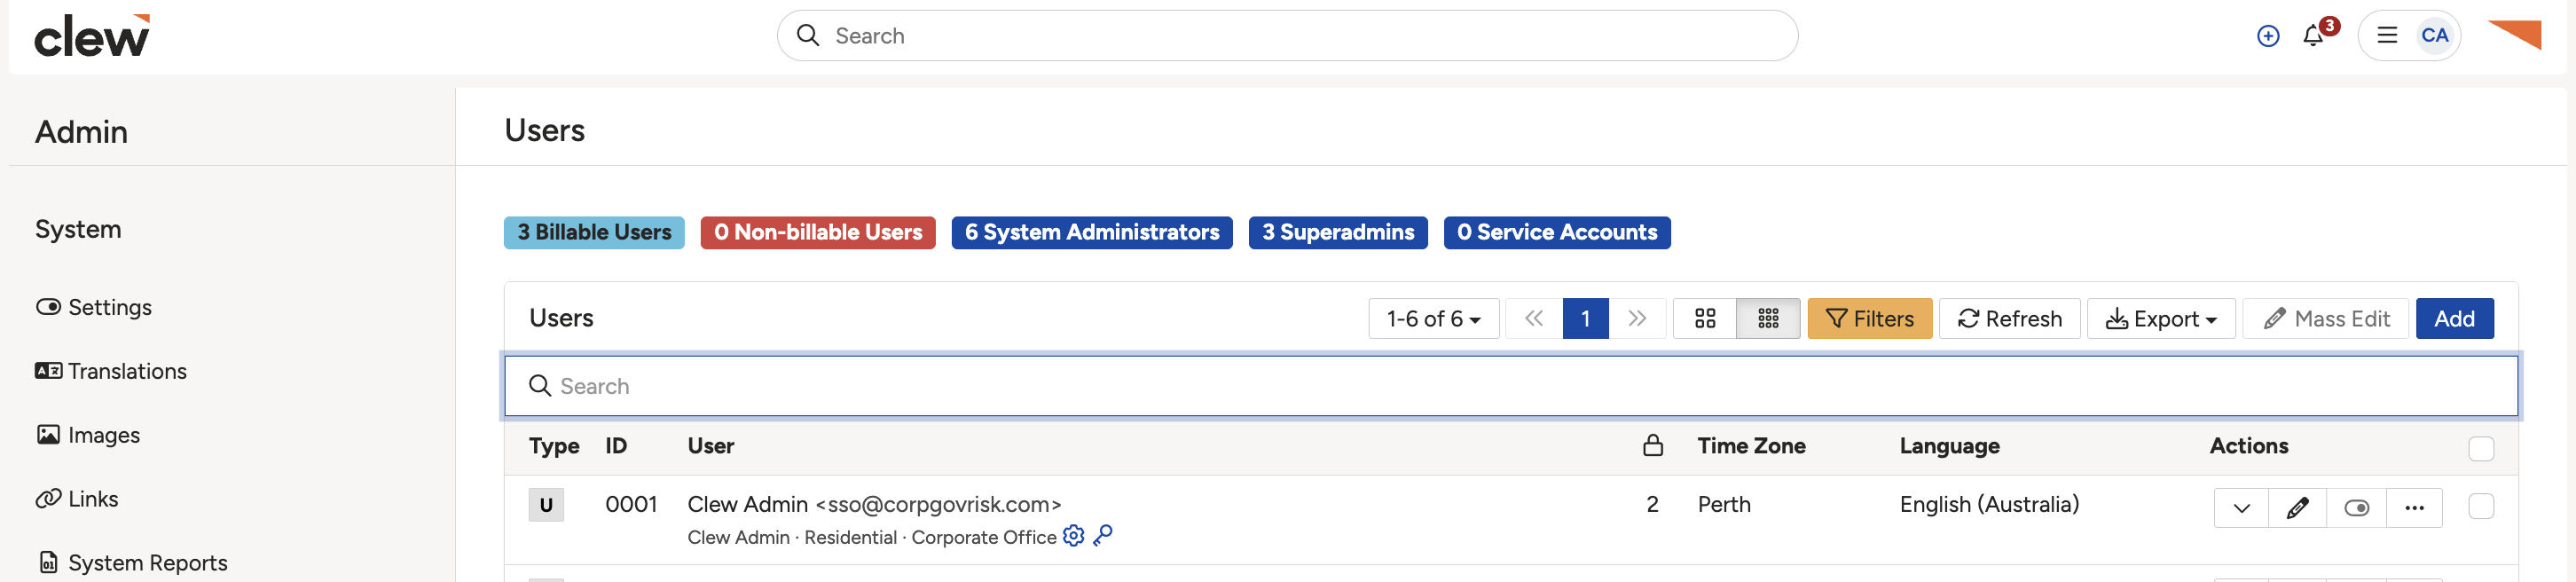
The Users List View, where users are added, updated, filtered, and exported.
3. Requirements
- Admin privileges are required to add a new user.
- A valid email address for the user.
- A password that meets your security requirements. A length of more than 8 characters, combining upper and lower case letters, numbers, and special characters, is recommended.
- At least one security group to assign, so the user can access data once created.
4. Step-by-Step Guide
Adding a new user
- Click your name drop-down to expand it, then click Users.
- Click the blue Add button.
- Fill out all required fields, such as the user's first name, last name, email address, password, default project and location, and user security groups.
- Specify the time zone, language, security groups, and user clearance.
- Once you have entered all the necessary information, save the user.

The Add User form: identity and sign-in details.
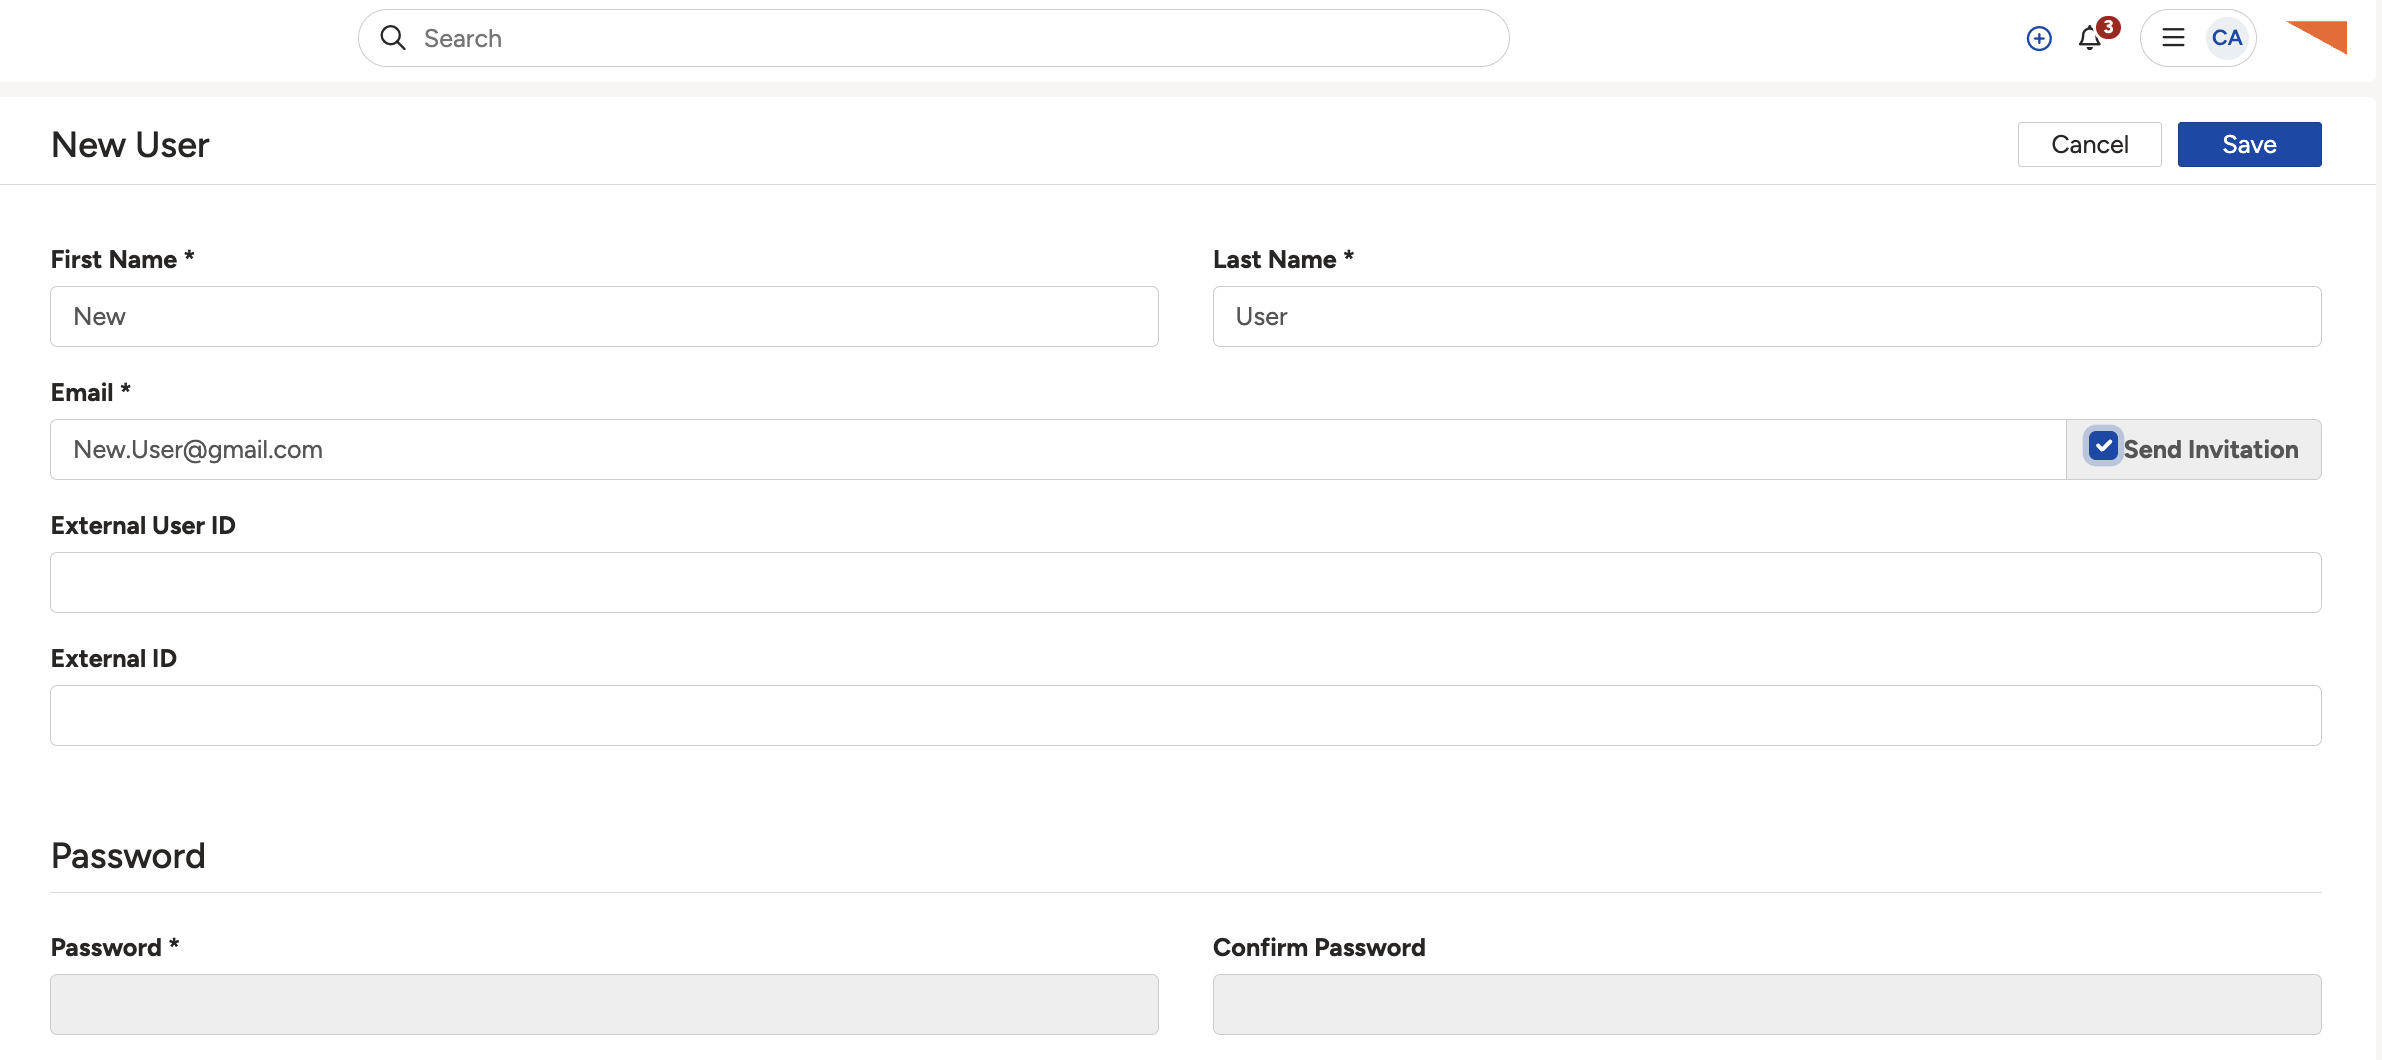
The Add User form: default project and location, security groups, and clearance.
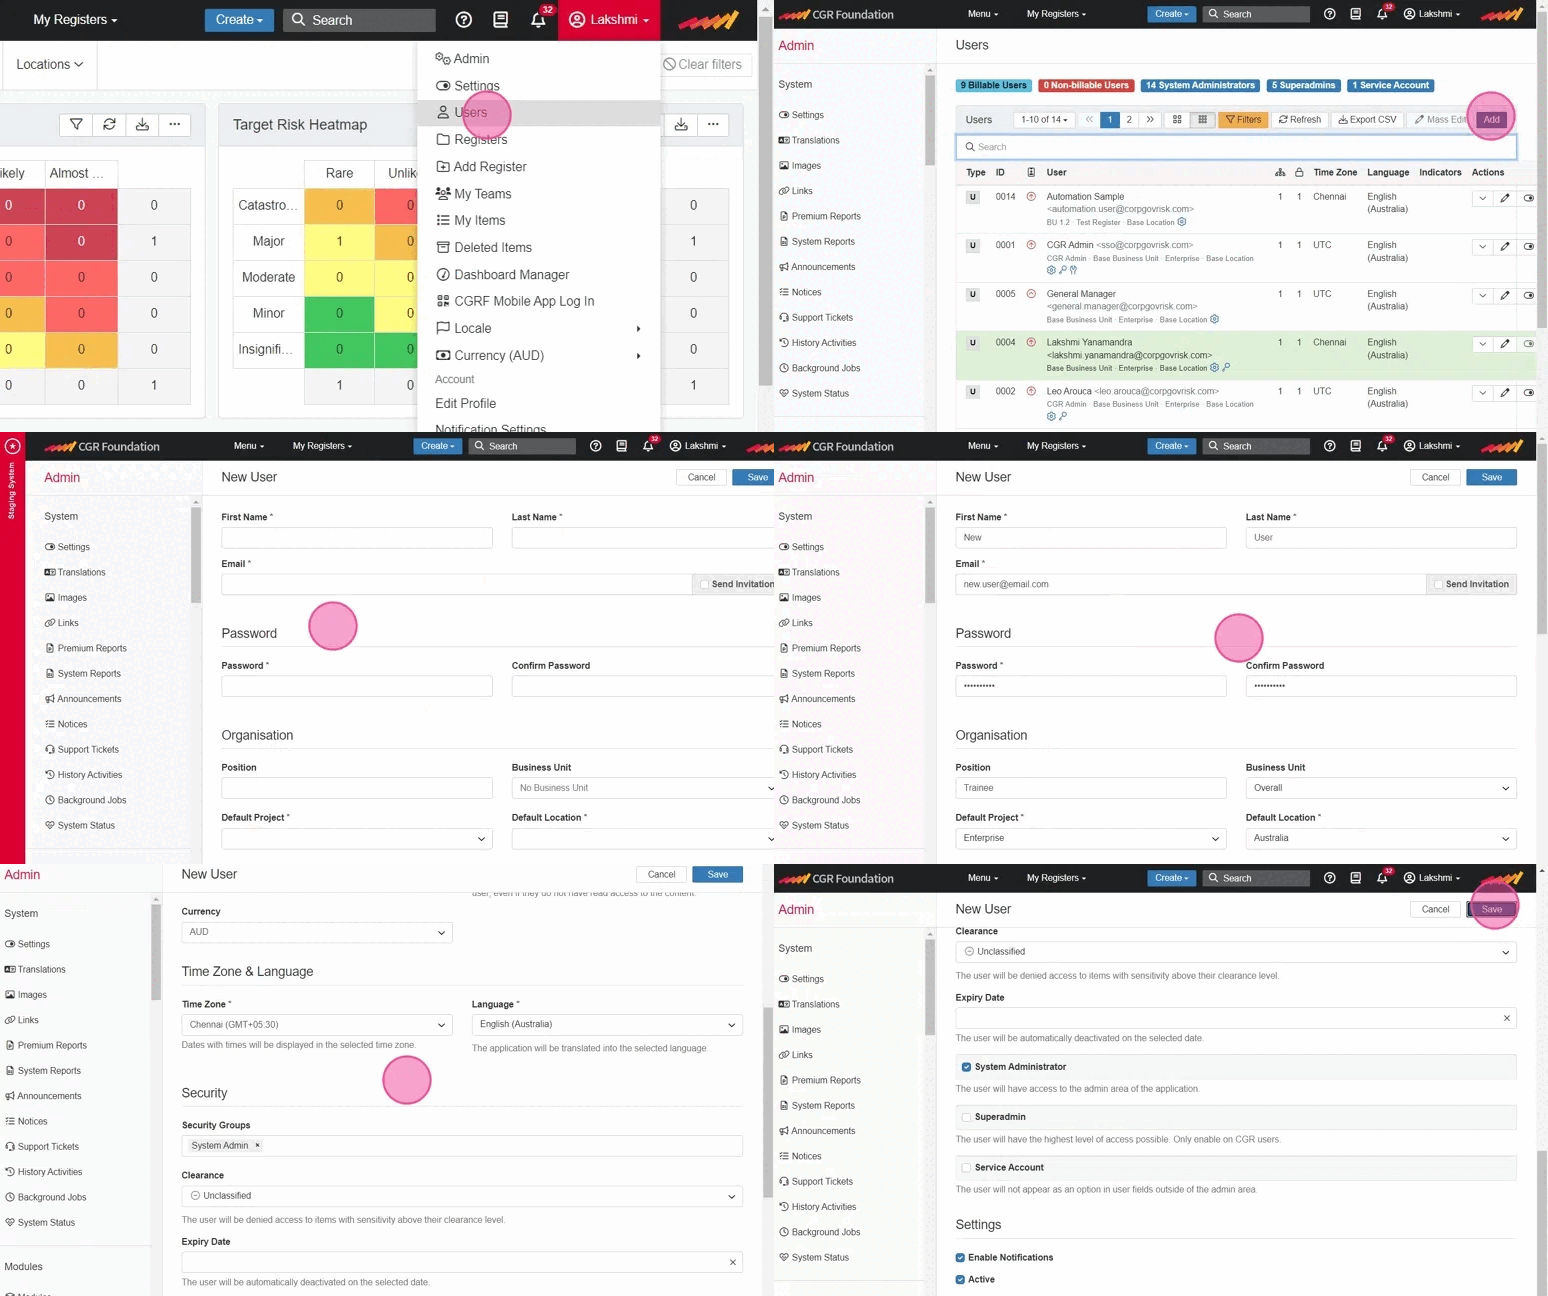
A short walkthrough of adding a new user from start to finish.
For a fuller walkthrough, see the step-by-step guide to adding users.
Sending an invitation instead of a password
Instead of setting a password yourself, you can have the new user set their own. Tick the Send invitation checkbox on the Add User form and save the user. The user then receives an invitation email prompting them to log on, and they are asked to set their own password the first time they sign in.
5. Common Issues & Troubleshooting
| Issue | Likely Cause | Solution |
| A new user cannot access any project or data | No security group has been assigned. | Assign at least one security group to the user. Access to projects and their data is enabled only through security groups. |
| A user has a default project but still cannot see it | A default project does not grant access on its own. | Assign a security group that covers that project. The default project and location only pre-fill add forms. |
| A user cannot open a classified item | Their clearance level is below the item's classification. | Raise the user's clearance to match or exceed the item's classification. Clearance applies even when a security group allows access to the item's project or location. |
| You cannot add a new user | You do not have admin privileges. | Ask an administrator to add the user, or to grant you admin privileges. |
Best practices:
- Check the email address is valid and the password meets your security requirements before saving.
- Review and update user permissions and security groups regularly so they stay aligned with organisational needs.
- Deactivate users who leave or no longer need access promptly, for organisational security.
Frequently asked questions
Click a question to expand the answer.
▾What is a user invitation, and when do I use it?
The Send invitation feature lets users set their own password before they first log on. Tick the Send invitation checkbox on the Add User form and save the user. They receive an invitation email prompting them to log on and set their own password. You must still assign one or more security groups, or the user will not be able to access any project or its contents.
▾What are security groups, and what do they mean for me as a user?
Access to projects and their data is enabled through security groups. A new user with no security group cannot access any register or its contents, including their own default project and location.
▾What is a default project or location, and why does it matter?
The default project and location are used whenever you create new items, pre-filling add forms when you have not selected a project from the project menu. Having a default project does not grant access to it on its own. You still need a security group to access any data.
▾None of the predefined security groups suit me. Can I create my own?
Yes. You can create a new security group to suit your requirements, as long as you have admin privileges, and then assign it to the user.
▾What is user clearance, and how does it affect me?
User clearance is the level of access a user has within the system, and it governs access to classified data. For example, if an item is classified as Protected, you cannot open it unless your clearance is at or above the Protected level, even if your security group allows access to that item's project or location.
▾What is a system admin privilege, and how is it different from a super admin?
A system admin can access the admin section of the application. A super admin has an extra level of access that allows them to configure the core application. Being a super admin does not grant universal access to all projects; permissions are still defined by the security groups you are assigned.
Click a title to preview it here. Use the Open full article button to read the full version in a new tab.
▾Adding Users: step-by-step guide Open full article »
Related article
A fuller walkthrough of creating a user account from start to finish.
▾What permissions does a security group provide? Open full article »
Related article
What access each security group grants, and how to read the access matrix.
▾Checking a user's permissions Open full article »
Related article
How to see exactly what a given user can access and why.
Was this article helpful?
That’s Great!
Thank you for your feedback
Sorry! We couldn't be helpful
Thank you for your feedback
Feedback sent
We appreciate your effort and will try to fix the article